The Settings menu on your iPhone has many different sections where you can modify something about the device.
So many different settings are available that it can sometimes be a little intimidating.
If you want to familiarize yourself with the device a little more, our article below will help you identify 15 different settings on the device that you may want to change.
These can help improve your privacy and your experience using some of the default apps on the phone.
You can check out our 15 iPhone settings to change video on YouTube for more information.
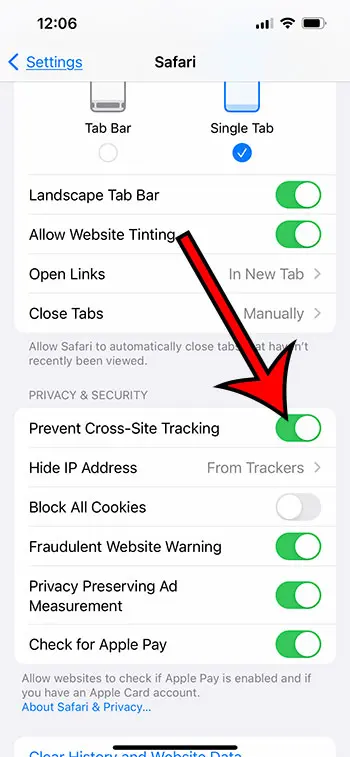
Setting 1 – Cross-Site Tracking
Advertisers use cross-site monitoring to track browsing across multiple websites and apps. This can jeopardize your privacy and result in targeted advertisements. Fortunately, the iPhone 13 includes a setting that allows you to stop cross-site tracking and preserve your privacy.
To disable cross-site tracking on your iPhone 13, take the following steps:
- Launch the iPhone 13 Settings app.
- Scroll down and select Safari.
- Locate and enable the Prevent Cross-Site Tracking option.
Turning off cross-site tracking may prevent websites from tracking your online behavior across several sites and apps. This can protect your privacy and keep targeted advertising from following you throughout the internet.
It’s important to realize that blocking cross-site tracking may have an impact on how some websites and apps function. Some websites, for example, may demand you to check in again after you disable cross-site tracking. Disabling cross-site tracking may also have an impact on tailored content or recommendations based on your browsing history.
However, the advantages of disabling cross-site tracking may exceed the disadvantages. You may preserve your privacy and avoid using your personal information for targeted adverts by blocking marketers from following your online activities.
There are more steps you can do to preserve your privacy on your iPhone 13 besides turning off cross-site tracking. For example, you can use Safari’s Private Browsing mode to prevent your browsing history from being saved.
You may also limit the usage of your location data by navigating to Settings > Privacy > Location Services and unchecking the apps that you don’t want to have access to your location.
Overall, adopting these actions to preserve your privacy on your iPhone 13 can help assure the security of your personal information. You can use your iPhone 13 confidently and safely by blocking cross-site tracking and adopting other privacy precautions.
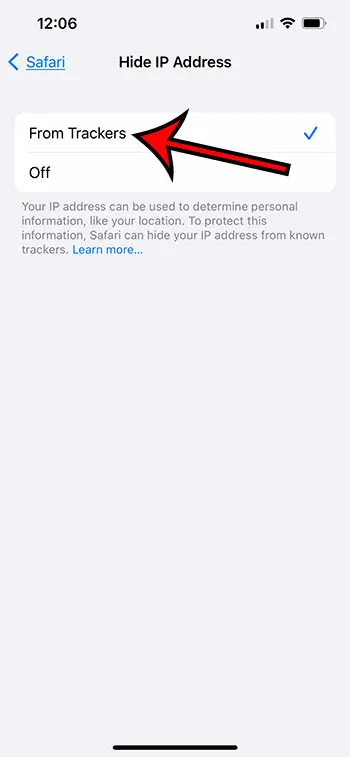
Setting 2 – Safari IP Tracking
Websites utilize IP tracking to gather your IP address, which can be used to identify your location and track your activity. This can jeopardize your privacy and expose you to targeted adverts or other unwanted tracking. Fortunately, the iPhone 13 includes a setting that allows you to prevent IP tracking and preserve your privacy.
Follow these steps to disable IP monitoring in Safari on your iPhone 13:
- Open Settings.
- Choose Safari.
- Select Hide IP Address.
- Choose From Trackers.
You can prevent websites from gathering your IP address and tracking your online activities by turning on Hide IP Address. This can help protect your privacy and avoid location-based advertising.
It’s crucial to realize that blocking IP monitoring may have an impact on how some websites and apps function. Some websites, for example, may demand you to check in again after you stop IP tracking. Furthermore, removing IP tracking may have an impact on tailored content or recommendations based on your location.
However, the advantages of disabling IP tracking may exceed the disadvantages. You may preserve your privacy and prevent your personal information from being used for targeted advertising or other unwanted tracking by prohibiting websites from tracking your IP address.
There are more things you may do to preserve your privacy on your iPhone 13 besides turning off IP tracking. For example, you can safeguard your device with a passcode or Face ID, and use a VPN to encrypt your internet traffic and prevent tracking by your internet service provider.
You may also limit the usage of your location data by navigating to Settings > Privacy > Location Services and unchecking the apps that you don’t want to have access to your location.
Overall, adopting these actions to preserve your privacy on your iPhone 13 can help assure the security of your personal information.
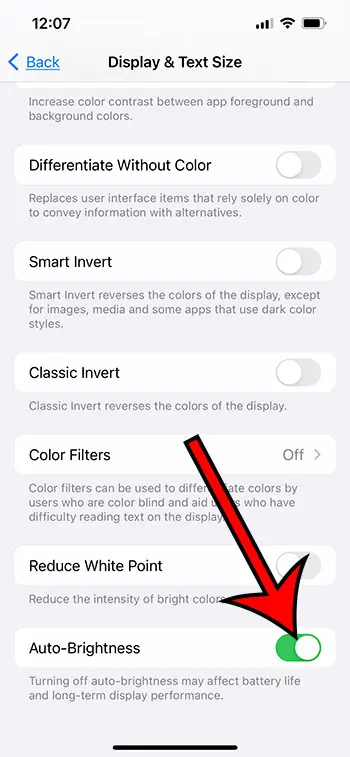
Setting 3 – Auto-Brightness
The auto-brightness feature changes the screen brightness depending on the ambient light. While this can be useful in some circumstances, it can also be inconclusive and waste your battery. If you want to adjust your screen brightness manually, you can disable auto-brightness on your iPhone 13.
To disable auto-brightness on your iPhone 13, do the following:
- Open the iPhone Settings menu.
- Select Accessibility.
- Select Display & Text Size.
- Locate and deactivate the Auto-Brightness option (it’s at the very bottom of the menu.)
You may preserve battery life by turning off auto-brightness and manually adjusting your screen brightness. This is especially useful if you discover that the screen on your iPhone 13 is too dull or too bright in specific lighting conditions.
It’s worth noting that turning off auto-brightness may have an impact on how some apps perform. Some apps, for example, may have their own brightness settings influenced by auto-brightness. Furthermore, turning off auto-brightness may alter how some iPhone 13 users with vision problems use their devices.
However, the advantages of disabling auto-brightness may exceed the disadvantages. You can have more control over your device’s battery life and screen display by manually setting the brightness of your screen.
Other than turning off auto-brightness, there are other methods you may take to increase the battery life of your iPhone 13. You can, for example, select Low Battery Mode to reduce battery consumption by removing functions like Background App Refresh and Hey Siri.
Overall, adopting these measures to maximize the battery life of your iPhone 13 can help ensure that your device lasts longer and performs better.
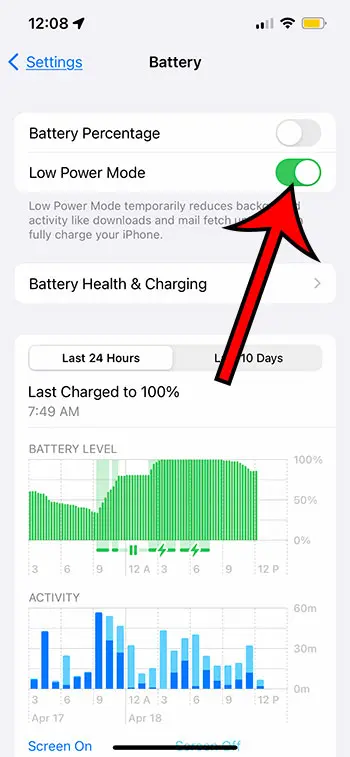
Setting 4 – Low Power Mode
Low Battery Mode is an iPhone 13 feature that decreases battery usage by removing features such as background app refresh, Hey Siri, and automated downloads. When your battery level falls below 20%, this can be useful, but you should switch it off when you have access to a power source or want to use all your device’s functions.
To disable Low Power Mode on your iPhone 13, perform the following steps:
- Launch the iPhone Settings app.
- Select Battery.
- Locate and deactivate the Low Power Mode option.
You will know that Low Power Mode is enabled when the screen’s battery icon is yellow at the top-right.
You can enable your device’s capabilities and settings by turning off Low Power Mode. This is especially useful if you need to use services like Hey Siri or background app refresh that are unavailable while Low Power Mode is engaged.
It’s crucial to know that turning off Low Power Mode may impact your smartphone’s battery life. If you have a low battery and need to save power, you should leave Low Power Mode activated until you have access to a power source.
In addition to turning off Low Power Mode, there are other steps you may do to improve the battery life of your iPhone 13. For example, you can disable extra capabilities such as Wi-Fi or Bluetooth when not in use or lower the brightness of your device’s screen.
You can also add a Low Power Mode button to the Control Center by going to Settings > Control Center > then tapping the green + button to the left of Low Power Mode.
You can then open the Control center by swiping down from the top right corner of the screen and tapping the Low Power Mode button to turn it on or off.
Overall, adopting these measures to maximize the battery life of your iPhone 13 can help ensure that your device lasts longer and performs better.
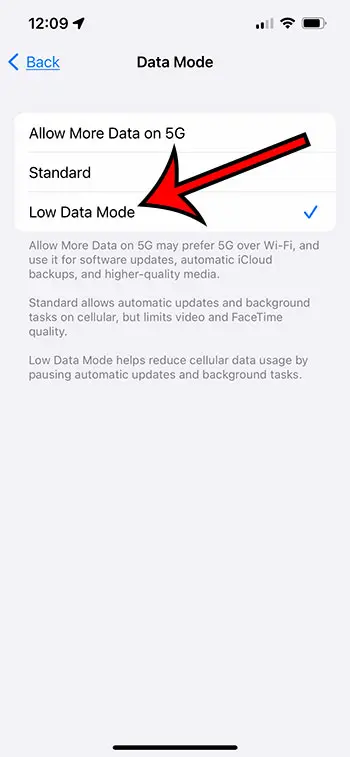
Setting 5 – Low Data Mode
Low Data Mode is an iPhone 13 feature that minimizes data usage by turning off automated updates, background app refreshes, and visual enhancements. This can be useful if you have a restricted data plan or want to save data, but you should turn it off when you have access to a Wi-Fi network or want to use all of your device’s functionality.
To disable Low Data Mode on your iPhone 13, do the following:
- Launch the iPhone 13 Settings app.
- Select Cellular.
- Locate and touch the Cellular Data Options tab.
- Locate and deactivate the Low Data Mode option.
Turning off Low Data Mode can restore your device’s previously disabled capabilities and settings. This is especially useful if you need to use services impacted by Low Data Mode, such as background app refresh or automatic updates.
It’s crucial to know that disabling Low Data Mode may have an impact on your device’s data usage. If you have a restricted data plan and need to save data, keep Low Data Mode active until you can access a Wi-Fi network.
In addition to turning off Low Data Mode, there are other steps you may take to minimize the data usage of your iPhone 13. You can, for example, disable automatic downloads of apps or media or lower the quality of photographs or videos you transmit or receive.
You can also keep track of your data usage by navigating to Settings > Cellular and looking at the data usage for each app. You may then change the settings for individual apps to lower their data usage.
Overall, optimizing your data consumption on your iPhone 13 can help you stay inside your data plan and avoid overage costs.
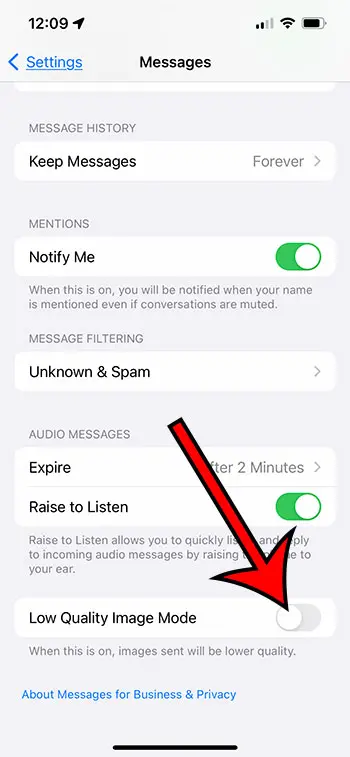
Setting 6 – Low-Quality Image Mode
Low-Quality Image Mode is an iPhone 13 feature that decreases the size and quality of photos and videos sent or received via iMessage. This is useful if you have a restricted data plan or a sluggish internet connection, but you should turn it off if you want to view or transfer higher-quality images and videos.
To disable Low-Quality Image Mode on your iPhone 13, perform the following steps:
- Open the Settings app.
- Select Messages.
- Locate and deactivate the Low-Quality Image Mode option.
By turning off Low-Quality Image Mode, you can see and send higher-quality photographs and videos using iMessage. This is especially useful for seeing or communicating essential photographs or videos with more clarity and detail.
It’s crucial to know that disabling Low-Quality Image Mode may have an impact on your device’s data usage. If you have a restricted data plan and need to save data, keep Low-Quality Image Mode active until you can access a Wi-Fi network.
Along with turning off Low-Quality Image Mode, you may use additional methods to minimize the data consumption of your iPhone 13. You can, for example, disable automatic downloads of apps or media or lower the quality of photographs or videos you transmit or receive.
You can also keep track of your data usage by navigating to Settings > Cellular and looking at the data usage for each app. You may then change the settings for individual apps to lower their data usage.
Overall, optimizing your data consumption on your iPhone 13 can help you stay inside your data plan and avoid overage costs.
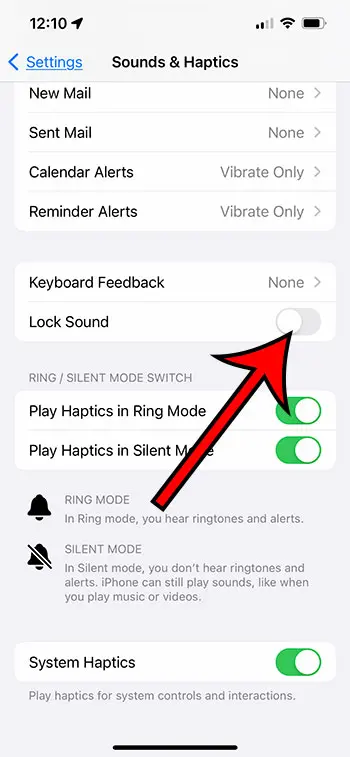
Setting 7 – Lock Sound
If you recently purchased an iPhone 13, you may want to consider altering a few settings to make the device more user-friendly. The lock sound is one of the options that iPhone users often inquire about. Here’s how to enable or disable the lock sound on an iPhone 13.
To begin, it’s important to note that the lock sound is your iPhone’s sound when you lock or unlock the screen. It’s a simple sound, but some people find it useful because it indicates whether the gadget has been locked or unlocked. Others find it irritating and choose to turn it off.
Follow these instructions to enable or disable the lock sound on your iPhone 13:
- Launch the iPhone Settings app.
- Scroll down and select Sounds & Haptics.
- Tap the switch next to Lock Sound to turn it on or off.
When you disable the lock sound, you will no longer hear a sound when you lock or unlock your iPhone 13. To turn it back on, repeat the instructions above and flip the switch back to the on position.
Finally, turning on or off the lock sound on your iPhone 13 is a simple operation. Whether you find the sound useful or disruptive is entirely up to you.
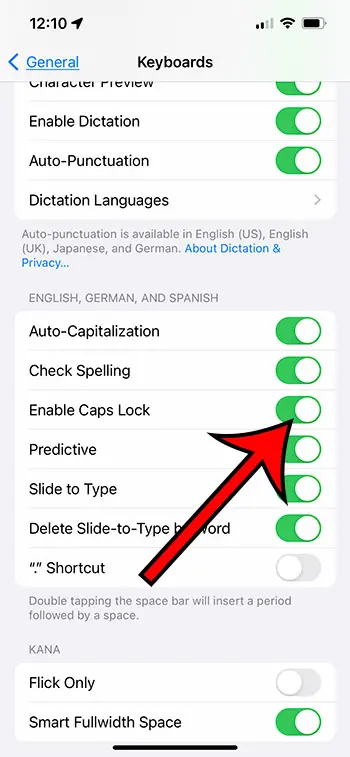
Setting 8 – Enable Caps Lock
When utilizing an iPhone 13, consumers may wish to change a few settings to make the device more user-friendly. The caps lock function is one of the options that might be beneficial. Here’s how to enable and disable caps lock on an iPhone 13.
First and foremost, caps lock is a function that allows you to type in full caps. It’s useful when you want to highlight a specific word or sentence or when you need to input a case-sensitive password. However, if you accidentally hit the caps lock key, you may find yourself typing in full caps without realizing it. Here’s how to activate or deactivate it:
Follow these instructions to enable caps lock on your iPhone 13:
- Launch the iPhone Settings app.
- Scroll down and select General.
- Choose Keyboard.
- Toggle the switch next to Enable Caps Lock to turn it on.
After you’ve enabled caps lock, you can use it by double-tapping the shift key while typing. Caps lock will be shown by the shift key turning blue. Simply touch the shift key again to turn it off.
Alternatively, if you find yourself mistakenly activating caps lock too frequently, you can disable it. Here’s how it’s done:
- Launch the iPhone Settings app.
- Scroll to the bottom and select “General.”
- Select “Keyboard.”
- Toggle the option next to “Enable Caps Lock” to off.
You won’t be able to enable caps lock by double-tapping the shift key after you’ve disabled it. Instead, while typing in all caps, hold down the shift key. Caps lock will be shown by the shift key turning blue. Simply touch the shift key again to turn it off.
It’s also important to note that many people interpret typing in all capital letters as shouting, so that’s something else to consider when deciding whether or not to use it.
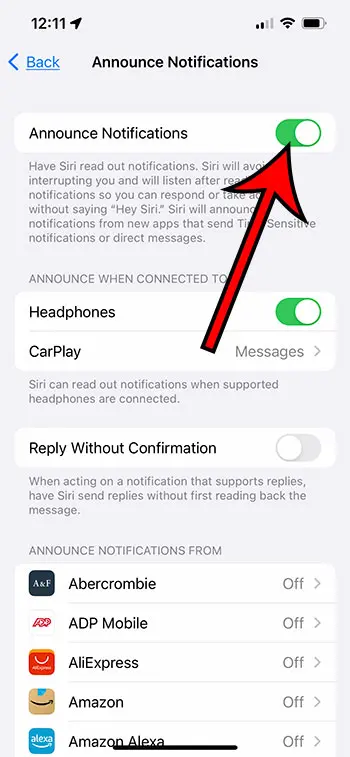
Setting 9 – Announce Notifications
When you receive a notification on your iPhone 13, you may have the option of hearing it. This is especially beneficial if you’re driving or otherwise distracted because it allows you to hear your notifications without having to look at your phone. It can, however, be distracting or unpleasant in some settings. Here’s how to turn on or off announce notifications on an iPhone 13.
Follow these instructions to enable or disable announce notifications on your iPhone 13:
- Launch the iPhone Settings app.
- Select Notifications.
- Scroll down and select Announce Notifications.
- Turn on or turn off Announce Notifications by toggling the option next to it.
When you enable this option, your iPhone 13 will notify you of any incoming notifications. You can also choose whether or not to broadcast notifications in specific situations by choosing “Announce Notifications” and selecting “Headphones” or “CarPlay.”
You can disable this feature if you find the announcement of alerts excessively distracting or if you’re in a calm place and don’t want to bother others.
When you disable this feature, your iPhone 13 will no longer notify you of incoming notifications. You will, however, continue to get notifications, which you can check by looking at your phone’s lock screen or notification center.
Many people that elect to modify this setting do so because of Carplay, or because they don’t like it when Siri reads them their text messages while listening to music with their AirPods.
For more information about turning off AirPod notifications, check out this article.
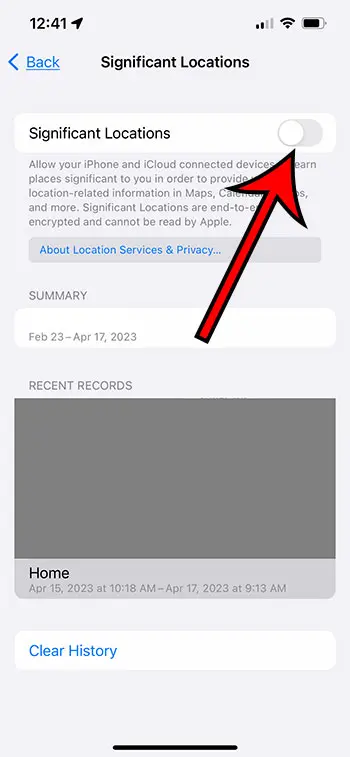
Setting 10 – Significant Locations
Significant Locations, a built-in function on your iPhone 13, keeps track of the places you visit most frequently. This feature is intended to give you customized location-based services, such as suggested routes in Maps or reminders based on your location.
However, if you’re concerned about your privacy or don’t want your iPhone tracking your movements, you should disable this option. Here’s how to turn on or off Significant Locations on an iPhone 13.
Follow these instructions to activate Significant Locations on your iPhone 13:
- Launch the iPhone Settings app.
- Select Privacy & Security.
- Select Location Services.
- Scroll to the bottom and select System Services.
- Select Significant Locations.
- Enter your passcode or use Touch ID/Face ID to authenticate if asked.
- Toggle the switch next to Significant Locations to the desired setting.
When you enable this feature, your iPhone 13 will begin tracking the locations you visit most frequently. You can view this information by navigating to “Significant Locations” and entering your passcode or authenticating with Touch ID/Face ID.
You can disable this feature if you are uncomfortable with your iPhone tracking your significant locations or if you do not want your location data to be shared with third-party apps.
After you disable this feature, your iPhone 13 will no longer track your significant locations. Keep in mind, however, that removing this function may have an impact on the performance of certain location-based services, such as suggested routes in Maps or location-based reminders.
To summarize, activating or disabling Significant Locations on your iPhone 13 is a personal choice depending on your privacy concerns and the importance you place on location-based services.
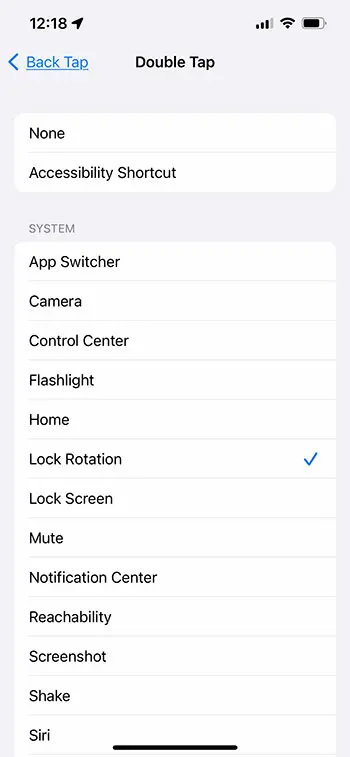
Setting 11 – Back Tap Button
Back Tap is a new feature on the iPhone 13 that allows users to conduct things by tapping the back of their phone. This is especially handy for persons with disabilities or those who have difficulties utilizing their iPhone’s physical buttons. However, if you find this function unneeded or constantly mistakenly activating it, you should disable it. Here’s how to enable or disable the iPhone 13’s Back Tap button.
Follow these instructions to activate or disable Back Tap on your iPhone 13:
- Launch the iPhone Settings app.
- Select Accessibility.
- Scroll to the bottom and tap Touch.
- Scroll to the bottom and tap Back Tap.
- Select whether to associate the double-tap or triple-tap gesture with an activity.
- Choose the action you want to perform from the list of potential actions.
After enabling this feature, you can conduct activities by double- or triple-tapping the rear of your iPhone 13. You can, for example, apply a double-tap gesture to take a screenshot and a triple-tap gesture to open the camera app.
You can disable Back Tap if you mistakenly activate it too frequently or don’t need it.
When you disable this function, you can no longer conduct tasks by tapping the back of your iPhone 13. If you change your mind, you can always turn it back on.
Finally, whether you enable or disable the Back Tap button on your iPhone 13 is a personal choice based on your demands and usage habits. If you find this feature useful, you can configure it to execute tasks specific to you. You may quickly disable it if you don’t find it useful or if you constantly accidentally activate it.
Note that this feature can work if you use a phone case, but it’s much more difficult.
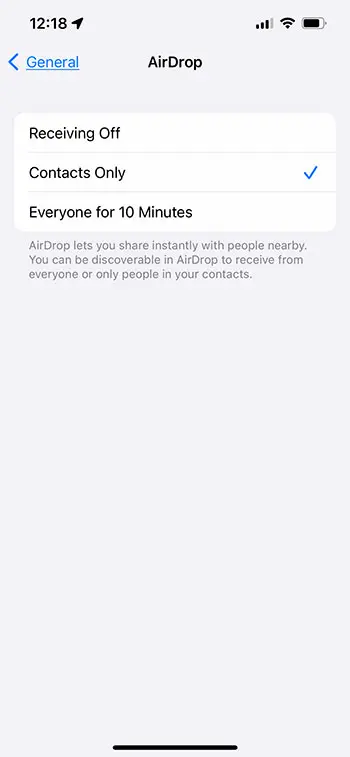
Setting 12 – AirDrop
AirDrop is a valuable function on the iPhone 13 that allows you to exchange files, images, and other media with neighboring Apple devices. If you’re concerned about your device’s security, you should change the AirDrop settings on your iPhone 13. Here’s how to modify the AirDrop option on an iPhone 13.
Follow these steps to update the AirDrop setting on your iPhone 13:
- Tap the Settings icon.
- Select General.
- Choose AirDrop.
- Select “Receiving Off” to fully disable AirDrop, “Contacts Only” to allow AirDrop just from persons in your contacts, or “Everyone for 10 Minutes” to allow AirDrop from everyone nearby.
When you modify the AirDrop setting on your iPhone 13, the change takes effect immediately. When you select “Contacts Only,” only people in your contacts will be able to view your iPhone 13 when using AirDrop. If you select “Everyone for 10 Minutes,” everyone in your vicinity will be able to see your iPhone 13 as an available AirDrop recipient and send you files using AirDrop.
If you select “Everyone,” you may receive unsolicited files from strangers or malicious files from hackers. When utilizing AirDrop, use caution and only accept files from persons you know and trust.
Finally, adjusting the AirDrop setting on your iPhone 13 is a simple operation that can help you increase your device’s security. By changing the settings to “Contacts Only” or “Receiving Off,” you can restrict the visibility of your iPhone 13 to just persons you know and trust.
Setting 13 – Automatic iOS Updates
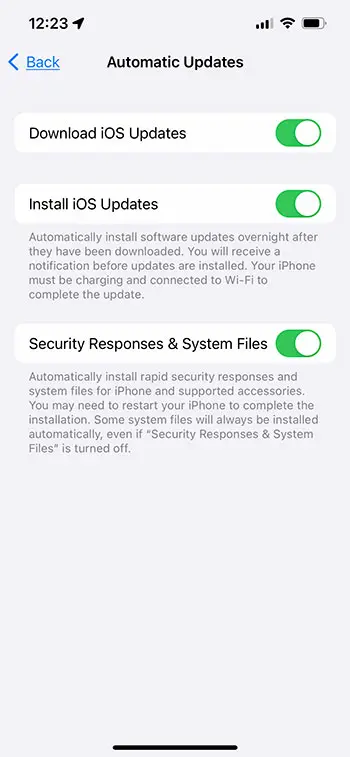
When iOS updates become available, the iPhone 13 is set to install them automatically. This is a useful tool that keeps your device up to speed with the most recent features and security patches. However, if you prefer to update your iPhone manually or are concerned about data usage, you should disable automatic iOS updates. Here’s how to turn on or off automatic iOS updates on an iPhone 13.
Follow these instructions to activate or deactivate automatic iOS updates on your iPhone 13:
- Launch the iPhone Settings app.
- Select General.
- Select Software Update.
- Turn on Automatic Updates by toggling the switch next to it.
Once enabled, your iPhone 13 will automatically download and install iOS upgrades as they become available. This feature requires a Wi-Fi connection and enough battery life to function effectively.
You can disable automatic iOS upgrades if you want to update your iPhone manually or are concerned about data usage.
After disabling this feature, your iPhone 13 will no longer automatically download and install iOS updates. Instead, go to “Software Update” in the Settings app and follow the on-screen instructions to check for updates manually.
Finally, whether you enable or disable automatic iOS upgrades on your iPhone 13 is a personal choice based on your needs and usage habits. You can enable automatic updates if you like to have the most recent software updates without having to install them manually. You can disable automatic updates if you prefer to update your iPhone manually or are concerned about data usage.
If you are very low on device storage, you may run into problems installing updates manually or automatically. This is especially true for full iOS version updates, like iOS 15 to iOS 16, which can be several GB in size.
Related: How to Turn Off iPhone 11
Setting 14 – Automatic App Updates
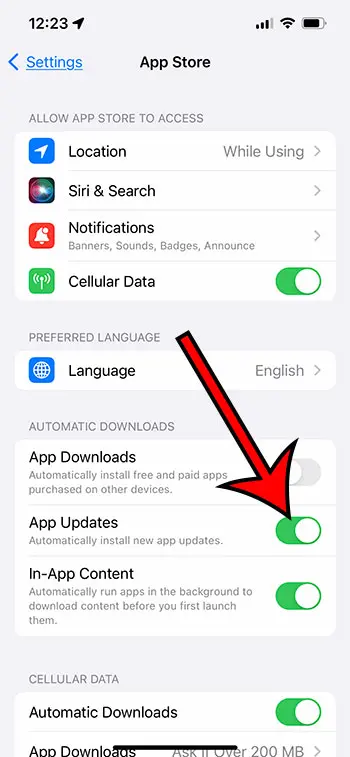
When new versions of apps become available, the iPhone 13 is designed to update them automatically. This feature is useful since it keeps your apps up to date with the latest features and security updates. However, it can be inconvenient if you want to update your apps manually or are concerned about data usage. Here’s how to turn on or off automatic app updates on an iPhone 13.
Follow these steps to enable or disable automatic app updates on your iPhone 13:
- Launch the iPhone Settings app.
- Select App Store.
- Toggle the switch next to App Updates to the desired setting.
When you enable this function, your iPhone 13 will automatically update apps when new versions are released. To function effectively, this functionality requires a Wi-Fi connection and enough battery life.
You can disable automatic app updates if you want to update your apps manually or if you are concerned about data use.
After you disable this option, your iPhone 13 will no longer update apps automatically. Instead, you must manually update your apps by visiting the App Store and selecting “Updates.”
Finally, whether you enable or disable automatic app updates on your iPhone 13 is a personal choice based on your needs and usage habits. You can enable automatic app updates if you prefer to have the most recent program versions without having to update them manually. You can disable automatic app updates if you prefer to update your apps manually or are concerned about data usage.
Manual app updates can be installed by going to the App Store, tapping your profile icon, then scrolling down and selecting the Update button next to an app. You could also tap Update All to install every update that is available on your device.
Setting 15 – Email Signature
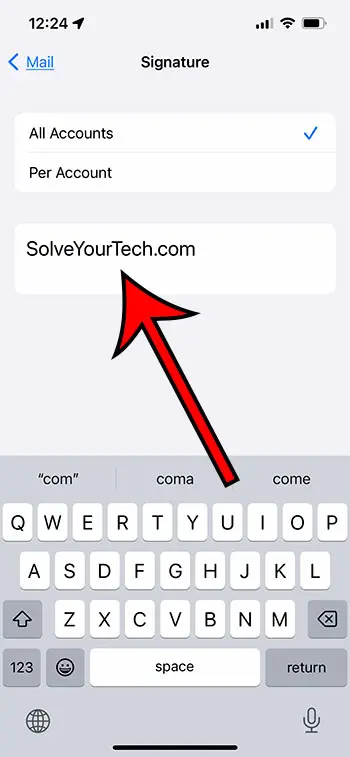
Your iPhone 13’s email signature is a block of text that appears at the end of every email you send. This includes your name, title, contact information, and anything else you desire. The email signature on your iPhone 13 will default to “Sent from my iPhone.” However, you can modify the email signature to customize and professionalize your emails. Here’s how to alter your email signature on an iPhone 13.
Follow these instructions to update the email signature on your iPhone 13:
- Launch the iPhone Settings app.
- Scroll to the bottom and tap Mail.
- Scroll to the bottom and select Signature.
- Change the text in the text box to incorporate your chosen email signature.
Once you’ve added your desired email signature, it will appear at the bottom of all emails sent from your iPhone 13. You may also personalize your email signature for each email account configured on your device.
When designing your email signature, remember it should be brief, professional, and reflect your personal or business identity. Avoid including excessive personal information or huge graphics, which can make your communications appear cluttered and unprofessional.
To summarize, altering the email signature on your iPhone 13 is a straightforward operation that can help you customize and professionalize your communications. By designing your email signature, you can include crucial information such as your name, title, and contact information.
One other setting that you might want to adjust on your device is the name that other devices see when trying to pair with your iPhone.
Related: How to Keep iPhone Screen On
How to Change iPhone Name for Bluetooth
Changing the Bluetooth name on your iPhone 13 is a fairly straightforward process that can be done in just a few steps. Here’s how you do it:
- Open the Settings app on your iPhone 13.
- Scroll down and select “General.”
- Tap on “About.”
- Scroll down and select “Name.”
- Tap on “Name” and enter the new name you want to give your iPhone 13’s Bluetooth.
- Tap “Done” in the upper right corner of the screen.
If you want to read additional discussion on this topic, then find out more with our how to change Bluetooth name on iPhone article.
And that’s it! Your iPhone 13’s Bluetooth name should now be changed to the name you entered. It’s important to note that changing your iPhone’s Bluetooth name won’t affect any other settings or functions on your device – it’s simply a way to personalize your device and make it easier to identify when connecting to other Bluetooth devices.
If you’re having trouble changing your iPhone 13’s Bluetooth name or have any other questions about using your device, don’t hesitate to reach out for further assistance. We’re here to help make your technology experience as smooth and seamless as possible.
Conclusion
Hopefully, these 15 iPhone settings have provided you with more information about how to customize your iPhone and make it your own.
Usually, if there is something about your iPhone that you don’t like or want to change, then there will be a way for you to make that modification.
If you’re looking to change a specific setting that wasn’t mentioned here or that you can’t find, we have a number of other articles on this site about different customizable iPhone settings.
Keep Reading – iPhone Battery Articles

Matthew Burleigh has been writing tech tutorials since 2008. His writing has appeared on dozens of different websites and been read over 50 million times.
After receiving his Bachelor’s and Master’s degrees in Computer Science he spent several years working in IT management for small businesses. However, he now works full time writing content online and creating websites.
His main writing topics include iPhones, Microsoft Office, Google Apps, Android, and Photoshop, but he has also written about many other tech topics as well.
