To turn off the AirPods “left behind” notification on an iPhone, open the Find My app, tap Devices, tap your AirPods, tap Notify When Left Behind, turn the switch off, and tap Done. If you still want the alert when you’re out but not at home, leave it on and add a Trusted Location instead.
These steps are for Find My on iOS 27 and iOS 26. Apple calls the feature a separation alert and covers it in getting notified when you leave a device behind. Versions back to iOS 15 have the switch too, though screens differ.
What the Left Behind Alert Is
When you walk away from your AirPods and leave them somewhere, Find My can send a notification on your iPhone that says your AirPods were left behind, along with the place and time. It’s useful when you leave them on a bus or at the gym, but it gets old fast if it goes off every time you leave them on your desk at home. For most devices you get an alert every time the device separates from the one sharing your location.
Separation alerts work on AirPods 3, AirPods 4 with Active Noise Cancellation, AirPods Pro, AirPods Max and the newer models added to Apple’s Find your AirPods list. AirPods 4 without noise cancellation and AirPods (1st and 2nd generation) are not on it. The Find My network also has to be on for the AirPods. If you don’t see Notify When Left Behind for your AirPods, your model doesn’t support separation alerts, so there’s nothing to turn off.
Turn Off the AirPods Left Behind Notification
Do this on the iPhone that shares your location in Find My. Separation alerts arrive on the device sharing your location, because that’s the device used to tell whether you and your AirPods have separated.
- Open the Find My app. A map opens with tabs along the bottom.
- Tap Devices. A list of your Apple devices appears.
- Tap your AirPods in the list. Their card opens with their location and options such as Play Sound.
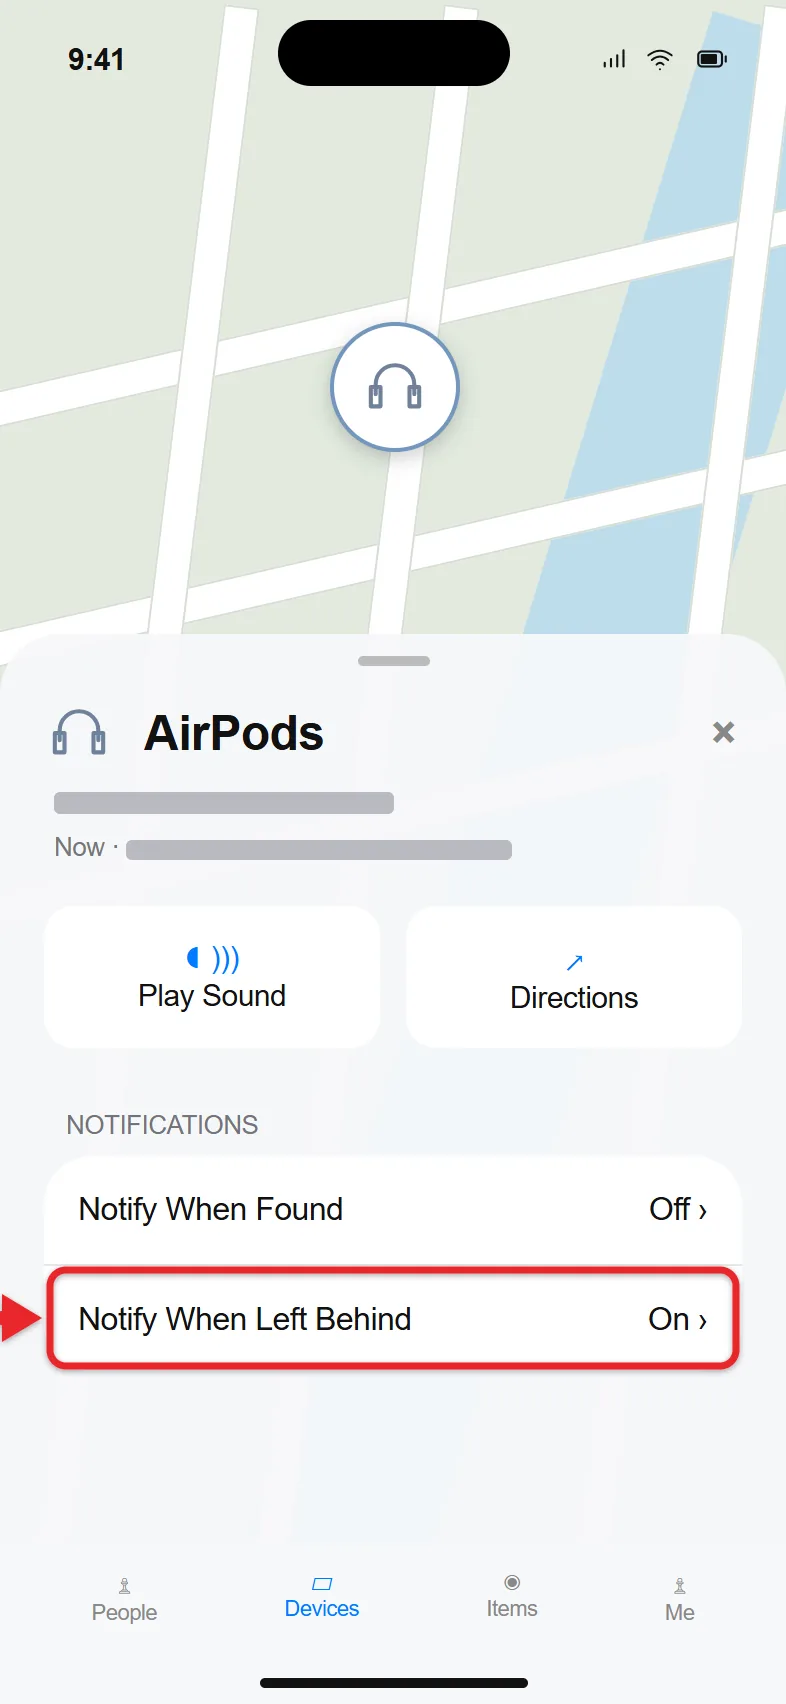
- Swipe up on the card if needed, then under Notifications tap Notify When Left Behind. The current setting opens.
- Turn off the Notify When Left Behind switch. The switch turns gray.
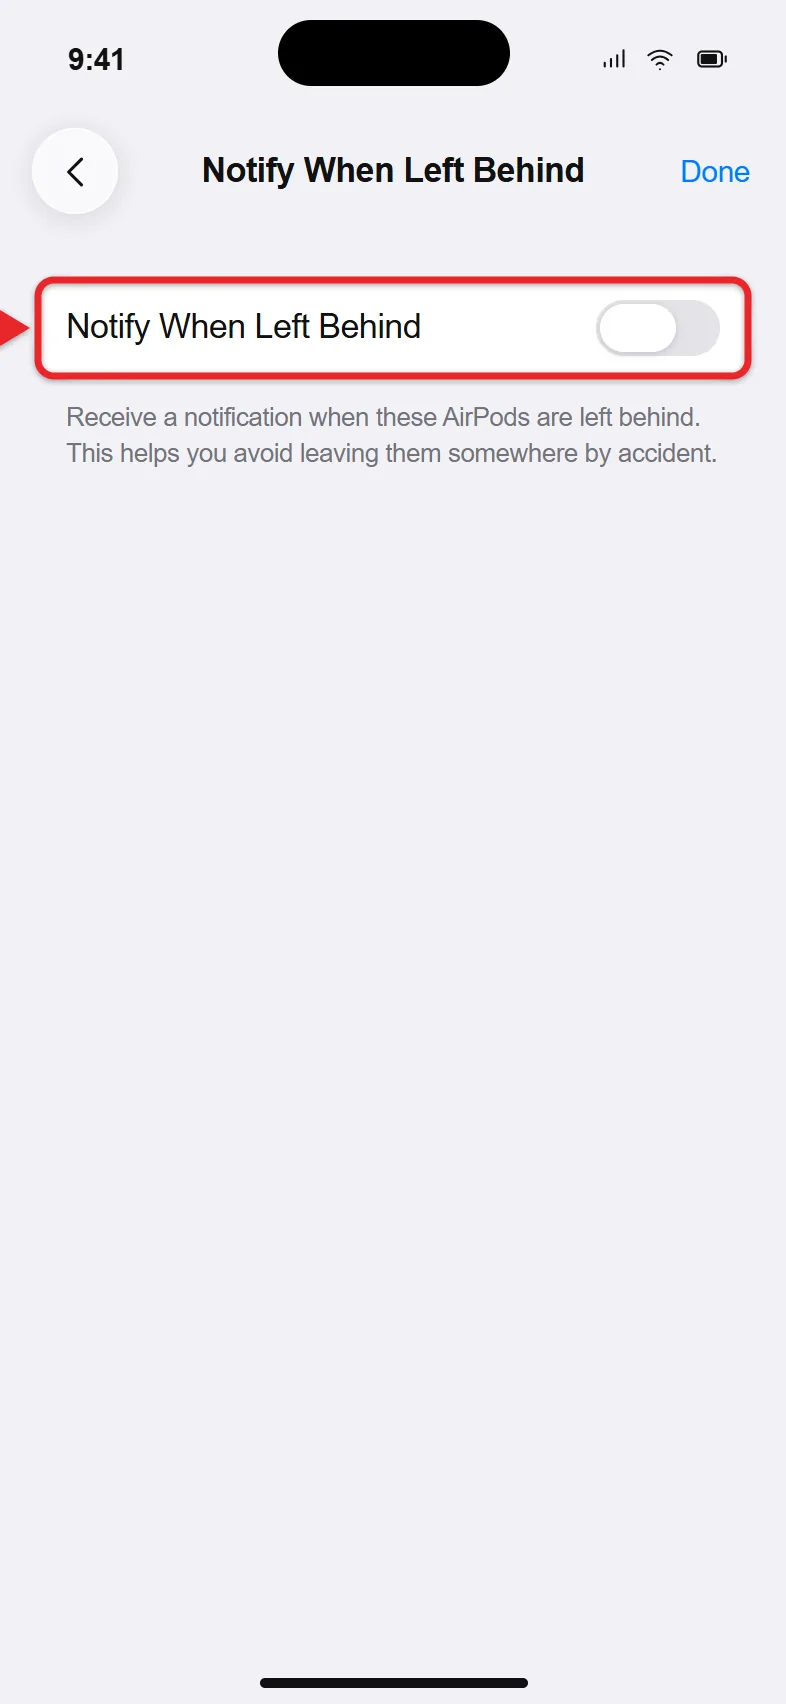
- Tap Done. You return to the AirPods card.
To confirm it worked, tap your AirPods again and look under Notifications: the Notify When Left Behind row should show it is off. You won’t get any more left behind notifications for that pair. They stay in your Devices list, so you can still see them on the map and play a sound to find them. Find My still protects them, too: you can mark them as lost and see their location through the Find My network.
If you own more than one set of AirPods, each pair has its own switch. Repeat the steps for every pair you want to silence.
Keep the Alert but Stop It at Home
Turning the alert off completely means you also lose it when you really do leave your AirPods at a restaurant. A Trusted Location is a better choice if the alert only bothers you at home or at work. A trusted location is a place where you can leave a device without getting an alert; Find My still sends one anywhere else.
- Open Find My, tap Devices, and tap your AirPods.
- Tap Notify When Left Behind and make sure the switch is on.
- Under Trusted Locations, tap a suggested place, such as your home address, or tap New Location.
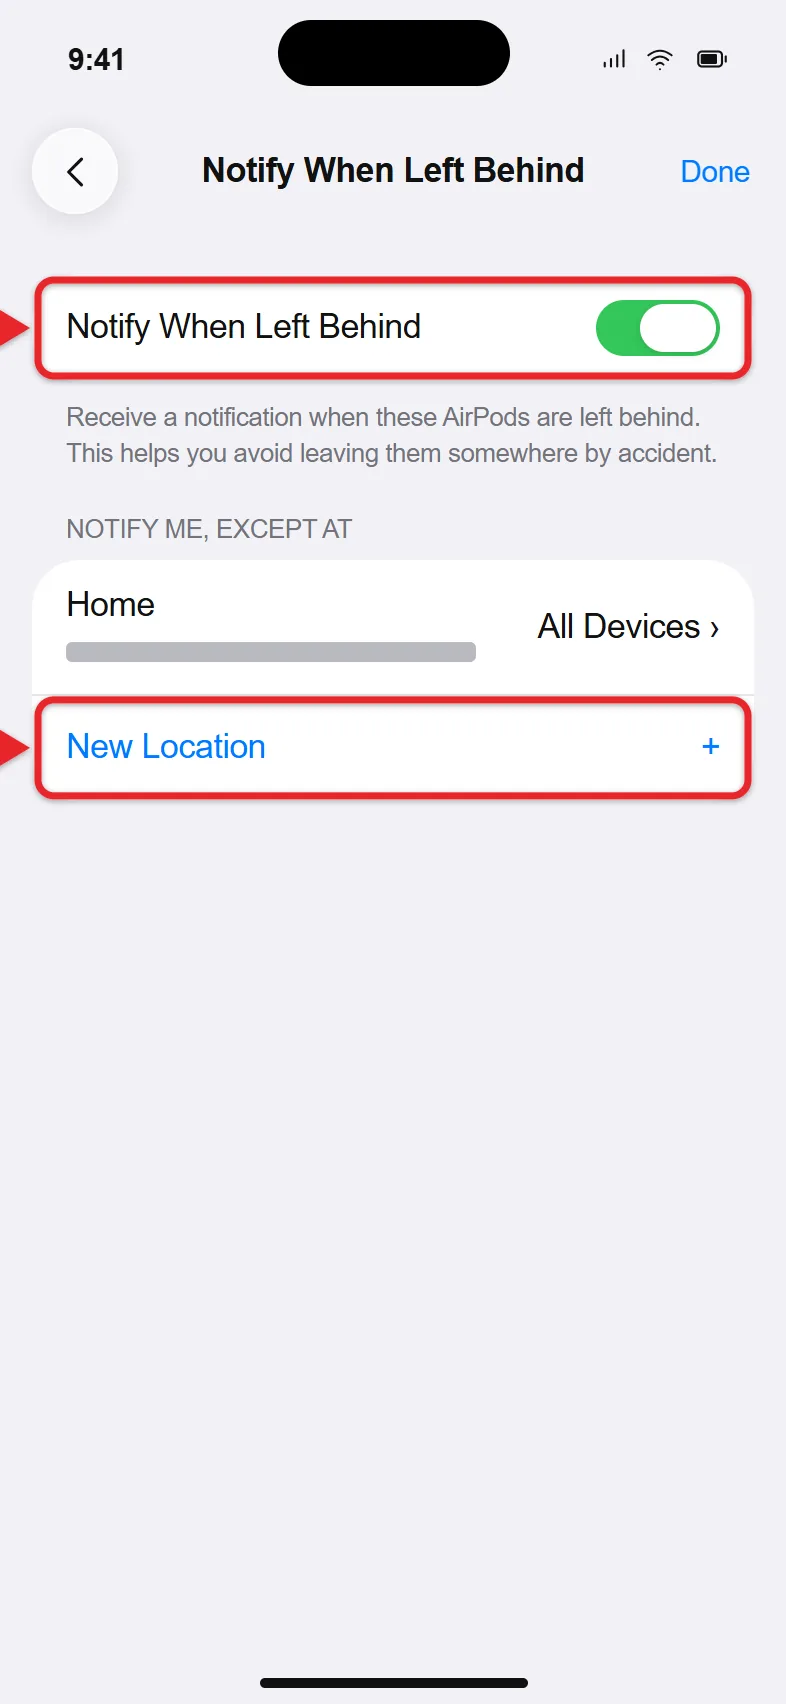
- For a new location, move the map or search for an address, then tap Done.
- Tap Done again to save the setting.
You can add more than one trusted location, for example your home and your office. To remove one later, go back to the same screen, swipe left on the location, and tap Delete. Former trusted locations appear in the suggestions list, which makes it quick to add them back.
Change the Setting From a Mac or iPad
You can manage the same switch from Find My on another Apple device signed in to your Apple Account. The alert itself still goes to the device that shares your location.
- iPad: open Find My, tap Devices, tap your AirPods, and follow the same steps as on iPhone.
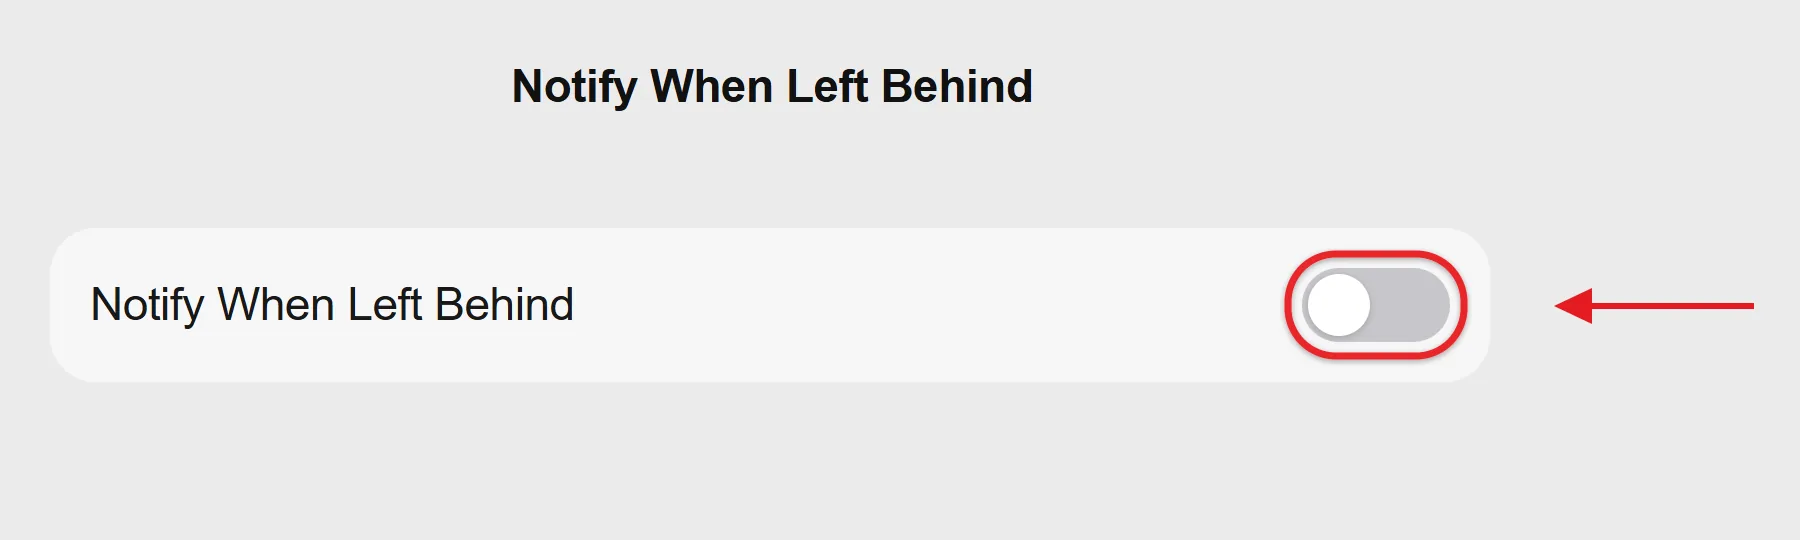
- Mac: open Find My, click Devices, select your AirPods, and click the More button. In Notifications, click When Left Behind, turn Notify When Left Behind off, and click Done. Apple’s Find My for Mac guide shows the same screen for adding a trusted location, where you can also choose a Small, Medium or Large area.
Why You Still Get Alerts
- You changed the setting on the wrong device. Separation alerts come from the device that shares your location. If your iPad or a second iPhone shares your location, turn the alert off from that device, or change which device shares your location in Find My > Me > Use This iPhone as My Location.
- You have another pair of AirPods. Each pair in the Devices list has its own Notify When Left Behind switch.
- The alert is for a different item. An AirTag or other tracked item has its own separation alert. Those are under the Items tab, not Devices.
- The alert is about your iPhone, iPad, or Mac. Other Apple devices in your Devices list can have their own left behind alerts. Tap that device in Devices and check its switch.
If you haven’t added your tracker yet, here’s how to connect an AirTag to your iPhone.
If you want to stop every Find My notification, not only separation alerts, go to Settings > Notifications > Find My and turn off Allow Notifications. That also blocks other Find My alerts, such as when a friend shares a location update, so most people are better off with the per-device switch above. The reverse is true as well: separation alerts only arrive when notifications for Find My are allowed.
If you’re tired of Siri reading messages aloud in your AirPods, that’s a different feature. Turn it off in Settings > Notifications > Announce Notifications. Apple’s Announce Notifications article explains the options.
If Siri starts when you squeeze a stem, change the AirPods press and hold controls instead.
“AirPods Detected” Is a Different Alert
An alert that says AirPods Detected, AirPods Pro Detected or AirPods Max Detected is not a left behind notification. It’s a safety alert that appears when AirPods that are separated from their owner seem to be moving with you. It may just mean you’re carrying a friend’s AirPods, but it can also warn you about unwanted tracking, so don’t try to silence it.
Tap the alert and follow the steps on screen, such as Play Sound, to find the item. Apple’s guide on what to do if you get an alert that AirPods are with you explains the options. If you ever feel unsafe, go to a safe public place and contact law enforcement.
AirPods Left Behind Questions
Does turning off the alert stop Find My from locating my AirPods?
No. The switch only controls the separation notification. Your AirPods stay in Find My, and you can still see their last location and play a sound on them. For help with the rest of the app, read about using Find My on iPhone to find a lost device.
Why don’t I see Notify When Left Behind for my AirPods?
Older AirPods models, including AirPods (1st and 2nd generation), and AirPods 4 without noise cancellation don’t support separation alerts. The option also won’t appear if the AirPods aren’t set up with Find My on your Apple Account, if the Find My network is off for them, or if you’re looking from a device that doesn’t share your location.
Can I set more than one trusted location?
Yes. Open the Notify When Left Behind screen for your AirPods, tap New Location, and add as many places as you need, such as home and work.
How do I turn the alert back on?
Open Find My > Devices, tap your AirPods, tap Notify When Left Behind, and turn the switch on. Then tap Done. If no alerts arrive afterward, check that Settings > Notifications > Find My allows notifications.
How do I stop my old AirPods from showing up in Find My?
In Find My > Devices, tap the AirPods, swipe up, tap Remove This Device, and tap Remove to confirm. They don’t need to be connected, though removal can go faster if they are nearby and connected. Do this before you sell or give them away. If you’re also unpairing them from Bluetooth, here’s how to forget the Bluetooth device on your iPhone.
Next step: while you’re in Find My, make sure your iPhone is protected too with Send Last Location in Find My.

Matthew Burleigh is the founder, head writer, and editor of Solve Your Tech, which he launched in 2012. He has written technology tutorials since 2008 and worked in IT since 2003, including small-business support, IT management, and consulting. He holds Bachelor’s and Master’s degrees in Computer Science from Arizona State University.
Matthew writes practical guides for Windows, iPhone and iPad, Microsoft Office, Outlook, Google apps, and Android. Solve Your Tech’s guides are checked step by step against the device or app maker’s own documentation and tested on his own devices whenever he has the hardware or software, with clear steps, sources, and update dates.
Read more about Matthew and how Solve Your Tech writes and updates its guides, or report a correction.