When you are using your AirPods, your iPhone will automatically route the call audio to the headphones so that you can hear the other person.
But there is also a microphone on each of the AirPods that can pick up your voice so that the other person can hear you.
It’s possible to change which AirPod has the microphone turned on if you find that one AirPod isn’t doing a good job of picking up your voice or if you often turn your head to one side and think that the earbud on that side would be a better choice.
How to Switch the AirPod Microphone That’s Being Used
- Put at least one of your AirPods in your ear.
- Open Settings.
- Select your AirPods.
- Choose Microphone.
- Tap the desired option.
Our guide continues below with additional information about which AirPod has the microphone, including pictures of these steps.
You can keep your AirPods in your ears for a lot of the actions that you might perform on your iPhone, including phone calls.
In fact, the call experience with the AirPods is so good that many people prefer to make and receive calls with their earbuds in.
But if you find that people are having trouble hearing you, it might be because your AirPods are using the wrong microphone.
Each of the AirPods has a microphone, and it’s possible to set up your Apple earbuds to either use one ear’s microphone all the time or to switch automatically.
Our guide below will show you how to switch which AirPod has the microphone active so that you can improve the quality of your vice on calls.
How to Specify One of Your AirPods as the Active Microphone (Guide with Pictures)
The steps in this article were performed on an iPhone 13 in the iOS 16 operating system.
I am using the AirPods Pro for this guide. I also have my AirPods in, which you will need to do as well in order for these menus to appear.
Step 1: Open the Settings app.
Step 2: Select your AirPods.
If you don’t see your AirPods listed, make sure that you have at least one of them in your ear and that the AirPods are paired with your phone.
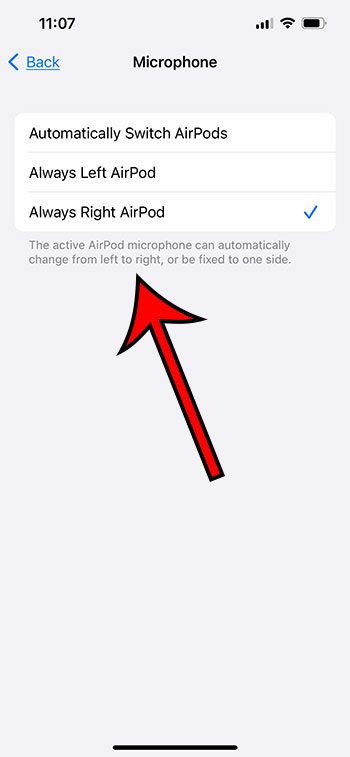
Step 3: Scroll down and select the Microphone option.
Step 4: Choose the desired setting for your AirPods microphone.
The options available for this setting are:
- Automatically Switch AirPods
- Always Left AirPod
- Always Right AirPod
Now that you know how to change which AirPod has the microphone enabled, you will be able to adjust this setting until you determine which option is best for phone calls.
How to Turn Off AirPod Notifications
When using AirPods, it’s important to know which one has the microphone enabled, as this can affect the quality of your audio and voice input during calls or recordings. By default, the AirPods will use the microphone on the right earbud, but you can switch to the left earbud or use both for better audio balance.
Related: Our AirPods notification guide can show you how to change some settings, including whether or not Siri reads your texts out loud while you use the AirPods.
However, another feature that can be enabled when using AirPods is the announcement of notifications through Siri. If your iPhone is not in Do Not Disturb mode and you’re using your AirPods, Siri may read notifications to you, such as text messages or calendar alerts. While this feature can be useful, it can also be disruptive if you’re in the middle of a call or recording, or simply want to enjoy your music without interruptions.
If you want to disable the announcement of notifications through Siri while using your AirPods, you can easily do so by following these steps:
- Open the Settings app on your iPhone.
- Tap on “Notifications.”
- Scroll down and select “Announce Notifications.”
- Here, you can choose to turn off the option to have Siri announce notifications through your AirPods or turn off the “Headphones” option altogether.
In addition to adjusting the notification settings, there are many other related settings you might want to change to enhance your AirPod experience. For example, you can customize the touch controls on your AirPods, adjust the EQ settings to improve sound quality, and enable or disable the automatic ear detection feature.
To learn more about these settings and how to customize your AirPods to suit your preferences, be sure to check out our comprehensive guide on AirPods. By taking the time to tweak your AirPod settings, you can enjoy a more personalized and enjoyable listening experience.

Matthew Burleigh has been writing tech tutorials since 2008. His writing has appeared on dozens of different websites and been read over 50 million times.
After receiving his Bachelor’s and Master’s degrees in Computer Science he spent several years working in IT management for small businesses. However, he now works full time writing content online and creating websites.
His main writing topics include iPhones, Microsoft Office, Google Apps, Android, and Photoshop, but he has also written about many other tech topics as well.


