If you are in a public place like a coffee shop or a hotel, you may find yourself connected to their public Wi-Fi from your iPhone.
This can be a good way to make sure you don’t use data, but it can also be problematic if you have AirDrop configured to let anyone send you files.
Our tutorial below will show you how to set AirDrop to contacts only on an iPhone so that you won’t have to worry about strangers using that feature to send you unwanted content.
How to Change AirDrop So That Only Contacts Can Send You Files
- Open the Control Center.
- Tap and hold on the top-left square.
- Select AirDrop.
- Choose Contacts Only.
Our guide continues below with additional information on how to set AirDrop to contacts only on an iPhone, including pictures of these steps.
Related: Check out our guide on changing your iPhone AirDrop name if other people are having trouble finding you because your name is inaccurate.
You can share files on your iPhone via a text message, email, or even by uploading it to Dropbox and sharing a link. But there is another method available, called AirDrop, that makes it possible to share files with other people.
One unfortunate side effect of AirDrop, however, is that there is an Everyone option that can be problematic when you are connected to a large Wi-Fi network, such as a hotel or coffee shop.
This means that anyone on that Wi-Fi network can send you a picture or file through AirDrop. Luckily this setting can be changed to Contacts Only so that only people who are in your Contacts list can send you files via AirDrop.
Did you know that you can add keyboards to your iPhone for other languages? Our Chinese keyboard iPhone tutorial will show you how.
How to Set AirDrop to Just Your iPhone Contacts
The steps in this section were performed on an iPhone 13 in iOS 16.
In addition to the method mentioned above where you can block AirDrop messages from strangers, you can also adjust this option through the Settings menu on your device.
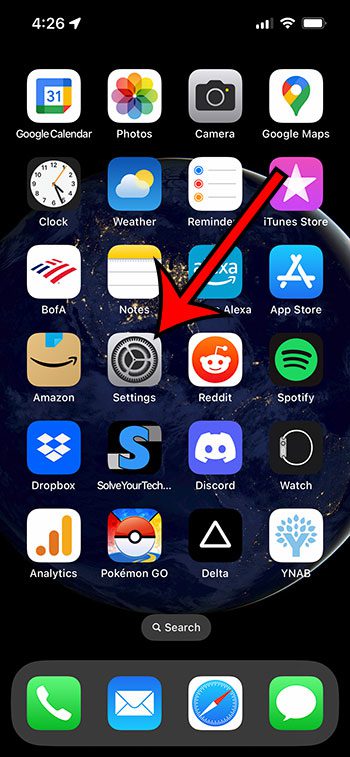
Step 1: Open the Settings app on your iPhone.
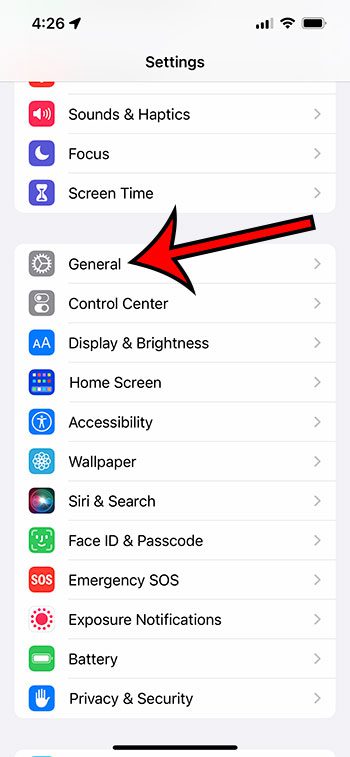
Step 2: Scroll down and choose the General option.
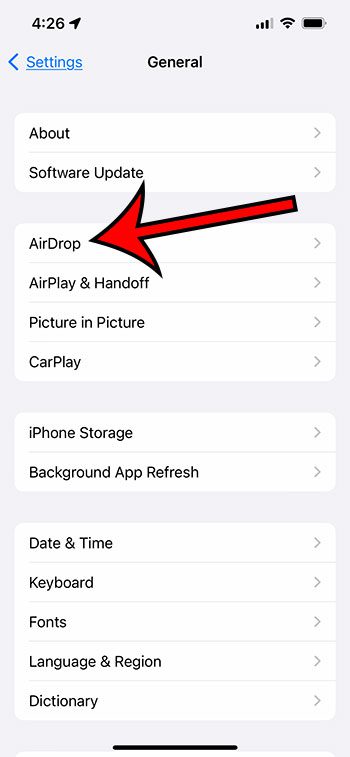
Step 3: Touch the AirDrop button.
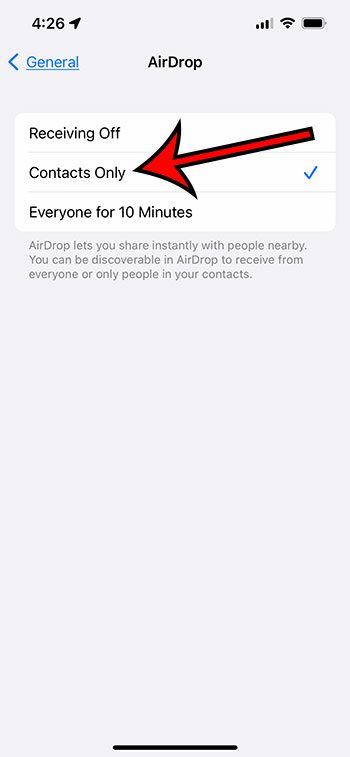
Step 4: Tap Contacts Only to make sure that only people in your contact list can send you files via AirDrop.
Now that you know how to limit AirDrop to just your iPhone contacts, you can rest assured that you will no longer receive unsolicited files from people who happen to be nearby.
Related: How to Enable or Disable Airdrop on iPhone 14
Old Method – How to Only Allow Contacts to Send You Files Through AirDrop on an iPhone (Guide with Pictures)
The steps in this section were performed on an iPhone 5, in iOS 8.
In order to use AirDrop you need to have Wi-Fi and Bluetooth turned on for your device, and you must be connected to a Wi-Fi network.
Step 1: Exit any open apps or unlock your device so that your Home screen is visible.
Step 2: Swipe up from the bottom of the screen to display the Control Center.
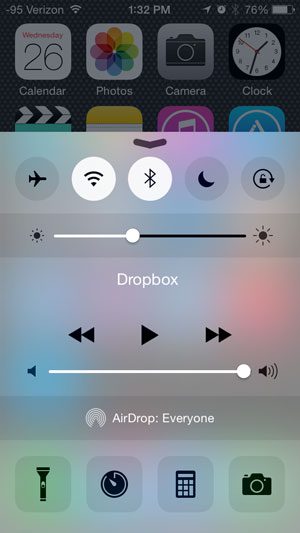
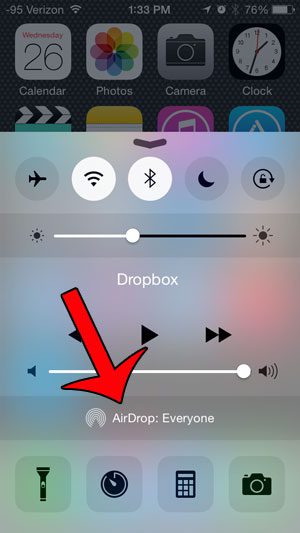
Step 3: Tap the AirDrop button.
Step 4: Select the Contacts Only option.
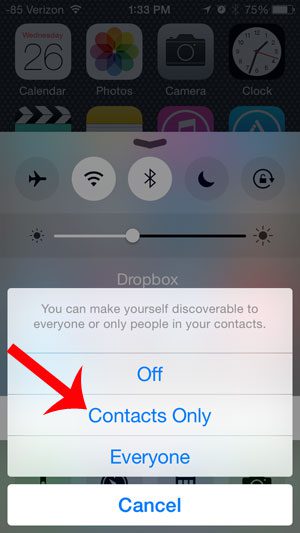
Now that you know how to set AirDrop to contacts only on an iPhone 5, you won’t need to worry about receiving random files from strangers when you’re in public and have AirDrop enabled on your device.
You can read more about AirDrop here.
Dropbox can be a very handy free addition to anyone with an iPhone. For example, this article will show you how to upload pictures from your iPhone to Dropbox so that they can be accessed through a Web browser on your computer.
More Information About AirDrop Contacts iPhone Settings
The three different options that are available to you for AirDrop include:
- Receiving Off
- Contacts Only
- Everyone
Note that in iOS 16.3.1, the “Everyone” option has been changed to “Everyone for 10 Minutes.”
This change allows you to permit AirDrops from strangers but deactivates that option after 10 minutes in case you forget to back and change it manually.
If you’ve never used AirDrop, then you may not be aware of how to use it.
One example is to open the Photos app, select a bunch of pictures, then tap the Share button.
If Airdrop is enabled and there are other people around with who you can communicate via Airdrop, then you would select them from the AirDrop section of the menu, then the files would send.
One nice thing about AirDrop is that it is very fast, and is one of the best ways that you can share a large number of pictures, or large videos, with other iPhone owners.
If the AirDrop name isn’t correct, then you might need to fix it. Luckily this can be accomplished with the same steps that you would use to change your iPhone’s Bluetooth name.
How to Rename iPhone Device
To get started, open up the Settings app on your iPhone. Once you’re there, scroll down until you see the “General” option and select it. From there, choose “About” and then scroll down a bit more until you find the “Name” option.
This is where you can change the name of your iPhone, which includes the name of your Bluetooth device too. To change it, just tap on the current name and type in the new name you’d like to use. Once you’re done, tap “Done” to save the changes.
To learn more about this, you can read our tutorial about how to change Bluetooth name on iPhone.
It’s important to keep in mind that changing the Bluetooth name on your iPhone won’t impact the name of your iPhone itself. If you want to change that too, just head back to the main “About” screen and change it there.
Overall, changing the Bluetooth name on your iPhone is super easy and only takes a few steps. By following these simple instructions, you’ll be able to personalize your Bluetooth device and make it simpler to recognize when connecting to other devices.

Matthew Burleigh has been writing tech tutorials since 2008. His writing has appeared on dozens of different websites and been read over 50 million times.
After receiving his Bachelor’s and Master’s degrees in Computer Science he spent several years working in IT management for small businesses. However, he now works full time writing content online and creating websites.
His main writing topics include iPhones, Microsoft Office, Google Apps, Android, and Photoshop, but he has also written about many other tech topics as well.
