Your iPad has a camera app that you might have used in the past to take a picture.
If you have an iPhone, it’s very similar to the way that you would capture a picture on that device, too.
But the iPad camera has a horizontal slider that lets you change app modes, and one of the options there lets you record video.
Our tutorial below will show you how to record a video on the iPad 2 using just the default Camera app.
How to Record an iPad Video
- Open the Camera app.
- Choose the Video option on the slider.
- Touch the red Record button to begin recording.
- Tap the red Record button again to stop recording.
Our guide continues below with additional information about how to record a video on the iPad 2, including pictures of these steps.
As an iPad owner and user, you are probably aware of many of the capabilities of the device.
Aside from having a rear and front-facing camera for still images, it can also record video.
But there is no dedicated video camera app on the iPad, which can be a little confusing as you try to record video images. So continue reading below to learn about recording iPad video.
Related Topic: Our iPhone video recording guide can show you how to capture video with your phone’s camera as well.
How to Record Video With an iPad (Guide with Pictures)
It’s important to note that recording video on the iPad 2 is going to take up much more space than taking a still photograph.
The specific size of the video will vary, but, for example, a 33-second sample video that I recorded is approximately 46 MB in size.
With that in mind, it can save you a lot of space to limit the number of videos you record, or to be sure and offload them from your iPad whenever possible.
You can check out this link to learn about syncing your iPad with iTunes.
Step 1: Launch the Camera app.

Step 2: Move the slider at the bottom-right corner of the screen to the Video Camera option, as shown in the image below.

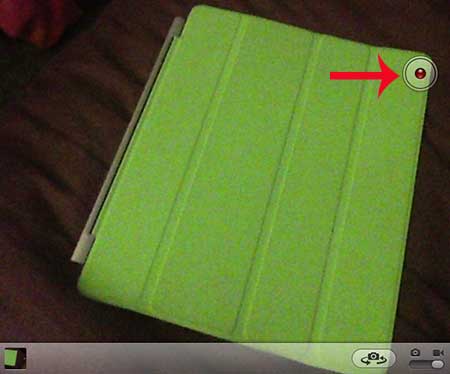
Step 3: Tap the red Record button to start recording video.

Step 4: Tap the red Record button again to stop recording video.
Now that you know how to record a video on the iPad 2, you will be able to use this method whenever you want to capture an event or experience as a video instead of just an image.
Click here to learn how to record a video on your iPhone 5.
More Information About Recording iPad Videos
If you’re looking to record a video on your iPad, you’ve come to the right place. Recording a video on an iPad is a simple process that can be done in just a few steps. Here’s how to do it:
- Open the Camera app. You can find the Camera app on your iPad’s home screen.
- Select the video mode. Once you’ve opened the Camera app, you’ll see a series of icons at the bottom of the screen. Select the video icon to switch to video mode.
- Adjust the settings. Before you start recording, you can adjust the settings to get the best quality video. You can adjust the resolution, frame rate, and other settings by tapping the gear icon in the top right corner of the screen.
- Start recording. When you’re ready to start recording, simply tap the red record button at the bottom of the screen. You can also use the volume buttons on the side of your iPad to start and stop recording.
- Stop recording. When you’re finished recording, tap the red record button again or use the volume buttons to stop recording.
That’s all there is to it! Recording a video on an iPad is a quick and easy process that anyone can do. With just a few taps, you can capture memories and share them with friends and family.
How to Back Up iPad Videos
- Sync with iTunes: Syncing your iPad with iTunes is a great way to back up videos.
- To do this, plug your iPad into your computer and launch iTunes.
- Make sure you have the latest version of iTunes installed on your computer.
- From there, you can sync your iPad with iTunes by clicking on the “Sync” button. This will back up all of your photos, music, and videos to your computer.
- Use iCloud: Another great way to back up your videos is to use iCloud.
- iCloud is a cloud storage service from Apple that allows you to store and back up your files in the cloud. To use this service, sign up for an iCloud account if you don’t already have one.
- Then, open your iPad’s Settings app and tap on “iCloud.”
- From there, you can turn on iCloud Backup and select which files you would like to back up.
- Use Third-Party Apps: There are also many third-party apps available that allow you to back up your iPad videos.
- Some of the most popular apps include Dropbox, Google Drive, and OneDrive. Each of these apps allows you to store and sync files in the cloud, making it easy to access them from any device.
- To use these apps, simply download the app from the App Store and sign in with your account information. Then, you can upload and store your videos in the app.
- Use External Drives: Finally, you can also use external drives to back up your iPad videos.
- External drives are portable hard drives that you can connect directly to your iPad or computer. To do this, simply connect the drive to your iPad or computer and then transfer your files over to the drive. This is a great way to store and keep a copy of your videos safe in case anything happens to your iPad.
Backing up your iPad videos is an important step in preserving your memories and protecting them from loss or damage.
By following these tips, you can easily back up your photos and videos, so they are safe and accessible when you need them.
How to Clear iPad Storage
On an iPad, clearing storage can help free up space and enhance functionality. The following steps will help you free up space on an iPad:
Assess your storage needs: Go to “Settings” > “General” > “iPad Storage” to discover how much storage your iPad is using. You can get a breakdown of how much storage each program, as well as images, music, and other data, is using here.
Delete Unused Apps: Unused apps are typically the main cause of an iPad’s storage usage. Swipe through your pages on the “Home” screen to find the apps you no longer use. Tap the “X” in the top left corner of an app icon after holding the icon down until the icons begin to wiggle.
Remove Videos and Photos: Videos and photos can consume a significant amount of storage space on an iPad.
Select “Albums” under “Photos” to remove them.
After selecting “Delete All,” tap “Recently Deleted.” Consider moving the images and movies to your PC or cloud storage to further reduce the number of files on your iPad.
Eliminate music and audio files: On an iPad, music and audio files can consume a significant amount of storage space. Go to “Music” and swipe left on any tracks you no longer require to remove them.
Next, select “Delete.”
Clearing your Safari cache and website data will help you make more room on your hard drive. “Settings” > “Safari” > “Clear History and Website Data” should be selected.
Turn off Automatic Downloads: You can stop updates, apps, books, and music from downloading automatically to save storage space. Turn off the toggle switch next to “Music, Apps, and Updates” under “Automatic Downloads” by going to “Settings” > “iTunes & App Store”
Utilize “Optimize Storage” to clear up space on your iPad by automatically deleting outdated conversations and attachments from the Messages app. Toggle the switch next to “Optimize Storage” in “Settings” > “General” > “iPhone Storage.”
Backup and restore: If your iPad has a lot of data, you might wish to create a backup of it before restoring it to the factory settings. All of your data will be lost, but you can recover it by restoring your backups. Choose “Erase All Content and Settings” under “Settings” > “General” > “Reset.”
You should be able to free up a sizable amount of storage space on your iPad by carrying out these instructions. To keep your iPad operating properly, make sure to frequently check your storage usage and delete any unnecessary files.

Matthew Burleigh has been writing tech tutorials since 2008. His writing has appeared on dozens of different websites and been read over 50 million times.
After receiving his Bachelor’s and Master’s degrees in Computer Science he spent several years working in IT management for small businesses. However, he now works full time writing content online and creating websites.
His main writing topics include iPhones, Microsoft Office, Google Apps, Android, and Photoshop, but he has also written about many other tech topics as well.