You may decide that you want to clear the cache on your iPad if your Safari browser seems to be running slowly or if Web pages are taking a long time to load.
Fortunately, this option is easily accessible through the Settings menu, and you can accomplish it with just a few steps.
You can clear your iPad cache by opening the Settings app, selecting the Safari option, tapping the Clear History and Website Data button, then touching the Clear button.
How to Clear the Cache and Cookies on an iPad
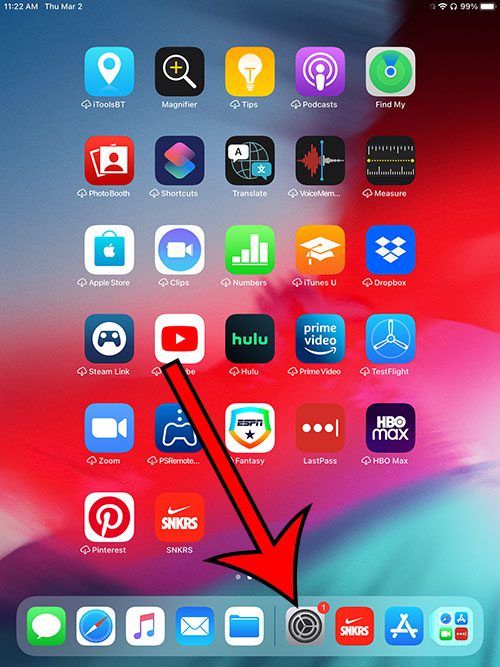
- Open Settings.
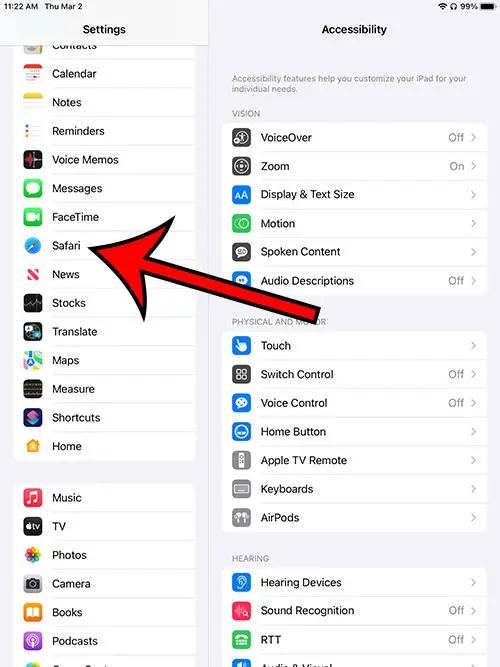
- Select Safari.
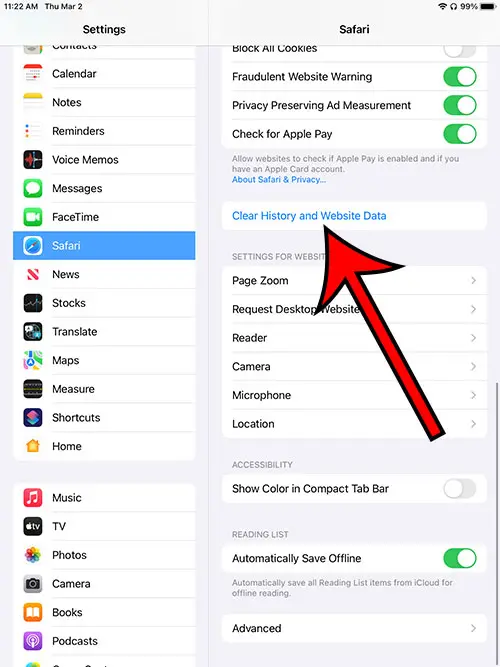
- Tap Clear History and Website Data.
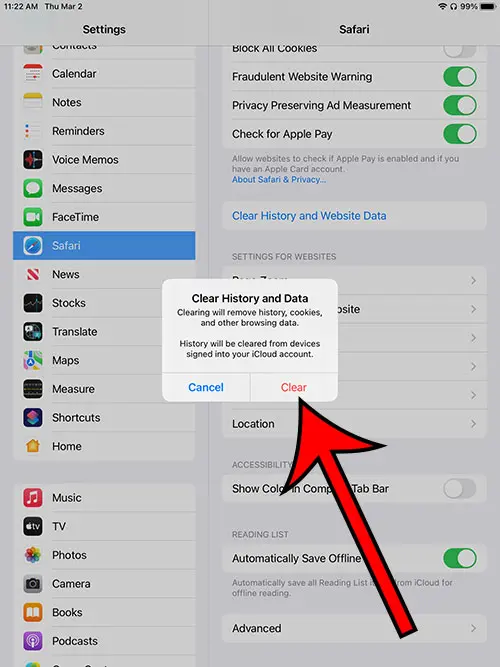
- Choose Clear.
Our guide continues below with additional information about how to clear cache on iPad, including pictures of these steps.
When you visit a Web page on your iPad, Safari will store information about that visit. This can include an entry in your browser history, as well as cookies and site data.
This data can help to improve your browsing experience, but too much data can cause the browser to load slowly.
That’s why it’s a good idea to clear your iPad cache from time to time.
Fortunately, you can accomplish this by following a few steps in the Settings app.
Related: Learn how to check your iPhone Safari history if you want to visit a page that you had seen previously.
How to Clear an iPad’s Cache in Safari
The steps in this guide were performed on a 6th generation iPad, using the iPadOS 15 operating system.
Step 1: Find the Settings app on your Home screen and open it.
Step 2: Scroll down in the left column and select the Safari option.
Step 3: Scroll down in the right column and choose the Clear History and Website Data option.
Step 4: Tap the Clear button to confirm that you want to delete this data.
Now that you know how to clear cache on iPad to remove Safari data, you will be able to use this feature anytime you want.
if you would like to browse in Safari without saving data, you can always use the Private Browsing mode instead.
You can open a Private Browsing tab on an iPad by tapping the Tabs button at the bottom of the Safari screen, touching the button at the top of the screen that indicates the number of open tabs, then choosing the Private option.
If you want to delete an app’s cache rather than the Safari browsing cache, then you can do that as well. We will discuss those steps in the next section.
How to Delete App Cache on an iPad
Occasionally an app might not be working properly because it is trying to use a problematic cache.
While you might have considered uninstalling and reinstalling the app, another option is to try and clear the app cache instead. You can do this with the following steps.
Step 1: Open the app for which you want to clear the cache.
Step 2: Press and hold the Power button until the “Slide to power off” button appears.
Step 3: Press and hold the Home button until the app closes and restarts.
Note that it can take a couple of seconds for this to occur.
If your iPad doesn’t have a Home button, then you can try offloading an app from your iPad, then reinstalling it.
You can do this by going to Settings > General > iPad Storage, then scrolling down and choosing the app for which you wish to clear the cache. You can then select the Offload App option to remove the app but keep its documents and data.
You can then redownload the app from the App Store.
Note that you can also choose the Delete App option on this screen to uninstall an app altogether. This accomplishes the same thing as if you had tapped and held on the app icon on the Home screen, chosen the Remove App option, then tapped the Delete App button.
If that doesn’t work, you could also try restarting the iPad by pressing and holding the Power button, then dragging the “Slide to power off” button to the right side of the screen.
Once the device has finished shutting down you can press and hold the Power button again until you see the white Apple logo on the screen. You can then release the Power button and enter your passcode.

Matthew Burleigh has been writing tech tutorials since 2008. His writing has appeared on dozens of different websites and been read over 50 million times.
After receiving his Bachelor’s and Master’s degrees in Computer Science he spent several years working in IT management for small businesses. However, he now works full time writing content online and creating websites.
His main writing topics include iPhones, Microsoft Office, Google Apps, Android, and Photoshop, but he has also written about many other tech topics as well.


