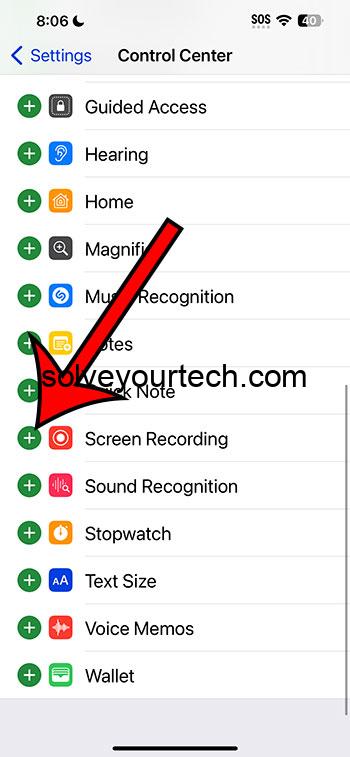
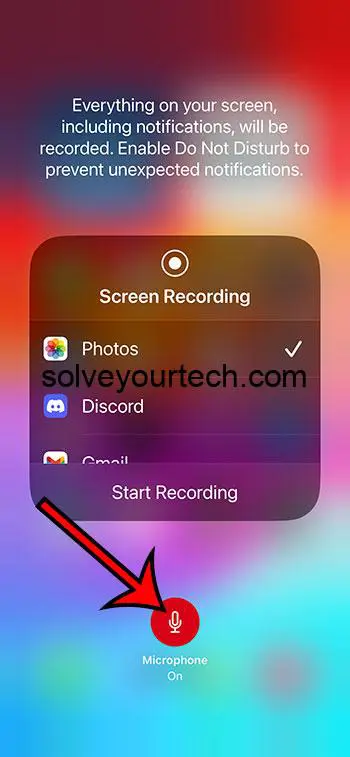
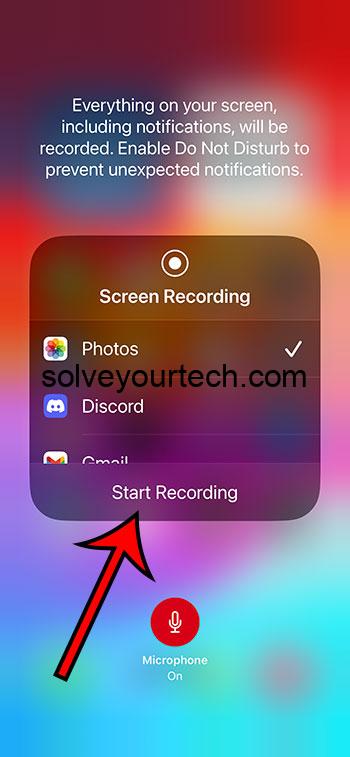
Recording your screen on an iPhone 15 is a breeze. Start by accessing the Control Center and locating the screen recording button. If it’s not there, go to Settings > Control Center > Customize Controls and add it. Press the screen recording button for a few seconds, choose your preferred microphone settings, and tap ‘Start Recording.’ Wait for the three-second countdown, and voila, you’re recording! To stop, tap the red dot at the top of your screen and select ‘Stop.’
After you’ve stopped the recording, your video will be saved automatically to your Photos app. You can then view, edit, or share it as you would with any other video.
You can also check out this video about how to screen record on iPhone 15 for more on this topic.
Introduction
Screen recording is an essential feature for iPhone 15 users who want to capture what’s happening on their device. Whether you’re a gamer wanting to record epic gameplays, a professional creating tutorials, or just someone looking to save a memorable video call, screen recording can come in handy.
Apple has made it pretty straightforward to record your screen, but there are some steps and settings you need to be aware of to make the most out of this feature. This guide is perfect for anyone, regardless of their tech-savviness, and aims to provide a clear and concise walkthrough on how to record your screen on the iPhone 15.
We’ll cover everything from enabling the feature, starting and stopping recordings, to what you can do with your recordings afterward. So, whether you’re new to iPhone or just haven’t tried screen recording before, you’re in the right place!
Related: How to Screen Record on iPhone
Step by Step Tutorial
In this section, we will walk through the steps of recording your screen on an iPhone 15.
Step 1: Enable Screen Recording in Control Center
Access the Control Center and make sure the screen recording button is available.
Your iPhone 15’s Control Center is the nerve center for all sorts of handy features and shortcuts, and screen recording is no exception. Swipe down from the upper-right corner of your screen to access the Control Center. If you can’t see the screen recording icon (it looks like a solid circle inside a ring), you’ll need to add it via Settings. Go to Settings > Control Center > Customize Controls, then tap the ‘+’ next to Screen Recording.
Step 2: Adjust Your Microphone Settings
Press and hold the screen recording button in the Control Center to adjust your microphone settings.
Once the screen recording button is in your Control Center, press and hold it. A menu will pop up, allowing you to turn the microphone on or off, depending on whether you want to record audio. Select your preference.
Step 3: Start Recording
Tap ‘Start Recording’ to begin capturing your screen.
After setting up your microphone, tap ‘Start Recording’. There will be a three-second countdown before the recording begins, giving you a moment to prepare. Once the countdown ends, everything on your screen, as well as any sounds or music playing on your device, will be recorded.
Step 4: Stop Recording
Access the Control Center again or tap the red circle in the Dynamic Island at the top of your screen to stop recording.
To stop recording, you can either open the Control Center and tap the screen recording button again, or simply tap the red dot in the Dynamic Island at the top of your screen and select ‘Stop’. Your recording will then be saved automatically to your Photos app.
Pros
Now let’s look at some of the advantages of using the iPhone 15’s screen recording feature.
Benefit 1: Easy to Use
The process is straightforward and user-friendly.
Apple is known for its user-friendly interfaces, and the screen recording feature on the iPhone 15 is no exception. The steps are simple and easy to follow, making it accessible for users of all ages and tech skill levels.
Benefit 2: High-Quality Recordings
Expect crisp and clear recordings.
The iPhone 15 boasts impressive hardware, resulting in high-quality screen recordings. Whether you’re capturing gameplay, a tutorial, or a video call, you can expect a crisp, clear, and smooth recording.
Benefit 3: Versatile Use Cases
The feature is useful for a variety of scenarios.
Screen recording isn’t just for tech experts or gamers. It’s a versatile tool that can be used for creating tutorials, saving memorable moments from a video call, reporting bugs, and much more. Its wide range of applications makes it a valuable feature for all iPhone 15 users.
Cons
However, no feature is without its limitations. Here are some drawbacks of the iPhone 15’s screen recording feature.
Limitation 1: Potential Privacy Concerns
Be mindful of what’s on your screen when recording.
Screen recording captures everything on your display, which could potentially include sensitive information. Always double-check that you’re not recording personal details or private conversations.
Limitation 2: Storage Space
High-quality recordings can take up a significant amount of space.
Because the recordings are of such high quality, they can take up a substantial amount of your device’s storage space. It’s important to regularly check and manage your storage to ensure you have enough space for new recordings.
Limitation 3: No Internal Audio Recording for Third-party Apps
You can’t record internal audio from third-party apps.
Due to copyright and privacy concerns, iOS does not allow the recording of internal audio from third-party apps. This can be limiting if you’re trying to record gameplay or content from apps like YouTube.
Video About Screen Recording
Additional Information
While screen recording on your iPhone 15 is pretty straightforward, there are some additional tips and insights that might enhance your experience. For starters, you can edit your recording directly in the Photos app, trimming the beginning or end to capture just the content you want. Additionally, if you’re looking to record a video call, ensure that all participants are aware and consent to the recording, as this touches upon privacy and consent.
Furthermore, while you cannot record internal audio from third-party apps, you can still use the microphone to record external sounds, which could be a workaround for some users. Lastly, remember that screen recording can consume a significant amount of battery, so it’s a good idea to ensure your device is fully charged or connected to a power source if you’re planning on recording for an extended period.
Summary
- Enable Screen Recording in Control Center
- Adjust Your Microphone Settings
- Start Recording
- Stop Recording
Frequently Asked Questions
Can I record audio from third-party apps?
No, iOS does not allow the recording of internal audio from third-party apps.
While you can’t capture internal audio from apps like YouTube or Spotify, you can use your device’s microphone to record external sounds during a screen recording. Just be mindful of the audio quality and background noise.
Where are my screen recordings saved?
All recordings are saved automatically to your Photos app.
After you stop the recording, it will be processed and saved in your Photos app, where you can view, edit, and share it just like any other video.
Can I edit my screen recording?
Yes, you can edit your screen recording in the Photos app.
The Photos app provides basic editing tools that allow you to trim the beginning and end of your recording, ensuring your video captures exactly what you need.
Does screen recording capture notifications?
Yes, any notifications that appear while you’re recording will be captured.
If you don’t want notifications to appear in your recording, you can enable ‘Do Not Disturb’ mode or turn off notifications for specific apps during the recording.
Can I record my screen with the phone locked?
No, screen recording will stop if you lock your iPhone.
If you lock your device during a screen recording, the recording will end, and the captured content up to that point will be saved.
Conclusion
Screen recording on the iPhone 15 is a powerful tool that’s easy to use and can be applied to a variety of situations, from creating tutorials to saving memorable moments. By following the steps outlined in this guide, you’ll be able to record your screen with ease and make the most out of this feature.
Just be mindful of privacy concerns and storage space, and you’ll be able to capture high-quality recordings whenever you need to. Whether you’re a seasoned iPhone user or new to the Apple ecosystem, screen recording is a feature worth exploring, opening up a world of possibilities right at your fingertips.

Matthew Burleigh has been writing tech tutorials since 2008. His writing has appeared on dozens of different websites and been read over 50 million times.
After receiving his Bachelor’s and Master’s degrees in Computer Science he spent several years working in IT management for small businesses. However, he now works full time writing content online and creating websites.
His main writing topics include iPhones, Microsoft Office, Google Apps, Android, and Photoshop, but he has also written about many other tech topics as well.


