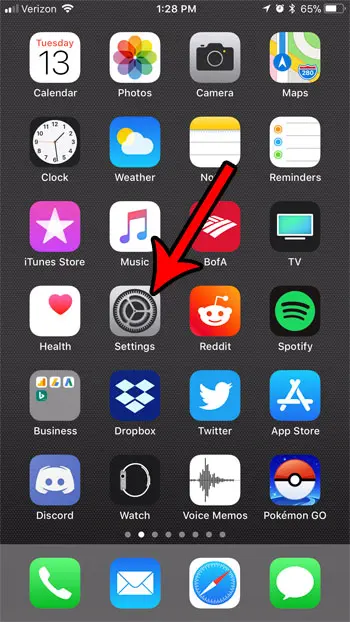
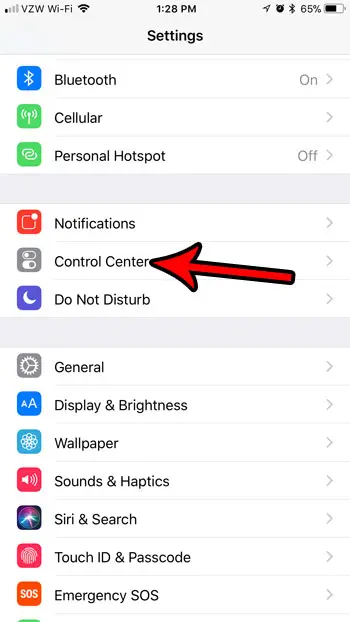
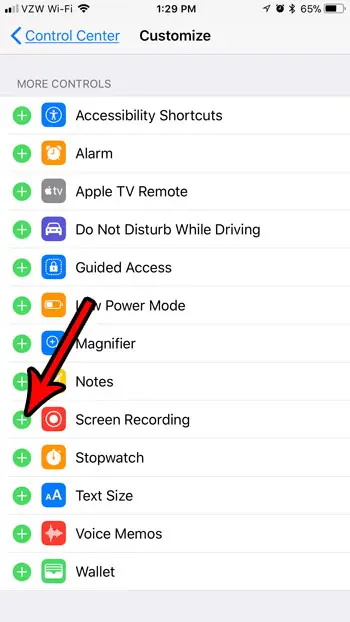
You can turn on screen recording on your iPhone by going to Settings > Control Center > and then tapping the green + button to the left of Screen Recording.
If you have seen someone make a video of their phone screen, then you might be wondering how to enable screen recording on an iPhone so that you can do it, too.
Fortunately, this is a feature that was added in an earlier version of iOS, and you likely have it available if you have installed any recent updates to iOS on your device.
You can also check out this video about how to screen record iPhone from more on this topic.
How to Screen Record iPhone 7
- Open Settings.
- Choose Control Center.
- Tap the green + next to Screen Recording.
- Swipe up from the bottom of the screen.
- Tap the Screen Recording button.
Our guide continues below with additional information on how to enable screen recording on an iPhone 7, including pictures of these steps.
You can read this article to learn more about screen recording on newer models like the iPhone 13.
You have long been able to take screenshots on an iPhone by pressing the Power button and the Home button at the same time. This is a great way to share images of your screen with others, and it is something that I have been using on this site for a while for my iPhone tutorials.
But until iOS 11, there wasn’t an easy way to record a video of your screen.
Fortunately, this has changed, and it’s now possible to take video recording of your iPhone screen. Our tutorial below will show you how to enable this feature in iOS 11 so that you can start recording videos from your device’s Control Center.
Find out how to get sound on screen recording videos after you have enabled the screen recording feature on your iPhone.
How to Turn on the Screen Recording Feature in iOS 11 (Guide with Pictures)
The steps in this article were performed on an iPhone 7 Plus in iOS 11.2.6. Note that this feature is not available in iOS versions lower than 11. If you aren’t running iOS 11, you can read here about updating.
Step 1: Open the Settings app.
Step 2: Select the Control Center.
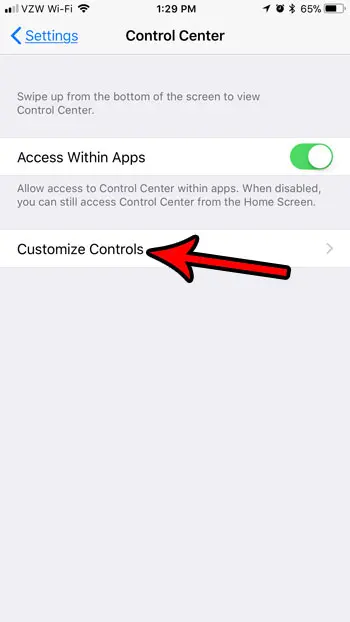
Step 3: Touch the Customize Controls option.
Step 4: Scroll down and tap the green + next to Screen Recording.
To start screen recording, swipe up from the bottom of your screen to open the Control Center, then tap the Screen Recording button.
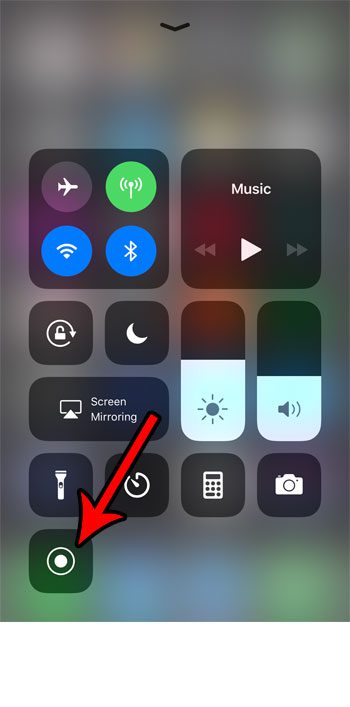
Now that you know how to enable screen recording on iPhone 7 you will be able to create and share videos of things that are occurring on your screen.
You can stop the screen recording by pressing that same button again, or by pressing the red bar at the top of the screen and choosing the Stop option. The recorded video will be saved to the Videos album in your Photos app.
If you are going to be recording a lot of videos on your device, then storage space could become a problem. Read our complete guide to deleting iPhone items for some tips on files and apps that you can remove to increase your available storage.
Video About Turning On iPhone Screen Recording

Matthew Burleigh has been writing tech tutorials since 2008. His writing has appeared on dozens of different websites and been read over 50 million times.
After receiving his Bachelor’s and Master’s degrees in Computer Science he spent several years working in IT management for small businesses. However, he now works full time writing content online and creating websites.
His main writing topics include iPhones, Microsoft Office, Google Apps, Android, and Photoshop, but he has also written about many other tech topics as well.