Yes, a website can use your iPhone camera, but only through a browser that has permission, and Safari lets you decide whether sites must ask first, are always refused, or are always allowed. To block every Safari website at once on iOS 18 or later, go to Settings > Apps > Safari > Camera and tap Deny.
The rest of this guide explains what each choice does, how to make an exception for one site you trust, how to check whether the camera is in use, and how to handle Chrome and other browsers, which have their own controls.
How Website Camera Access Works on an iPhone
A website cannot reach the camera by itself. It has to go through the browser, and the browser follows the permission you have set. Apple describes the Safari setting as a choice of whether Safari websites can use your camera without asking you first. There are three options:
| Option | What it means | Good for |
|---|---|---|
| Ask | Safari shows a prompt when a site wants the camera, and you decide each time. | Most people. You stay in control without breaking sites that need the camera. |
| Deny | Safari websites are refused camera access. | Anyone who never wants a site to use the camera. |
| Allow | Safari websites can use the camera without asking you first. | Rarely a good default. Better used as an exception for one trusted site. |
Sites usually request the camera for an obvious reason: a video call in the browser, scanning a QR code, taking a profile picture, or an identity check. If a page asks for the camera and you cannot see why it would need it, refusing costs you nothing.
This setting only covers websites opened in Safari. Apps, including other browsers, are handled separately, and both are covered later in this article.
How to Deny Camera Access for All Websites in Safari
These steps follow the current iPhone User Guide and apply to iOS 18 and later, where Safari settings sit inside the Apps section of Settings. If your iPhone runs iOS 17 or earlier, skip step 2 and tap Safari directly in the main Settings list.
Before you start: choosing Deny means sites that depend on the camera, such as browser video calls or web-based QR scanners, will not be able to use it until you change the setting back or add an exception for that site.
- Open the Settings app.
- Scroll down and tap Apps. This is a list of every app on the iPhone.
- Tap Safari. You can scroll to it or use the search field at the top of the list.
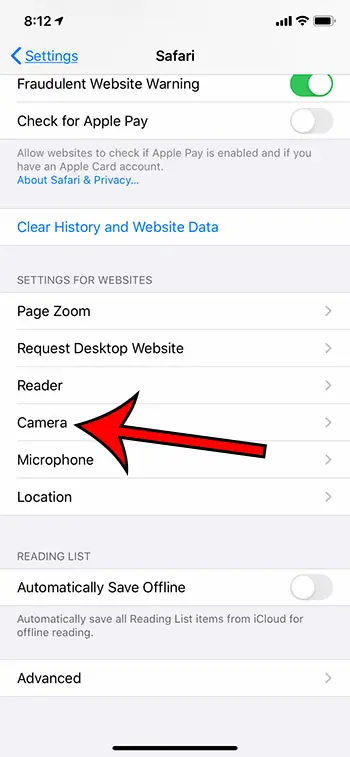
- Scroll down to the section labeled Settings for Websites and tap Camera.
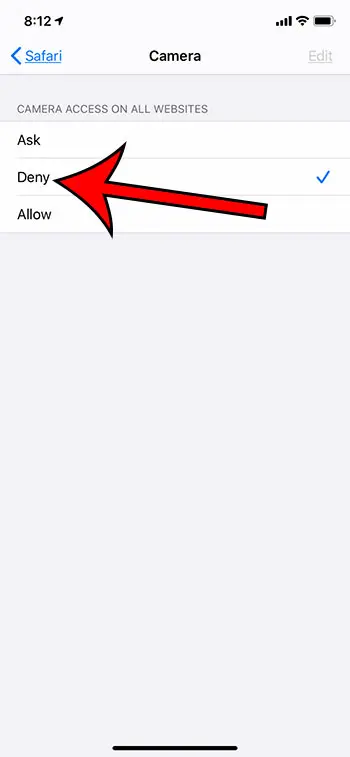
- Tap Deny. A check mark shows the option that is active.
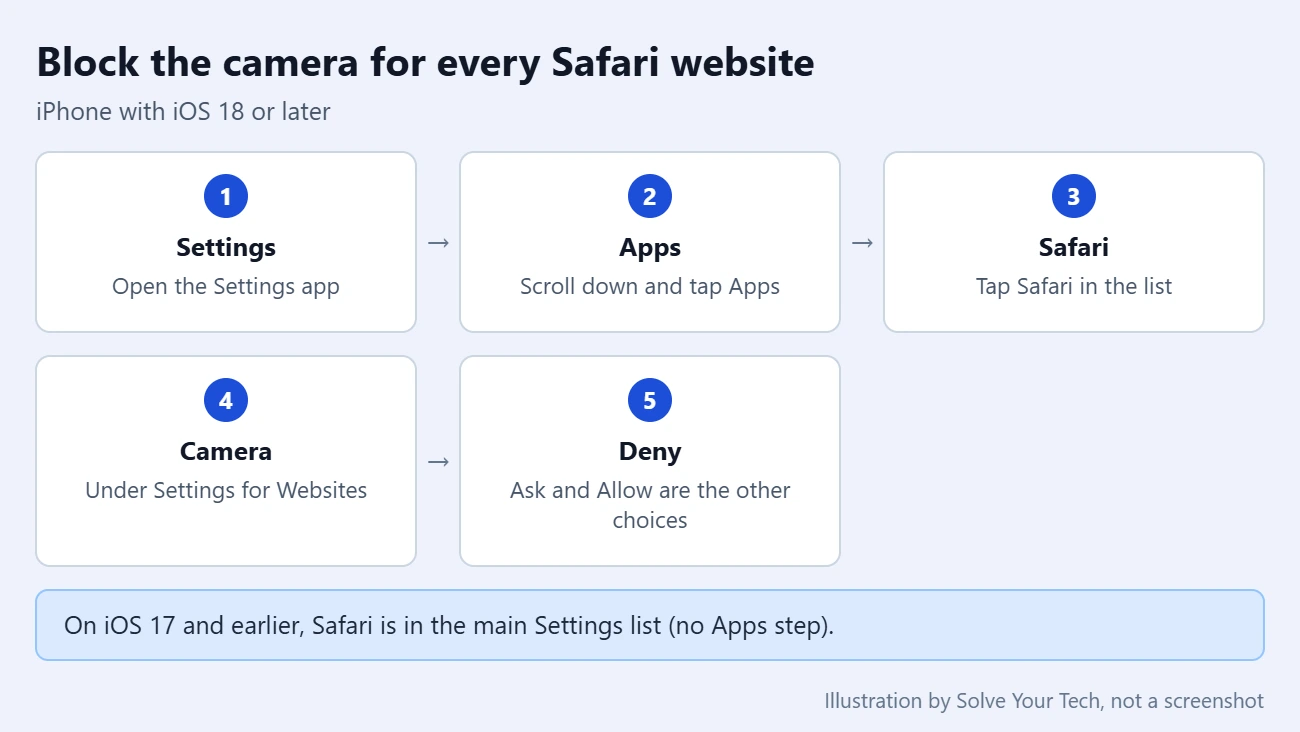
There is no Save button. The change applies as soon as you tap the option, and you can leave Settings.
The two images below come from an older version of iOS, so the colors and spacing may not match your screen, but the Camera row and the three choices are the same ones named in the current guide.
Apple lists this setting, along with the matching Microphone and Location settings, in its guide to browsing the web privately in Safari on iPhone.
Should You Pick Ask or Deny?
Both keep a website from using the camera silently. The difference is convenience.
- Ask is the flexible choice. Nothing happens until you approve a prompt, and you can still say no every time.
- Deny is the strict choice. It removes the decision entirely, which helps if you tend to tap through prompts quickly or if someone else uses the iPhone.
- Allow removes the prompt in the other direction. Because Apple describes it as letting Safari websites use the camera without asking first, it is safer to leave the main setting on Ask or Deny and allow individual sites instead.
How to Allow or Block the Camera for One Website
The setting above is the default for every site. Safari also lets you set an exception for a single website, which is useful when you have chosen Deny but still need one video call service to work, or when you use Ask but want one site blocked for good.
- Open Safari and go to the website.
- Tap the Page Menu button, which is the icon at the left side of the search field. On some iOS versions you then tap a More button with three dots to see the full menu.
- Tap Website Settings.
- Tap Camera and choose Ask, Deny, or Allow for that site.
- Close the menu. You may need to reload the page before the site notices the change.
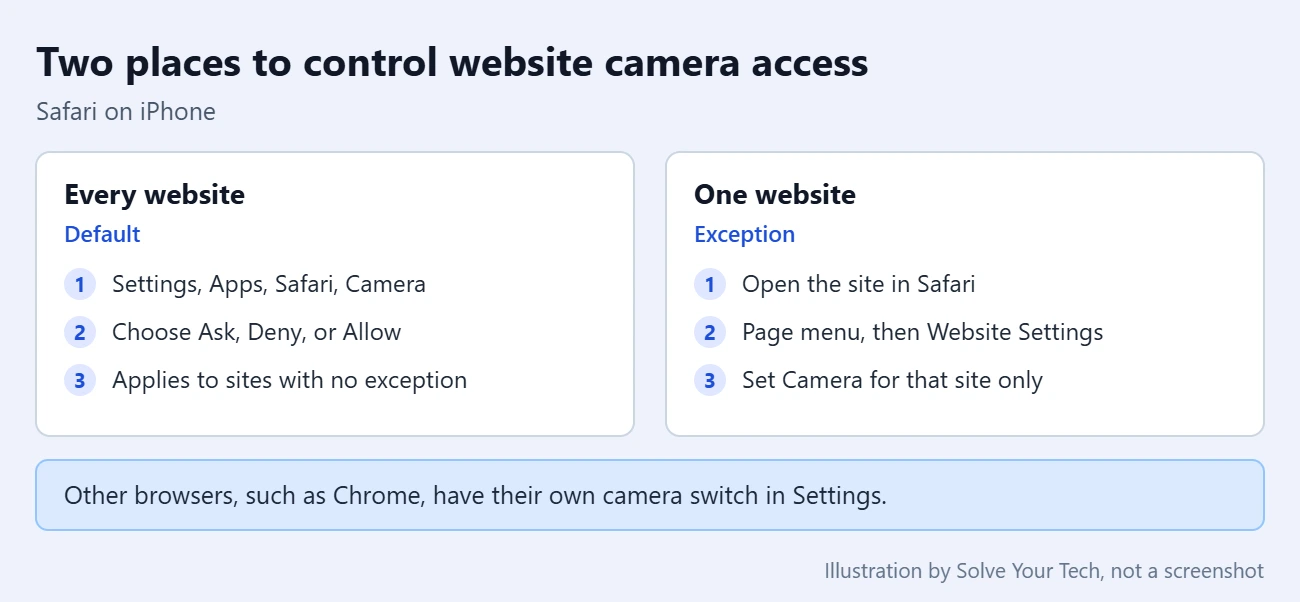
The same menu has separate Microphone and Location choices for the site. If you would like to tighten those as well, our guide on how to stop Safari websites from using your location walks through the location version of this setting.
What About Chrome and Other Browsers?
The Safari setting does not control other browsers. Chrome, Firefox, Edge, and similar apps are treated like any other app that wants the camera: the app itself needs camera permission from iOS, and then it handles requests from individual sites in its own way.
To see every app that has asked for the camera:
- Open Settings and tap Privacy & Security.
- Tap Camera.
- Turn the switch off next to any app that should not have the camera, including a browser.
Apple documents this list in its guide to controlling access to hardware features on iPhone. With the switch off, no website opened in that browser can use the camera, because the browser itself has none to share.
If you leave the switch on for Chrome, Google says Chrome shows its own prompt when a site wants the camera, with the choices Allow while visiting the site, Allow this time, and Never allow. Google covers this in its help page on using your camera and microphone in Chrome. For the opposite problem, where Chrome needs the camera and cannot get it, see our guide on how to allow Chrome to use the camera on an iPhone.
How to Tell When the Camera Is Being Used
The iPhone gives you two signals, both described by Apple:
- A green indicator appears at the top of the screen whenever an app uses the camera, including when the camera and microphone are used together. An orange indicator means the microphone is in use without the camera.
- Control Center shows a message at the top naming an app that has recently used the camera or microphone. Swipe down from the top-right corner of the screen to open it on an iPhone with Face ID.
If the green indicator appears while you are on a web page and you did not expect it, close the tab, then set that site to Deny using the steps above.
How to Confirm the Setting and Undo It
To confirm the change, return to Settings > Apps > Safari > Camera and check that the mark is next to the option you wanted. With Deny selected, a site that asks for the camera should report that it could not get access rather than starting video.
To undo it, open the same screen and tap Ask. Nothing is erased when you switch between the three options, so you can change your mind as often as you like.
Troubleshooting
I cannot find Safari in Settings
On iOS 18 and later, Safari is inside Settings > Apps rather than in the main list. On iOS 17 and earlier it is in the main list. You can also pull down on the Settings screen and type Safari into the search field.
There is no Camera row in the Safari settings
Scroll farther down. The row is in the Settings for Websites group, below the general and privacy options. Very old iOS versions used a single combined switch for camera and microphone access instead, and Apple’s current guides no longer cover those versions, so updating iOS is the dependable way to get the separate Camera setting.
A site still cannot use the camera after I chose Ask or Allow
Check whether that site has its own exception. Open the site, tap the Page Menu button, tap Website Settings, and look at Camera. An exception set to Deny keeps blocking the site even when the main setting is more relaxed. Reloading the page after a change can also help.
A site can still use the camera after I chose Deny
Make sure you opened the site in Safari and not in another browser or inside an app, since those do not follow the Safari setting. Then check the site’s own entry under Website Settings in case it was set to Allow earlier.
The setting is grayed out or will not change
An iPhone that is managed by an employer, a school, or parental controls can have some settings locked. In that case the person or organization that manages the device has to change the restriction.
Frequently Asked Questions
Can a website turn on my iPhone camera without permission?
Not through Safari when the camera setting is on Ask or Deny. With Ask, the site has to wait for you to approve a prompt. With Deny, it is refused. Only the Allow option lets Safari websites use the camera without asking first.
Does denying camera access in Safari affect the Camera app or FaceTime?
No. The setting is described by Apple as applying to Safari websites. Apps get their camera permission separately, under Settings > Privacy & Security > Camera. Our guide to turning camera permission on or off for an individual app shows how that switch works using one app as the example.
Do I need to block the microphone too?
The microphone has its own row directly below Camera, with the same Ask, Deny, and Allow choices. Changing one does not change the other, so set both if you want websites kept away from audio and video.
Will websites keep asking if I leave the setting on Ask?
Sites that want the camera will prompt you. If one site prompts too often, give it its own exception under Website Settings: Deny if you never want it to have the camera, or Allow if you trust it and use it regularly.
Is it safe to allow a website to use my camera?
It depends on the site. Allow access only when you understand why the page needs the camera and you reached the site yourself, not through an unexpected link. Leaving Fraudulent Website Warning turned on in the Safari settings adds a warning when Safari suspects a phishing site.
Next Step
With the camera handled, the Microphone and Location rows in the same Safari menu are worth a quick look, since they work the same way. If you also want to remove data that sites have already stored on your phone, see how to clear the Safari cache on an iPhone.

Matthew Burleigh is the founder, head writer, and editor of Solve Your Tech, which he launched in 2012. He has written technology tutorials since 2008 and worked in IT since 2003, including small-business support, IT management, and consulting. He holds Bachelor’s and Master’s degrees in Computer Science from Arizona State University.
Matthew writes practical guides for Windows, iPhone and iPad, Microsoft Office, Outlook, Google apps, and Android. Solve Your Tech’s guides are tested on current devices or checked against official product documentation, with clear steps, sources, and update dates.
Read more about Matthew and how Solve Your Tech writes and updates its guides, or report a correction.