To create a website with Google Sites, go to sites.google.com/new on a computer, choose a template under Start a new site, name the site, and add your content. To publish it, click Publish at the top, enter a web address, and click Publish. Then click Share and, next to Published site, choose Public so anyone can view it, or Restricted to limit it to people you add.
These steps cover Google Sites in a web browser on a Windows PC, Mac, or Chromebook, with a personal Google account or a work or school account. Google’s help pages describe building and publishing on a computer, so plan to do the editing there.
Is Google Sites the Right Tool?
- A Google account. A free personal account works. Google says accounts managed by a parent can’t create sites, though they can see and edit existing ones.
- A computer with a current web browser.
- Your text and pictures. Google Sites accepts images in .jpg, .png, and .gif format. Gather a logo too if you have one.
- A rough page list. Most small sites need three to five pages, such as Home, About, Services or Schedule, and Contact.
Is Google Sites the Right Tool?
Google Sites is a good fit for a club, class, family event, team intranet, small business information page, or a simple portfolio. Hosting is included, and the pages adjust on their own for phones and tablets.
It’s a poor fit if you need to sell products, run a blog with posts and categories, or let visitors create accounts. Google Sites has no built-in store, blog, or member login tools, and you get few controls for search engine settings. You can add outside tools with an embed, but a full website builder or WordPress is easier for those jobs.
Step 1: Create the Site
- On a computer, go to sites.google.com/new. You can also open Google Drive and click New > More > Google Sites.
- Under Start a new site, choose a template, or choose the blank option to start from scratch. Click Template gallery at the top right to see every template, grouped into personal, work, and education designs.
- At the top left, type a name for the file and press Enter. This name is for you; it’s how the site is listed in your Google Drive.
- Click Enter site name at the top left of the page, type the name visitors should see, and press Enter. This site title shows only once the site has two or more pages.
The editor opens with three tabs on the right: Insert, Pages, and Themes. Google saves your edits to a draft as you work, so there’s no save button.
Step 2: Pick a Theme
A theme controls the colors and fonts across the whole site. It’s separate from the template, which only sets the starting layout and sample content.
- Click Themes on the right.
- Under Created by Google, click a theme to apply it. Some themes offer color and font choices below the theme name.
- For your own colors and fonts, go to Custom and click Create theme. Enter a name, click Next, add a logo or banner if you want, choose a color palette or Customize colors, choose fonts, and click Create theme.
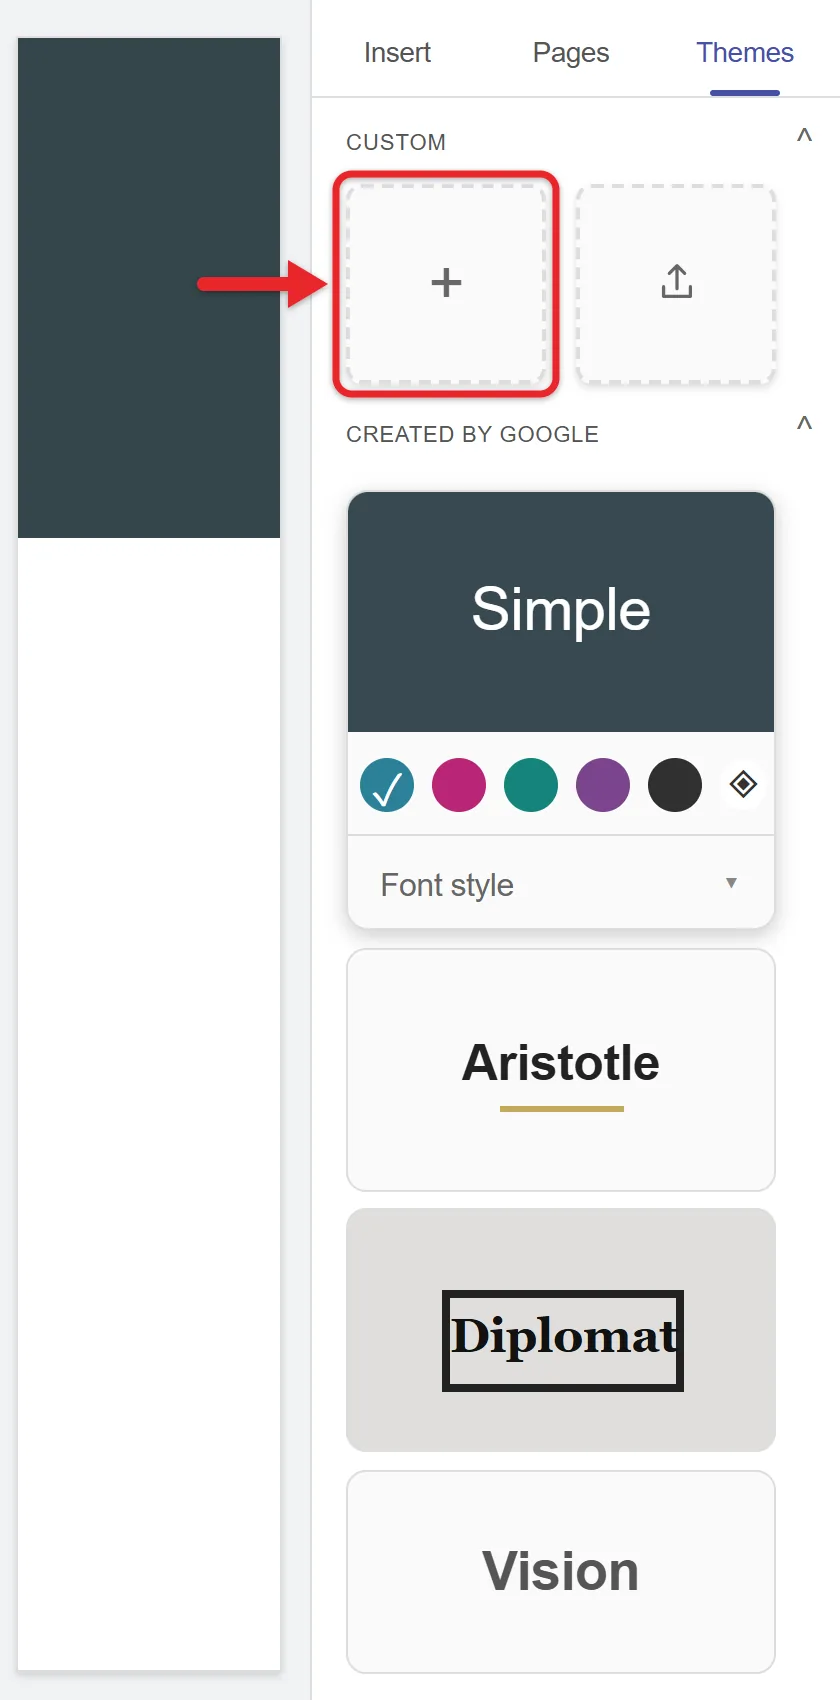
If you already built a custom theme on another site, use Custom > Import theme to reuse it so your sites match.
The header is the banner at the top of each page. Point to it to see its controls:
- Change image swaps the banner picture. Upload your own or choose one from the options Google shows.
- Header type changes its size. The choices go from a large cover image down to a title-only bar.
- Delete removes the header from that page. To add it back, point to the site name at the top and click Add header.
To add a logo, point to the site name area at the top left and click Add logo, then upload the image. For the small icon that shows in the browser tab, open Settings (the gear at the top) and go to Brand images, where you can upload a favicon.
For a footer, point to the bottom of a page and click Add footer or Edit footer. Type your text, such as contact details or a copyright line, and use the background option to change its color. The footer appears on every page. Point to it and click Hide to hide it on one page.
Step 4: Add Your Content
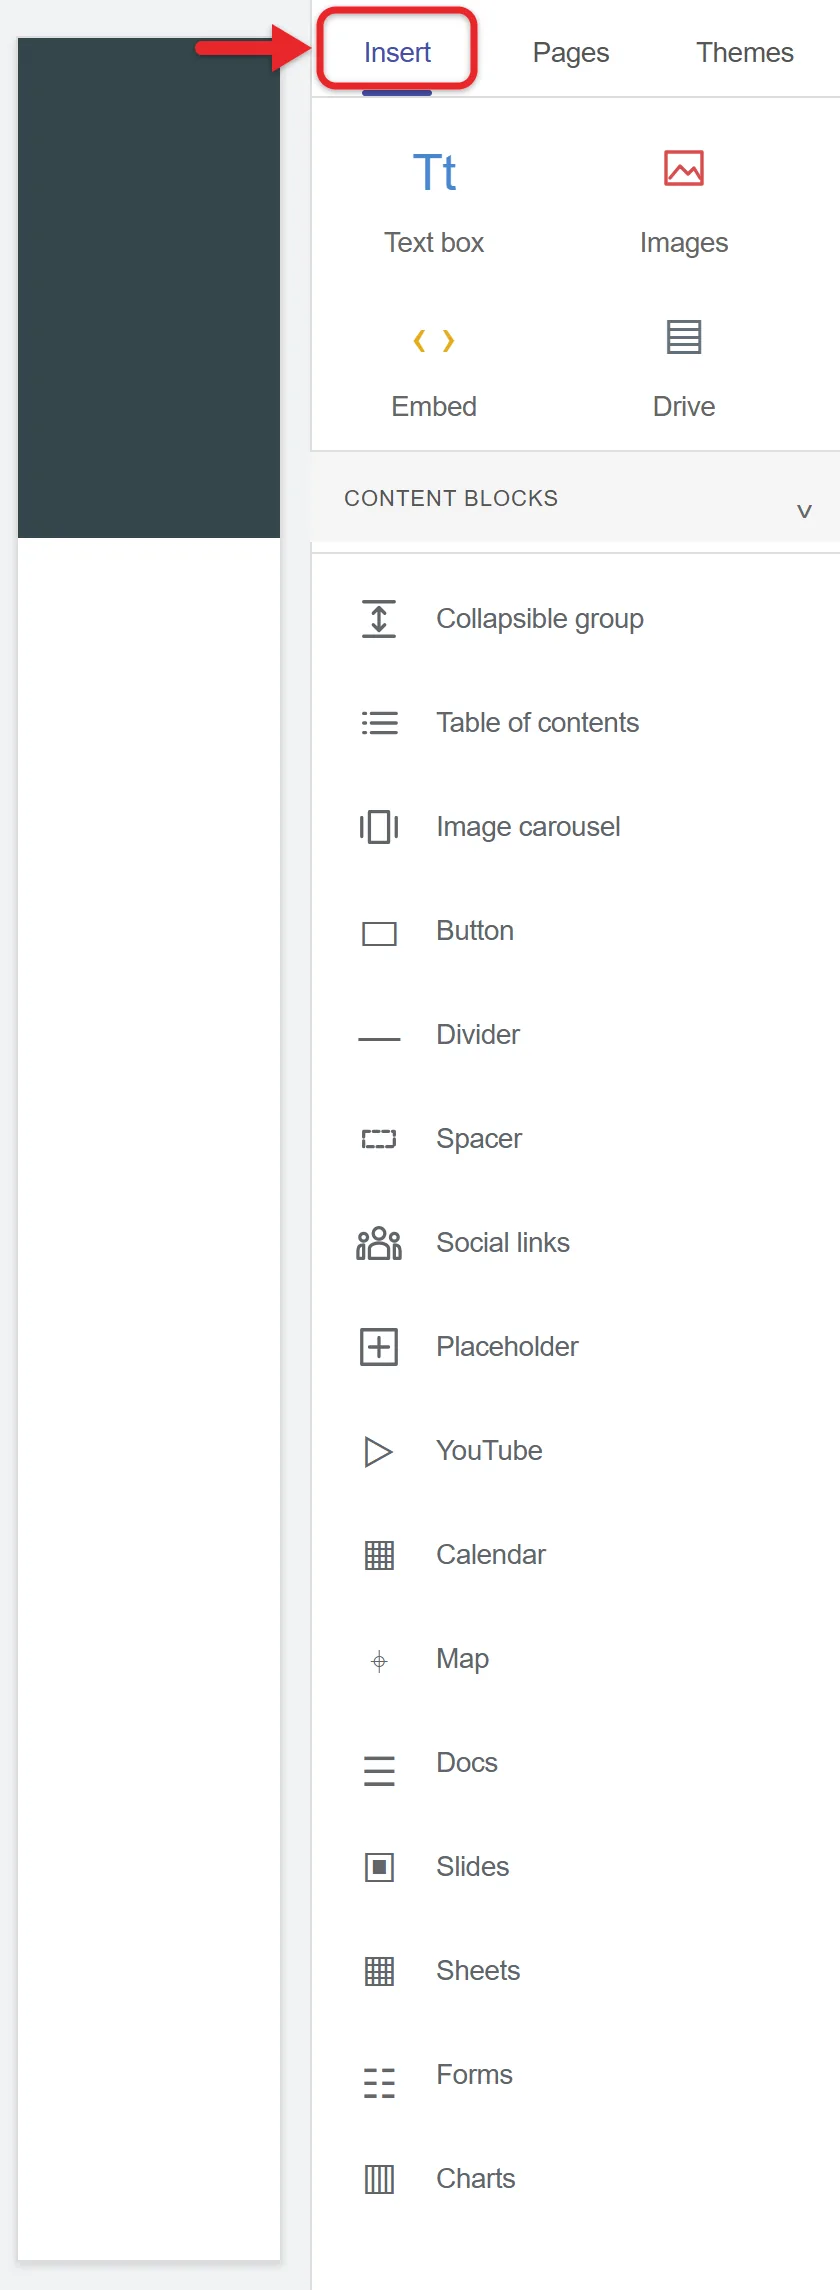
Everything you place on a page comes from the Insert tab on the right. The menu includes:
- Text box for paragraphs. Use the style drop-down to switch between normal text, headings, and a title.
- Images to add a picture from your computer or another source Google offers.
- Layouts under Content blocks, which drop in ready-made arrangements of text and image boxes.
- Collapsible text, Image carousel, Button, Divider, and Social links.
- YouTube, Calendar, and Map to show a video, a Google Calendar, or a location.
- Docs, Slides, Sheets, Forms, and Charts at the bottom of the menu, plus Drive for any other file.
To add something:
- Click Insert on the right.
- Click the item you want. For a file, video, or map, choose it in the window that opens and click Insert or Select.
- Drag the new box into place on the page. The page snaps items to a grid, and guides show where they’ll land.
- Drag a corner handle to resize the box, then click it and type if it holds text.
Embedding a sign-up form is a common use. Here’s how to create a survey with Google Forms that you can then insert from the Forms option.
Embed Content From Other Websites
To show something from another site, click Insert > Embed. On the By URL tab, paste a web address and click Insert. If a service gives you code to paste, such as a booking widget, switch to the Embed code tab, paste it, click Next, and click Insert.
Google’s embed help page says the code can include HTML, CSS, and JavaScript, as long as JavaScript sits inside script tags and CSS sits inside style tags. Some websites block embedding, and only that site’s owner can change it.
Check file sharing before you publish. Embedded Drive files are visible only to people who already have access to the file. If visitors see a request for access instead of your document, change the file’s sharing in Drive, or publish it to the web from Docs, Sheets, or Slides first.
Step 5: Add and Organize Pages
- Click Pages on the right.
- Point to Add (the plus sign) at the bottom right and click New page.
- Enter a page name and click Done. The page appears in the list and in the site menu.

From the same Add button you can also create a New menu section (a drop-down heading that holds other pages), a New link to another website, or a Full page embed that fills a page with content from another site.
Click More (three dots) next to a page for other options:
- Add subpage places a page under it. Google allows up to five levels.
- Duplicate page copies the page and its layout, which saves time on similar pages.
- Hide from navigation removes the page from the menu, but anyone with its link can still open it. The home page can’t be hidden.
- Delete removes the page. You can get it back by restoring an earlier version (see Version History below).
Drag pages in the list to change their order, or drag one onto another to make it a subpage. The menu updates by itself, using the page names. To move the menu from the top of the page to the side, open Settings and look under Navigation. Full details are on Google’s Add, delete & organize pages page.
Step 6: Preview Your Site
Preview the site before it goes live:
- At the top of the editor, click Preview.
- At the bottom right, choose a layout to see how the site looks on a phone, tablet or computer.
- To go back to editing, click Exit at the bottom right.
You can spot layout problems, like text that wraps badly on a phone or an embed that’s too wide, before anyone else sees them.
Step 7: Publish the Site
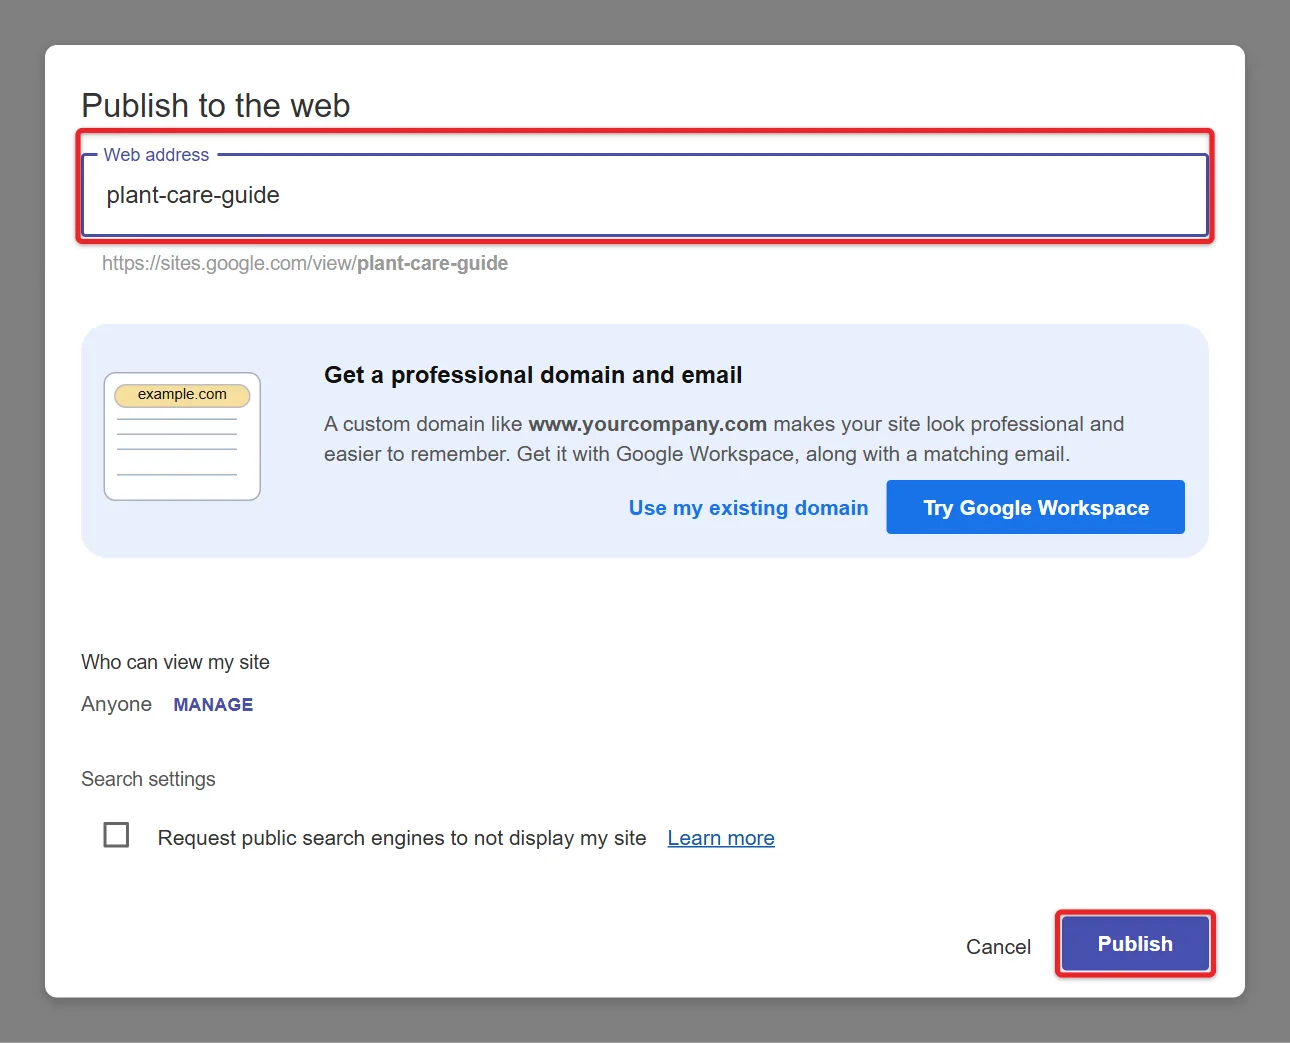
- Open your site in Google Sites on a computer.
- At the top, click Publish.
- Enter the web address you want for the site. Google won’t allow terms that violate its Acceptable Use Policy.
- Click Publish.
- Optional: visit the web address to make sure the site is published correctly.
Your site is live at its Google Sites address. Personal accounts get an address that starts with sites.google.com/view/, while work and school sites usually include the organization’s domain.
If the address you want is one you’ve used before for another site you own, you have to change that other site’s address, or permanently delete that site, before you can reuse it.
Step 8: Choose Who Can See Your Site
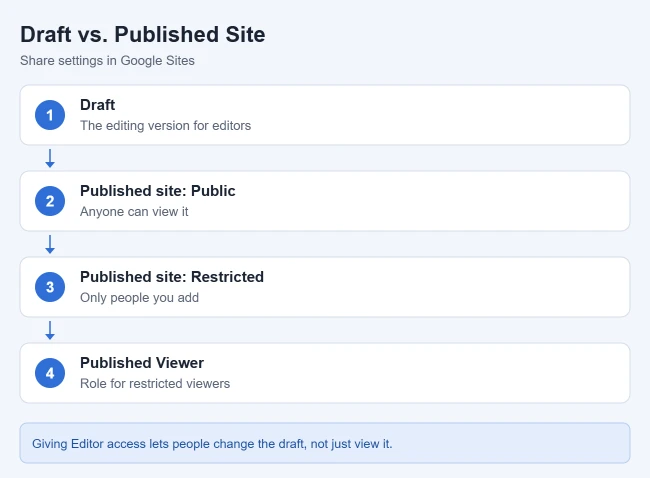
Publishing a site and making it public are separate settings. A site can be published but still restricted, especially on a work or school account, so check this step even after you’ve clicked Publish.
- Open the site in Google Sites on a computer.
- At the top, click Share.
- Next to Published site, open the drop-down list and select Public or Restricted. Work and school accounts may show other options.

- Click Save or Done.
If you chose Restricted, you can add specific people or groups. Enter a name or email address, choose Published Viewer from the drop-down, and click Send. Check Notify people if you want them to get an email.
A public site can be opened by anyone with the address. A restricted site can only be viewed by the people you added.
Draft Access vs. Published Access
Google Sites has two versions of every site: the draft you edit and the published site visitors see. Google’s Invite others to edit your site article explains that the Links section of the Share window has separate settings for each. The draft setting controls who can edit with a link, while the published setting controls who can view. People sometimes open up the draft by mistake, which gives others editing access instead of just letting them see the site.
Invite Someone to Help Edit
To build the site with someone else, click Share, enter their email address under Share with people and groups, choose Editor, and click Done or Send. Editors can work on the draft at the same time as you. Google also lets owners uncheck Editors can publish, change permissions, and add new people if you want to be the only one who publishes.
How to Publish Changes to a Site That’s Already Live
Edits you make in Google Sites save to the draft automatically, but visitors don’t see them right away. According to Google’s How to use Google Sites overview, you publish your changes by clicking Publish at the top right again.
The live site updates to match your latest draft.
Once the site is public, you can test how fast its pages load with Lighthouse in Chrome or PageSpeed Insights.
Version History: Undo a Mistake
Google Sites keeps earlier versions of your draft, so a deleted page or a bad edit isn’t permanent.
- In the editor, click More (three dots) at the top right, then Version history.
- Click the arrow to expand detailed versions in the right sidebar, then click an earlier version.
- At the top left, click Restore this site version and then Restore to bring back the whole site, or Restore this page version and then Restore page to bring back one page.
- Click Publish so visitors see the restored version.
You need edit access to see version history. To name an important version, click More next to it, then Rename. These steps come from Google’s Find what’s changed in a site page.
How to Change Your Site’s Web Address
- Open the site in Google Sites on a computer.
- At the top right, next to Publish, click the drop-down arrow and choose Publish settings.
- Under Web address, enter the new address.
- Click Save.
Old links and bookmarks to the previous address will stop working after the change, so update anywhere you’ve shared the link.
Use Your Own Domain
To use an address like www.yourname.com instead of a Google Sites address, follow Google’s custom domain guide. The short version: open Settings > Custom domains, click Start setup, enter the domain, and follow the on-screen instructions for your domain registrar. Keep these points from Google in mind:
- Only the site owner can connect a domain, and work or school accounts may need an administrator to allow it.
- Google may ask you to verify that you own the domain in Google Search Console first.
- The address needs a subdomain such as www. A bare domain like yourname.com isn’t accepted on its own.
- The site must be shared publicly, or visitors are sent back to the sites.google.com address.
- Changes can take up to 48 hours to show up. An Invalid DNS error means the record your registrar needs hasn’t been added or hasn’t taken effect yet.
If you build your own pages and rent web hosting instead of using Google Sites, you’d upload the files to a web server with FileZilla.
Keep Your Site Out of Search Results
If you don’t want the site to show up in search engines, Google offers an opt-out for sites that are public on the web.
- Open the site in Google Sites on a computer.
- At the top, next to Publish, click the down arrow.
- Click Publish settings.
- Click Request public search engines to not display my site.
- Click Save.
This is only a request and doesn’t guarantee the site won’t appear in public search engines. If you do want people to find the site, leave this unchecked and keep the site public. New sites can take a while to appear in search results.
How to Unpublish a Google Site
You can take a site offline by clicking the arrow next to Publish and choosing Unpublish. The site is no longer available to visitors, but you can still edit and preview it, and you can publish it again later. To remove a site for good, delete it as described in Google’s Create, name, delete, or copy a site page.
When People Can’t Open the Site
- People can’t open the site: Click Share and make sure Published site is set to Public. If it’s Restricted, only the people you added can see it.
- Your changes don’t show up: Click Publish again. Edits stay in the draft until you do.
- The web address is taken: Pick a different address, or free up an address you own by changing or deleting the site that uses it.
- An embedded file asks visitors for access: Change the file’s sharing in Google Drive so the people who view the site can open it.
- An embedded website shows an error: That site doesn’t allow embedding. Link to it with a Button or a New link page instead.
- An image won’t upload: Save it as .jpg, .png, or .gif and try again.
- You can’t add people or change settings: On a work or school account, your admin may limit sharing. An owner may also have unchecked Editors can publish, change permissions, and add new people, which blocks editors from changing sharing.
- The site title doesn’t show: Add a second page. The site name appears once the site has two or more pages.
Google Sites Questions
Is it free to publish a Google Site?
You can build and publish a site at a sites.google.com address with a free Google account. A custom web address means buying a domain. Google’s custom domain guide says you can buy one through a Google Workspace plan, which is a paid subscription, or use a domain from another registrar.
Can I let someone edit my site without making it public?
Yes. In Share, enter their email address under Share with people and groups and choose Editor. Editors without a Google account can view a draft but can’t edit it. The published site’s visibility is a separate setting.
Can I build a Google Site on my phone?
Google’s steps for creating, editing, and publishing all start on a computer. You can open and view a published site in any phone browser, and use Preview on a computer to check how it looks on a phone.
Can I add Google Analytics?
Yes. Open Settings > Analytics in the editor and enter your Google Analytics measurement ID, then publish the site again.
How many pages can a Google Site have?
Google doesn’t list a page limit on its help pages, but it does limit nesting to five levels of subpages. Very large sites are easier to manage in a full content management system.
More Google Guides
- How to download a folder in Google Drive
- How to upload a PDF to Google Drive
- How to get a shareable link for a Google Sheets file

Matthew Burleigh is the founder, head writer, and editor of Solve Your Tech, which he launched in 2012. He has written technology tutorials since 2008 and worked in IT since 2003, including small-business support, IT management, and consulting. He holds Bachelor’s and Master’s degrees in Computer Science from Arizona State University.
Matthew writes practical guides for Windows, iPhone and iPad, Microsoft Office, Outlook, Google apps, and Android. Solve Your Tech’s guides are checked step by step against the device or app maker’s own documentation and tested on his own devices whenever he has the hardware or software, with clear steps, sources, and update dates.
Read more about Matthew and how Solve Your Tech writes and updates its guides, or report a correction.