While some people may keep the same email account for a really long time, it’s not uncommon for you to create a new email account, or start using one for work or an organization.
When you switch emails on your iPhone, however, you may have set up forwarding, or you simply no longer wish to see the mail for the old account.
Our tutorial below on how to turn off email on iPhone will show you a quick way to shut off mail on your phone so that it stops coming to your inbox.
How to Turn Off Mail on an iPhone in iOS 15
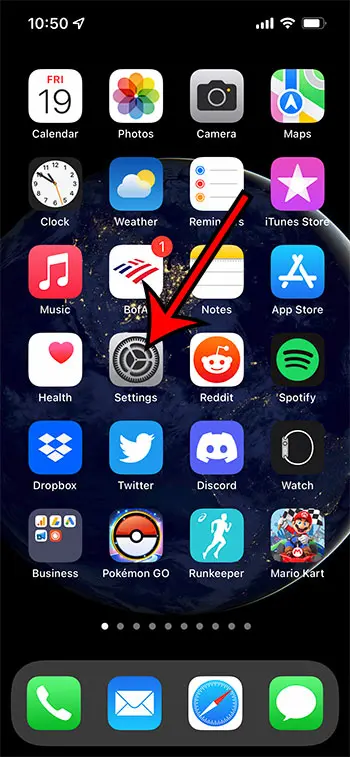
- Open Settings.
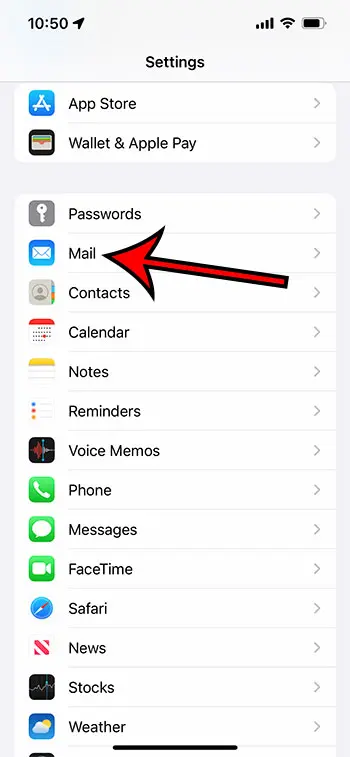
- Choose Mail.
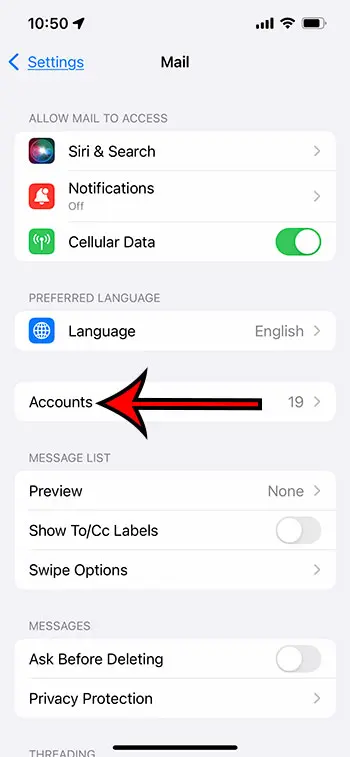
- Select Accounts.
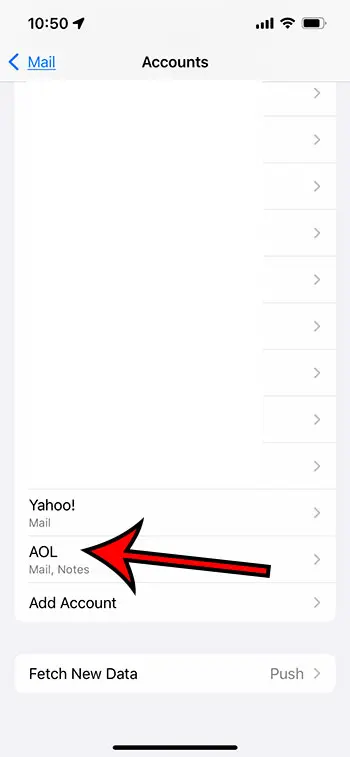
- Touch the account.
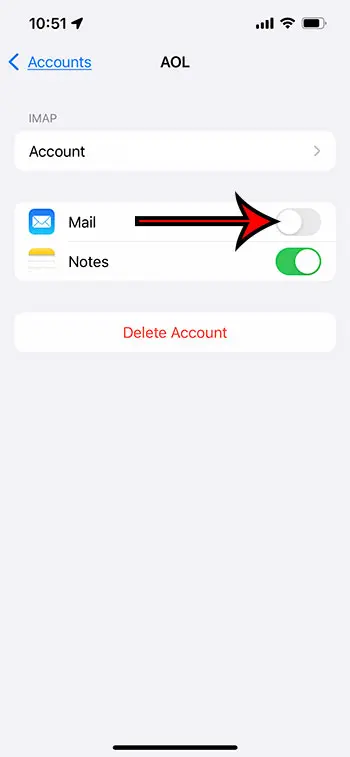
- Tap the button next to Mail.
Our guide continues below with additional information on turning off mail on an iPhone, including pictures of these steps.
If you are trying to consolidate email accounts, then our Yahoo Mail different account guide can show you one way to simplify the process of managing them.
Do you have an email account on your iPhone that only receives junk mail or spam? You could delete the account from your iPhone if you aren’t using it, but you may simply prefer to turn off mail for the account instead.
It’s entirely possible that you have more than one email account that you use every day. You may have a personal account, a work account, an account for an organization, or an old email account that you have stopped using, but which still received messages from older accounts that you set up using that email address.
But while you aren’t ready to cancel the email account or delete it from your iPhone entirely, you may be looking for a way to turn off email on your iPhone for that one account.
This can be a preferable option if you are syncing other items from the account, such as notes or contacts, or if you like to send emails from the account. Plus, if you decide later that you want to start receiving mail on that account again, you can simply follow the steps below again to turn mail back on.
Is your calendar adding holidays on its own? Our remove holidays from iPhone calendar guide can help you to get rid of them.
How to Disable Email on iPhone (Guide with Pictures)
The steps in this section were performed on an iPhone 11 in iOS 15.0.2. These same steps will work on most other iPhone models in most other recent versions of iOS.
Step 1: Open the Settings app on your iPhone.
Step 2: Scroll down and select the Mail option.
Step 3: Touch the Accounts button near the top of the screen.
Step 4: Select the account for which you wish to turn off email.
Step 5: Tap the button next to Mail to turn it off.
You can also choose to turn off any other options that appear on this menu, including Notes, Calendar, Contacts, and more. The options that are available will depend on the type of email account that you are turning off.
The section below shows you the slightly different steps to perform this action on an iPhone using a much older version of iOS.
Old Method – How to Turn Off Email on an iPhone Without Deleting an Account
The steps in this article will stop your iPhone from downloading new emails. This will not cancel or delete your email account, and you will still be able to view new email messages from your computer, or from other devices to which you have synced your email account.
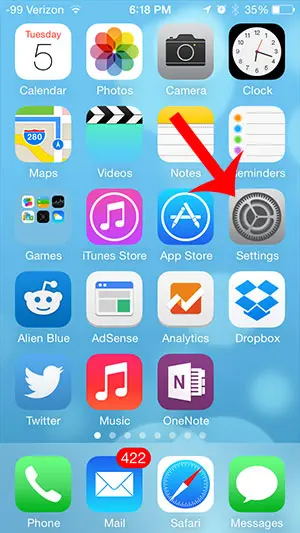
Step 1: Tap the Settings icon.
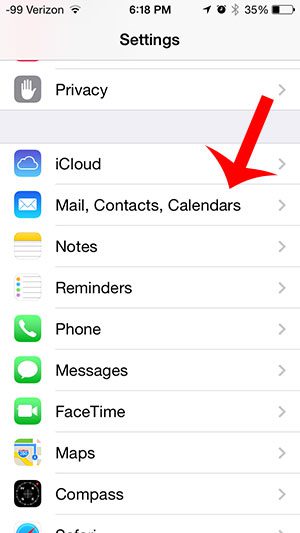
Step 2: Scroll down and select the Mail, Contacts, Calendars option.
Step 3: Tap the email account that you want to turn off.
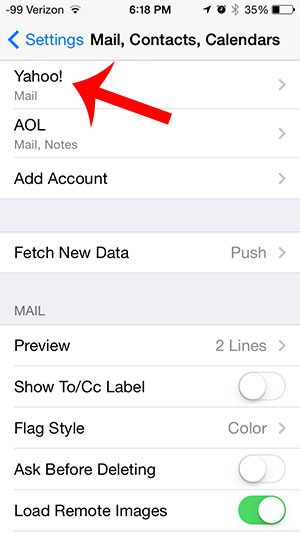
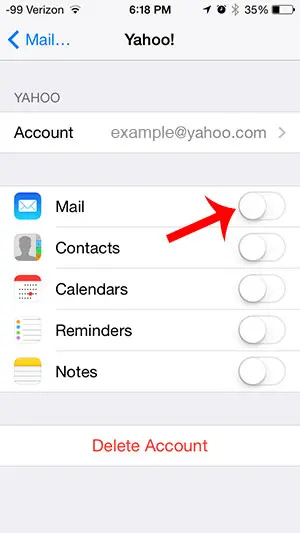
Step 4: Tap the button to the right of Mail to turn it off.
You will know that it is turned off when there is not any green shading around the button.
Now that you know how to turn off Mail on iPhone, you can use this option to easily stop receiving emails from an account on your device.
The next section will show you how to turn off Apple Mail notifications.
Do you have apps that you don’t use anymore? You can read this how to remove apps from iPhone 8 article and learn how to delete them.
How to Turn Off Email Notifications on an iPhone
If you don’t want to disable your email accounts on your device but you would like to stop seeing notifications every time you receive a message, then you will need to change a different setting.
- Open Settings.
- Choose Notifications.
- Select Mail.
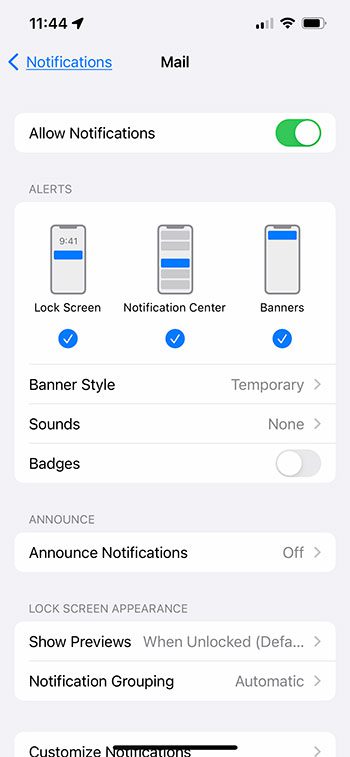
- Adjust the notification settings as needed.
You can disable notifications entirely for all accounts configured on the device if you choose the Allow Notifications option at the top of the screen.
If you have more than one email account on your iPhone then you can choose the Customize Notifications option at the bottom of the screen, then choose the email account for which you would like to set up different notifications.
I personally turn off all of my email notifications, but the exact combination of settings that you choose will depend on how you wish to be informed about new emails. For example, you might want to turn off the badge app icon if you don’t want to see the circle with the number on it appear on the Mail app.
More Information on How to Turn Off Email on iPhone
Choosing to temporarily disable the receipt of new messages on your iPhone can best be accomplished using the steps outlined in this article. If you need to stop receiving email because it’s downloading too much data or because you are getting inundated with a lot of unwanted messages then this can give you a break so you can attempt to resolve the issue.
If you can’t tap Mail on your home screen because the app has been moved to a different location then you can swipe down from the top of the screen to open the Spotlight Search menu, then type mail into the search field and choose the app icon from the list of search results.
You will notice that your iPhone will already filter junk mail or spam mail into the appropriate folders within your email account. This action is performed on your email server and is not done specifically by the iPhone.
If you see junk mail in your inbox and want to mark it as spam then you can swipe left on the message and select the Move to Junk or Mark as Spam option that you see. The exact wording will depend on the type of account you are using.
You may have noticed that there is a Delete Account button when you open the screen where you disable mail on your iPhone. If you tap that button you will be able to delete the email account from your iPhone. This means that you will stop receiving emails at all, not will you will be able to access any notes, calendars, or contacts associated with that account.
However, this does not completely delete the email account. You will still be able to access it in a Web browser, or from other Apple devices like an iPad or an iPod Touch. If you want to completely delete the email account then you will need to do so from the email provider’s website. The method for doing this is going to be different for each email provider, but you should be able to find it on the account settings screen.
Do you want to completely delete an email account from your iPhone? Read this to learn how to delete a Gmail account from your iPhone. The steps are the same for other types of email accounts.
Frequently Asked Questions About How to Turn Off Emails on iPhone
Can I disable the Mail app on the iPhone?
Yes, you can disable the Mail app on an iPhone with the Screen Time function.
If you go to Settings > Screen Time and turn it on, you can then select the Content & Privacy Restrictions option, choose Allowed Apps, then turn off the Mail app.
Can I delete the iPhone Mail app?
if you don’t want to use the mail app at all on your device, then you can choose to remove it.
Tap and hold on the Mail icon on your Home screen, then select the Remove App option.
You can then tap Delete App to uninstall it from the device.
If you want the app back in the future then you will need to download it from the App Store.

Matthew Burleigh has been writing tech tutorials since 2008. His writing has appeared on dozens of different websites and been read over 50 million times.
After receiving his Bachelor’s and Master’s degrees in Computer Science he spent several years working in IT management for small businesses. However, he now works full time writing content online and creating websites.
His main writing topics include iPhones, Microsoft Office, Google Apps, Android, and Photoshop, but he has also written about many other tech topics as well.
