Text that you copy from other locations, like a Web page or another document, will usually have some formatting applied to it.
As you are finalizing your document you will find that you need to remove that formatting to give the entire piece of work its own cohesive appearance.
Many of the formatting options in Word documents can be removed using specific settings found within the various menus of the application.
Our tutorial below will show you how to remove underline in Word by selecting the underlined text and changing the formatting style applied to it.
How to Remove Underlining in Word
- Open your document.
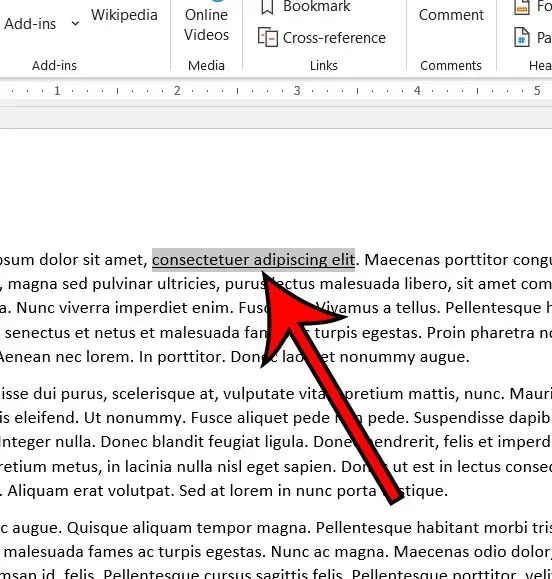
- Select the text with underline formatting.
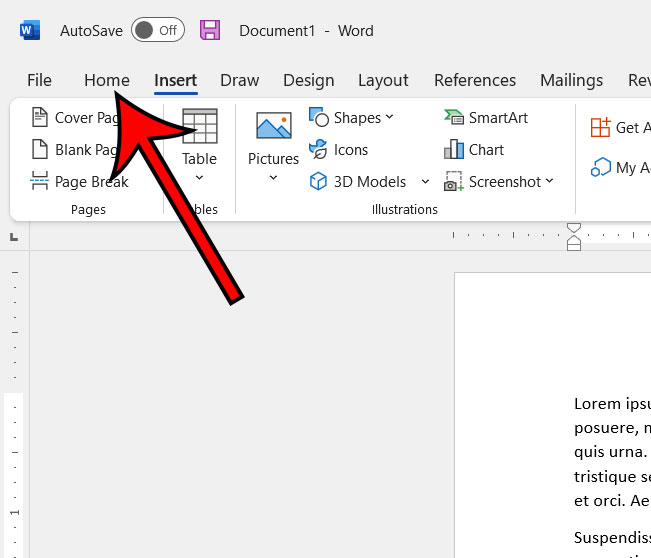
- Click the Home tab.
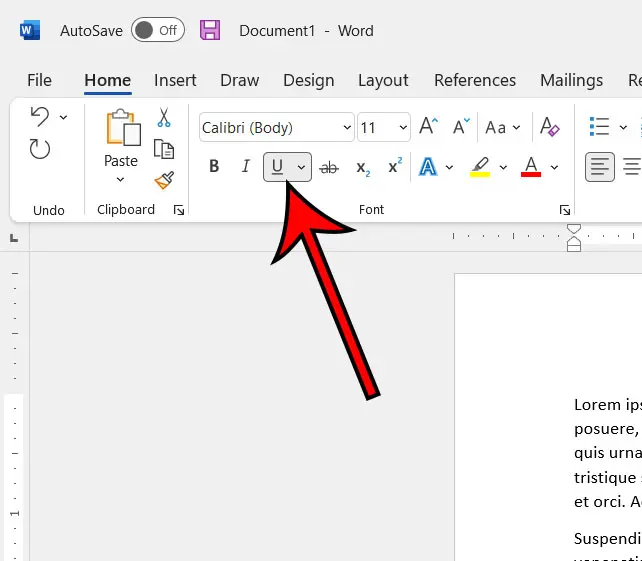
- Click the Underline button.
Our guide continues below with additional information on how to remove an underline from a Word document, including pictures of these steps.
if you need to remove other types of lines from your document as well, then read our how to remove table borders in Word article.
When you start writing a document in Microsoft Word you will be typing unformatted text into the body of the document. This is going to use the default font, font size, spacing, and other options that are defined by the normal template.
But as you start to apply formatting options to your document you might change your mind and want to get rid of some of it. If you previously applied underlining and have changed your mind, then you might want to clear that underline formatting from a selection in your Word document.
Fortunately, you can accomplish this by using the same process of selecting the text and clicking the underline button that you had likely used initially to apply that underlining. Our guide below will provide you with additional guidance on accomplishing this task.
Read our guide on how to delete Word documents if the folder where you store your documents is becoming too full or disorganized.
How to Get Rid of Underline Formatting in a Microsoft Word Document (Guide with Pictures)
The steps in this article were performed in the Microsoft Word for Office 365 version of the application but will work in other versions of Microsoft Word as well.
Step 1: Open your Microsoft Word document.
Step 2: Use your mouse to select the text that contains the underline formatting that you would like to remove.
if your entire document is underlined you can press Ctrl + A to quickly select the entire document.
Step 3: Click the Home tab at the top of the window.
Step 4: Click the Underline button (the one that looks like a capital U) in the Font group of the ribbon to remove the underline.
Our article continues below with more on removing a horizontal line from your document, as well as steps on how to remove an underline if it’s part of a hyperlink.
Is Word typing over existing content in your document? Our why does Word delete letters when I type guide can help you fix that problem.
How to Delete a Horizontal Line in Word 2016
Sometimes you may have a horizontal line in your document that either you or someone else used as either a stylistic choice or a visual separator of sections in the document.
You can remove a line like this by clicking at the start of the line below it, then pressing the Backspace key on your keyboard a couple of times.
If the horizontal line was added by typing three dashes, then you may also need to delete those dashes.
if you can’t delete the line with the Backspace key then it might be a paragraph border. If so you will need to click inside the paragraph above the border. You can then click the Home tab, click the down arrow next to the Borders button in the Paragraph group of the ribbon, then select the Borders and Shading option.
You can then click the None option under Setting at the left side of the Borders and Shading window, then click the OK button.
Related: This how to double underline in Excel article will show you how to use an interesting formatting option in the spreadsheet application.
How to Remove the Underline from a Hyperlink in Word
If you have a hyperlink in your document and you want to remove the entire hyperlink, then you simply need to right-click on the link and choose the Remove Hyperlink option.
However, if you want to keep the hyperlinked part of the selection, and just remove the underline aspect of the hyperlink, then you might be running into some issues.
Depending on how to hyperlink was applied and how your text is selected, you may be able to remove the underline from the hyperlink by clicking the Underline button or pressing Ctrl + U a couple of times until the underline is gone. But if you have a lot of hyperlinks this can be a little tedious, so there’s another option.
Microsoft Word applies hyperlink formatting as a style, so removing the underline from it with the steps that we incorporated above may not achieve the result for which you are looking.
Instead, you are going to click the small button at the bottom-right corner of the Styles section in the ribbon of the Home tab. This opens a Styles column at the right side of the window.
Click on a hyperlink in your document, which will make a Hyperlink option appear in the Styles column.
You can then click on the arrow to the right of the Hyperlink option, then select Modify. This opens another window called “Modify Style.” You can then click the Underline button to remove the underline from hyperlinks in your document. Click OK when you’re finished.
More Information on Removing Lines in Microsoft Word
Our guide above has shown you ways to get rid of a line that appears under words (underlining), horizontal lines that appear between paragraphs in your document, and how to delete the underline that is part of a hyperlink.
If one of these options hasn’t helped you to get rid of whatever link you are trying to remove from your document, then it’s possible that it is some other type of formatting. You can clear all formatting from a selection by selecting the Home tab at the top of the window then clicking the Clear All Formatting button in the Font group of the ribbon. It’s the button that looks like a capital A with an eraser next to tit.
Another way that you can remove underlines from a selection is with a keyboard shortcut. You will need to select the text that contains the underline that you want to remove, then press Ctrl + U on your keyboard. You can also use this same process to apply an underline to text that doesn’t have underlining yet.
If you want to use underlining in your document but don’t like the thickness or color of the default underline option in Microsoft Word then you can click the down arrow to the right of the Underline button in the Font group of the ribbon, then choose one of the options there. You could also click the More Underlines option, which opens a Font dialog box. There you will see some different font customization options that you may have been searching for previously.
Conclusion
Hopefully one of the options in the article above has helped you to remove the underline formatting or a non-formatting line from your document.
As we mentioned in the section above, you can always use the “Clear All Formatting” option in Microsoft Word if you are having trouble getting rid of something in a Word document.
The section below provides additional articles about Microsoft Word that can help you to resolve issues that you might be experiencing while attempting to accomplish other tasks in the Microsoft Office word processing application.

Matthew Burleigh has been writing tech tutorials since 2008. His writing has appeared on dozens of different websites and been read over 50 million times.
After receiving his Bachelor’s and Master’s degrees in Computer Science he spent several years working in IT management for small businesses. However, he now works full time writing content online and creating websites.
His main writing topics include iPhones, Microsoft Office, Google Apps, Android, and Photoshop, but he has also written about many other tech topics as well.


