To change the default font in Google Docs, select some text and set the font and size you want, then click Format > Paragraph styles > Normal text > Update ‘Normal text’ to match. Finish with Format > Paragraph styles > Options > Save as my default styles, and every new document you create will start with that font.
These steps are for Google Docs in a web browser on a Windows PC, Mac, or Chromebook, with a personal or work Google account. The Google Docs apps for iPhone, iPad, and Android can’t save default styles, so set your default on a computer. Google documents the commands on its help pages for changing how paragraphs and fonts look and adding titles and headings.
How Default Fonts Work in Google Docs
Google Docs doesn’t have a single “default font” setting. Every document uses a set of paragraph styles: Normal text for body paragraphs, plus Title, Subtitle, and Heading 1 through Heading 6. New documents start with Arial 11 for Normal text, and the style also stores line spacing, paragraph spacing, and text color.
Changing the default is a two-part job:
- Update ‘Normal text’ to match changes the Normal text style in the document you have open. All Normal text in that document switches to the new font.
- Save as my default styles saves that document’s whole style set to your Google account, so new documents use it too.
If you only do the first part, the change stays in one document. That’s the most common reason the default “doesn’t stick.” Picking a font from the toolbar without updating the style changes only the selected text.
Change the Default Font for New Documents
- Open Google Docs at docs.google.com and open any document, or click Blank document to start a new one.
- Type a line of text if the page is empty, then select it by clicking and dragging over it.
- In the toolbar, click the Font menu (it shows Arial in a new document) and choose your font. If the font has a small arrow, point to it and pick a weight such as Light or Bold. Then click the font size box and choose a size. The selected text changes right away.
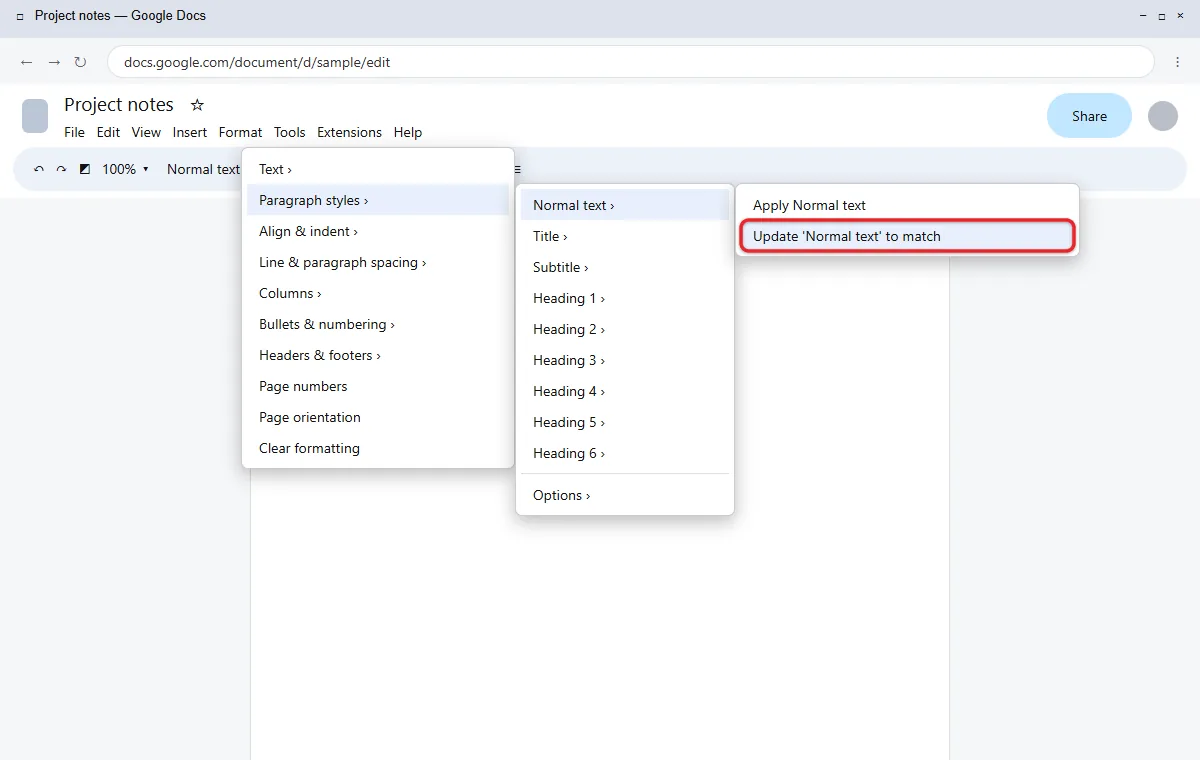
- With the text still selected, click Format > Paragraph styles > Normal text > Update ‘Normal text’ to match. Every Normal text paragraph in the document now uses your font and size.
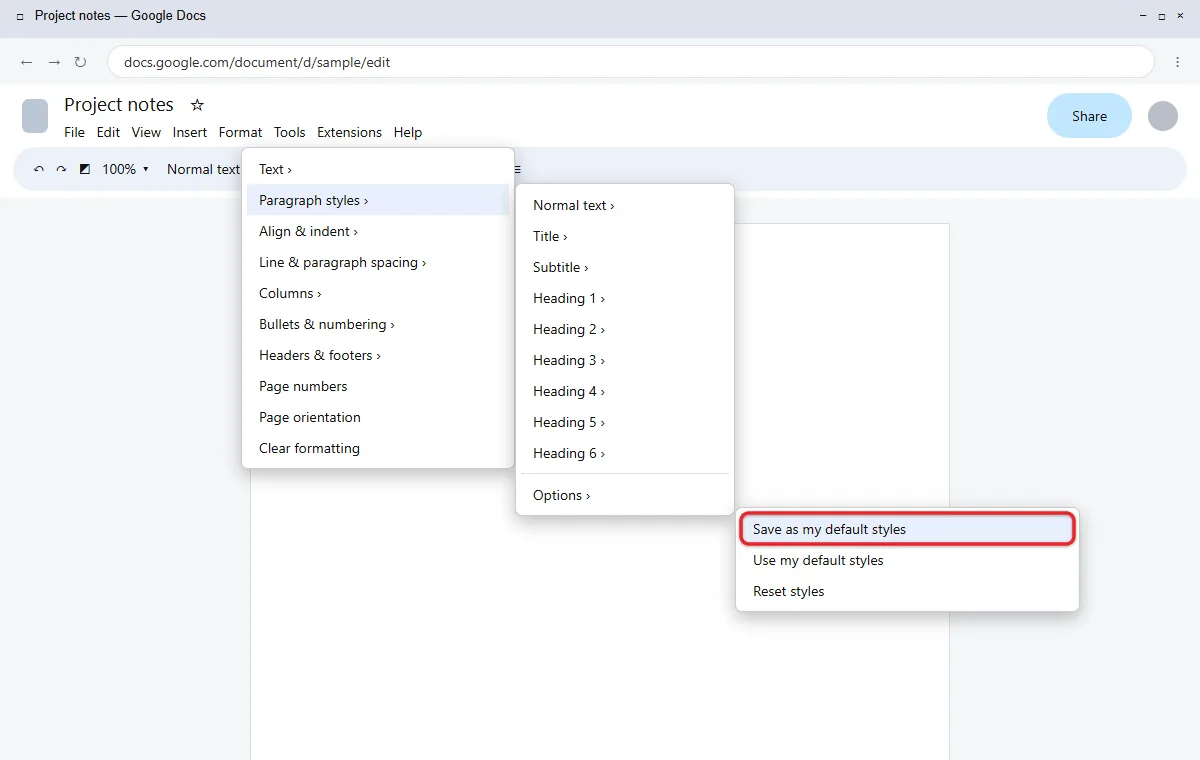
- Click Format > Paragraph styles > Options > Save as my default styles. Nothing visible changes, but your style set is now saved to your Google account.
- Check it by clicking File > New > Document. Type something in the new document. It should appear in your chosen font and size.
You can also set line spacing (Google’s starting value is 1.15), text color, and paragraph spacing on the selected text before step 4. Use Format > Line & paragraph spacing for spacing, or Custom spacing for exact before and after values. Update ‘Normal text’ to match copies all of those settings into the style, not just the font.
A keyboard tip: press Alt + / (Option + / on a Mac) to open the menu search, type the font name, and press Enter to apply it without opening the Font menu.
Set Default Fonts for Headings
Changing the Normal text style also changes the heading fonts, while each heading level keeps its own size. If you want headings in a different font from your body text, update each level:
- Type a heading, apply Heading 1 from the style box in the toolbar (the box that says Normal text), or press Ctrl + Alt + 1 (Command + Option + 1 on a Mac), and select it.
- Choose the font, size, and color you want for that heading level.
- Click Format > Paragraph styles > Heading 1 > Update ‘Heading 1’ to match.
- Repeat for any other levels you use, such as Heading 2 and Title.
- Click Format > Paragraph styles > Options > Save as my default styles once you’ve updated every level you want.
Updating a heading style changes every heading at that level in the current document, which makes it an easy way to restyle a long file in one step. Update Normal text first and headings second, so the Normal text change doesn’t overwrite a heading font you just chose.
Apply Your Default Font to an Existing Document
Saving a default doesn’t change documents you already have. To bring an older document in line:
- Open the document.
- Click Format > Paragraph styles > Options > Use my default styles.
The document switches to your saved style set, including any heading styles you saved. Text that someone formatted by hand, such as a paragraph manually set to Times New Roman, keeps that manual formatting. To clear it, select the text and press Ctrl + \ (Command + \ on a Mac) to remove formatting, and the paragraph falls back to its style.
For more ways to reset stubborn text, read how to clear formatting from a selection in Google Docs.
Restore Google’s Original Font
- Click Format > Paragraph styles > Options > Reset styles. The document returns to Google’s original styles (Arial 11 for Normal text).
- To make the original styles your default again, click Format > Paragraph styles > Options > Save as my default styles.
Resetting and saving are separate steps. If you only reset, new documents keep using the font you saved earlier.
Add More Fonts to the Font Menu
If the font you want isn’t in the menu, click the Font menu and choose More fonts at the top. In the dialog, search by name or filter by type (such as serif, script, or monospace), click the fonts you want to add, and click OK. They then appear in your font list in every document. More fonts is available in supported languages, and the list depends on your language.
Google Docs has no option to upload your own font files, so a font you installed on your computer won’t appear unless it’s also in the More fonts list.
Default Margins and Page Size Are Separate
Paragraph styles cover text only. Margins, paper size, orientation, and the choice between pages and pageless format live in File > Page setup. Make your changes there and click Set as default, and Google applies those page settings to new documents you create. You can set both kinds of defaults, and neither one replaces the other.
If Your Default Font Doesn’t Work
- New documents still use Arial. You updated Normal text but didn’t save it. Open the document with your formatting and click Options > Save as my default styles.
- Documents from a template use a different font. Templates from the template gallery carry their own styles. Open the document and use Options > Use my default styles.
- Pasted text keeps another font. Copied text brings its formatting with it. Paste with Ctrl + Shift + V (Command + Shift + V on a Mac) to paste without formatting, so it takes on the Normal text style.
- Your work account ignores your default. Defaults are saved per Google account. If you switch between personal and work accounts, set the default in each one.
- Headings changed when you updated Normal text. That’s expected. Set each heading level again and save your default styles.
- A Word file you opened keeps its own font. Files you open or convert from Word bring their own styles. Use Options > Use my default styles after converting.
How to Type Subscript and Superscript in Google Docs
To make text subscript in Google Docs, select it and click Format > Text > Subscript, or press Ctrl + , (Command + , on a Mac).
- Select the characters you want to lower, such as the 2 in H2O. To type new subscript text instead, place your cursor where it should start.
- Click Format in the menu bar, point to Text, and click Subscript. For raised text, such as the 2 in x2, click Superscript instead.
- Type your text if you started from the cursor. It appears smaller and below the line (or above it for superscript).
- Press the same shortcut again, or click the same menu item, to go back to normal text.
Google’s Google Docs keyboard shortcuts list gives Ctrl + , for subscript and Ctrl + . for superscript on a PC or Chromebook, and Command + , and Command + . on a Mac. Subscript and superscript are character formatting, so they don’t change your Normal text style or your default font.
Google Docs Default Font Questions
Can I change the default font in the Google Docs app?
Not directly. The iPhone, iPad, and Android apps let you change the font of selected text (tap the A format button, then Text), but they don’t have the options to update or save paragraph styles. A simple workaround on your phone is to keep one document set up with your preferred fonts and use More > Make a copy whenever you need a new one. On a computer, the same idea works with File > Make a copy.
Does changing the default font change my old documents?
No. Your saved default only applies to new documents. Use Format > Paragraph styles > Options > Use my default styles in each older document you want to update.
What is the default font in Google Docs?
New documents start with Arial, size 11, for Normal text until you save your own default.
Can I change the font for a whole document without changing the default?
Yes. Press Ctrl + A (Command + A on a Mac) to select everything, then pick a font and size in the toolbar. That changes this document only.
Will people I share a document with see my font?
Yes. The font is stored in the document, so collaborators see it. Your saved default only affects documents you create, so teammates who want the same starting font need to save it as their own default.
Excel works differently, with one setting in its options for the default font in Excel.
Slides has its own way to change the font on all slides. And if Docs keeps changing what you type, here’s how to turn off AutoCorrect in Google Docs.
For email, you can also change the default font in Gmail so new messages match your documents.

Matthew Burleigh is the founder, head writer, and editor of Solve Your Tech, which he launched in 2012. He has written technology tutorials since 2008 and worked in IT since 2003, including small-business support, IT management, and consulting. He holds Bachelor’s and Master’s degrees in Computer Science from Arizona State University.
Matthew writes practical guides for Windows, iPhone and iPad, Microsoft Office, Outlook, Google apps, and Android. Solve Your Tech’s guides are checked step by step against the device or app maker’s own documentation and tested on his own devices whenever he has the hardware or software, with clear steps, sources, and update dates.
Read more about Matthew and how Solve Your Tech writes and updates its guides, or report a correction.