While Microsoft Word can be a pretty intuitive application for many of the documents that you edit, you will inevitably find situations where you can’t fix a problem.
These issues are typically related to formatting choices that you made in the past, or that were made by someone else who has edited the document.
These problems often manifest when you are trying to make layout changes or adjustments to your entire document, but one small part of the document is not being affected by the changes.
One of the more common problems you might encounter can be resolved by following our how to remove section breaks in Word method outlined below.
Our guide continues below with additional how to delete section break in Word information, including pictures of these steps.
I like to use section breaks when I am making a document that contains information on a lot of topics. This allows me to use some additional navigation options, plus it gives me to option to change the formatting for different parts of my document.
Microsoft Word provides many tools that allow you to format the text that you have added to a document. But it also includes some formatting options for the document itself. This can range from things like columns, to other features like section breaks.
A section break in a Word document lets you split up your document into separate parts, which you can then format without affecting the rest of the document. A common use for this is to change the orientation for a single page of your document, while leaving the rest of the document in the current orientation.
But if you have previously created a section break that you no longer need, or if you are editing someone else’s document and wish to remove one of the section breaks they’ve added, then our guide below on how to remove section breaks in Word can help you out.
Full Guide – Removing a Section Break in Word (Guide with Pictures)
The steps in this article were performed in the Microsoft Word for Office 365 version of the application but will also work in most other recent versions of Word.
The next section of this article below provides a quick overview of how to remove a Word section break, but you can continue below to see the full guide with pictures.
Step 1: Open your document in Word.
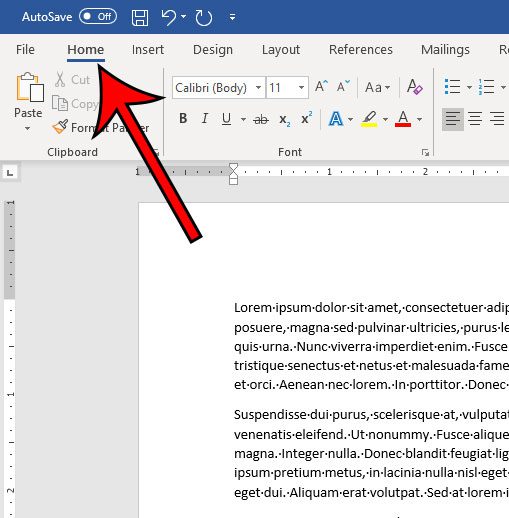
Step 2: Select the Home tab at the top of the window.
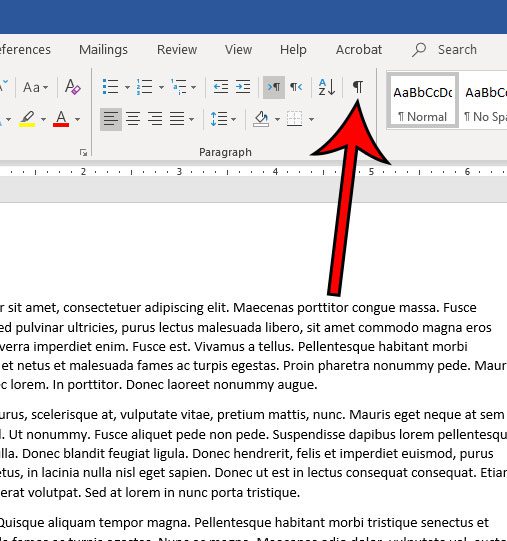
Step 3: Click the Show/Hide button in the Paragraph section of the ribbon.
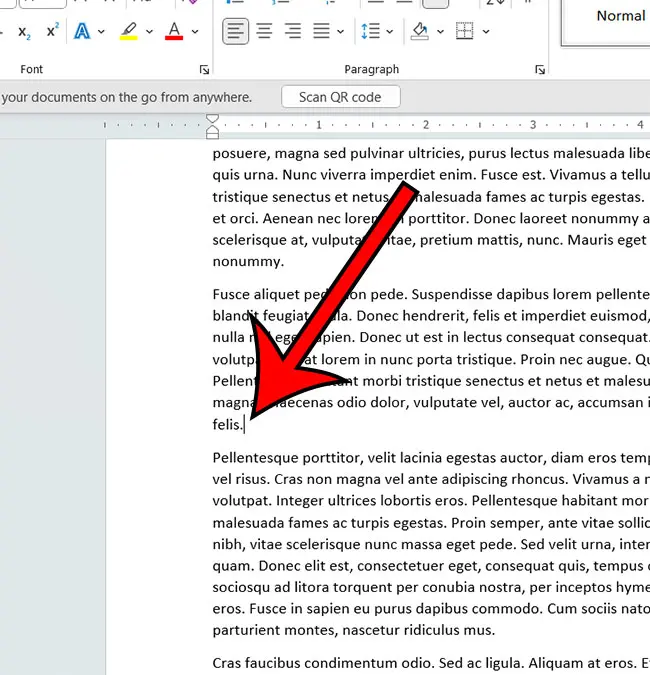
Step 4: Locate a section break in your document, then use your click your mouse on the left side of the break, hold it down, then drag to the right end of the break to select the entire thing.
Alternatively, you can place your mouse cursor at the left end of the break, but you may find that part of the break may remain after deletion.
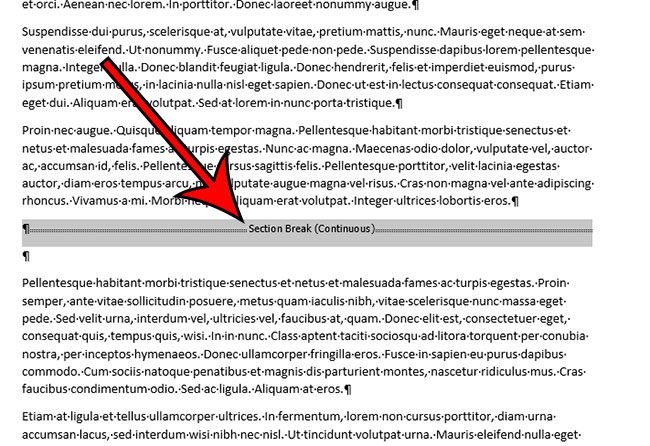
Step 5: Press the Delete key (not the Backspace key) on your keyboard to remove the section break.
If you wish to add another section break to a document, click at the point where you wish to add the break, select the Layout tab, then click the Breaks button and choose the desired type of section break.
Deal of the Day
- HIGH-QUALITY SOUND — Powered by the Apple H1 headphone chip, AirPods deliver rich, vivid sound.
- EFFORTLESS SETUP — After a simple one-tap setup, AirPods are automatically on and always connected. They sense when they’re in your ears and pause when you take them out. And sound seamlessly switches between your iPhone, Apple Watch, Mac, iPad, and Apple TV.
Last update on 2025-07-11 / Affiliate links / Images from Amazon Product Advertising API | As an Amazon Associate, I earn from qualifying purchases.
Now that you are familiar with the how to remove section breaks in Word steps, you will be able to fix random spacing issues that might crop up in documents that you are creating or documents that you are editing which came from other people.
Once you delete a section break, Word will use the formatting from the section after the combined sections. You will need to use the “Link to previous” option instead of deleting the section if you want to use the headers and footers from an earlier section instead.
How to Get Rid of a Section Break in Word on an iPhone
The mobile version of the Microsoft Word application that you use on your iPhone or Android device has most of the features that you would find in the desktop version of the application.
Luckily, this means that you can use this phone version of the app if you want to remove section breaks from a document.
Step 1: Open the Word app on your iPhone.
Step 2: Open the document.
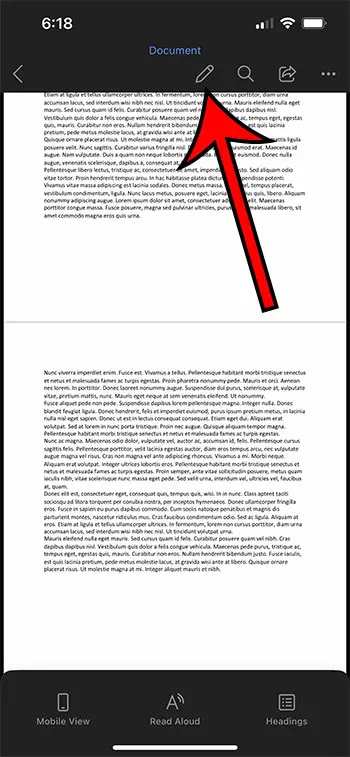
Step 3: Touch the pencil icon at the top of the screen.
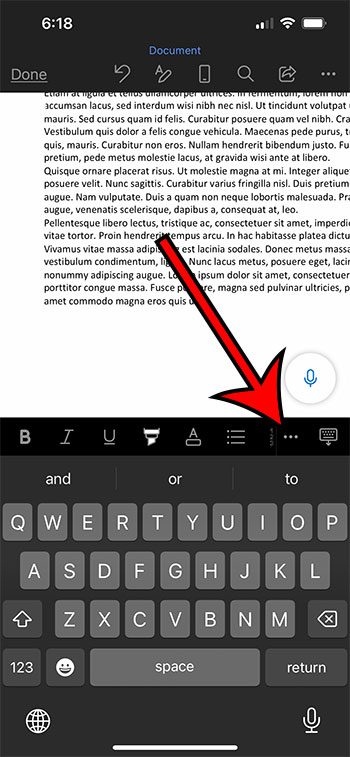
Step 4: Tap the three dots in the horizontal bar in the middle of the screen.
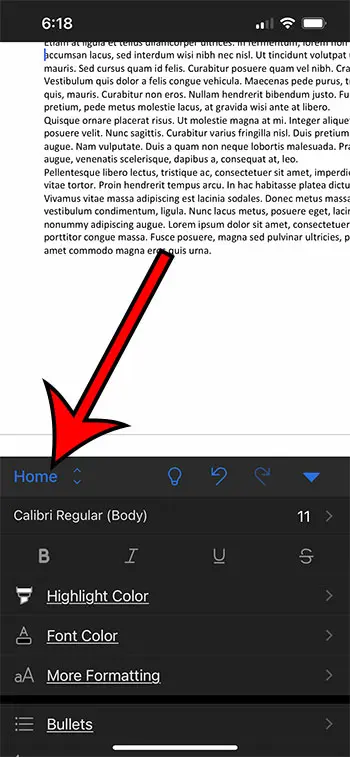
Step 5: Choose the Home option in the horizontal menu bar.
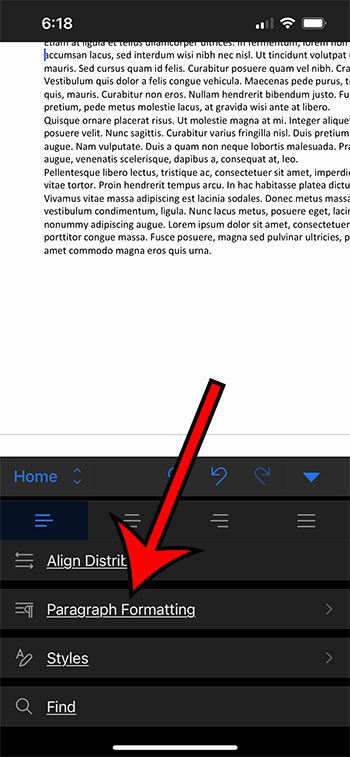
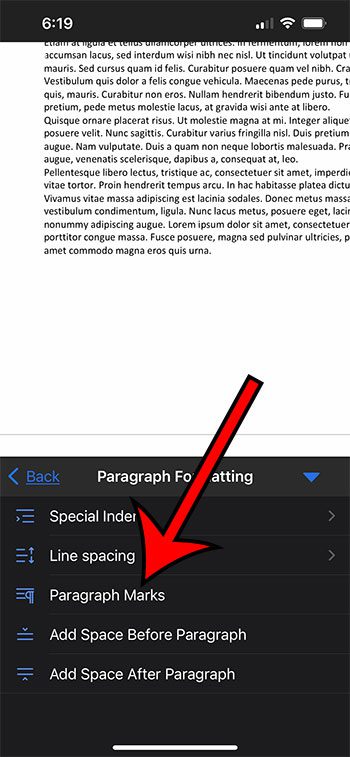
Step 6: Scroll down and select Paragraph Formatting.
Step 7: Tap Paragraph Marks.
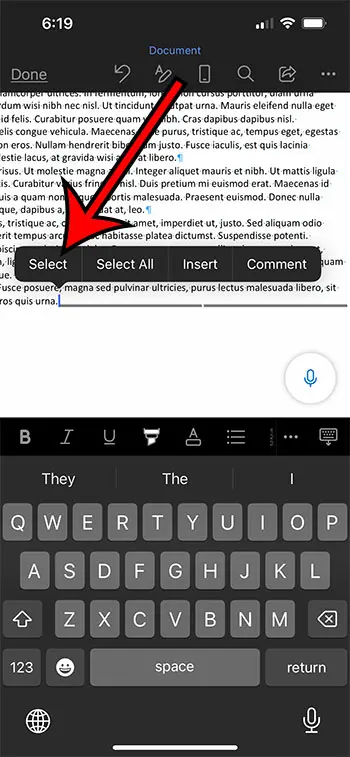
Step 8: Tap and hold on to the section break, then touch Select.
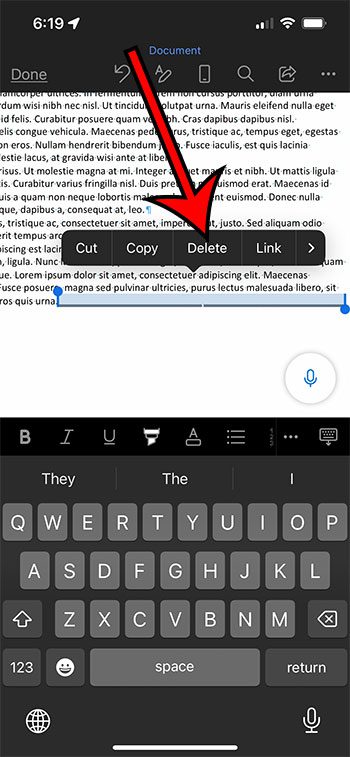
Step 9: Choose the Delete option to remove the break.
Now that you know how to remove section breaks in Word documents on an iPhone, you will be able to edit this type of document formatting from any device.
The next section discusses how to insert a section break in your document.
How to Insert a Section Break in Microsoft Word
While this article has focused on how to delete section breaks from documents, you may be curious about how they got there in the first place if you weren’t the person who added the break to a document.
Step 1: Open your document in Microsoft Word.
Step 2: Click at the point in the document where you want the break.
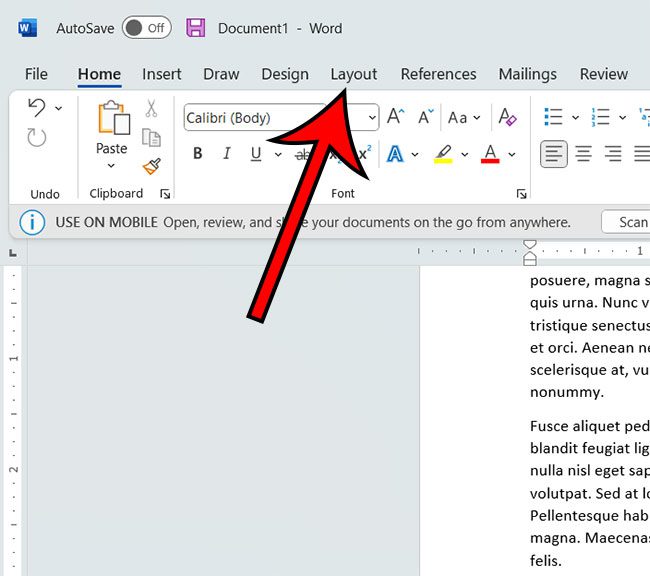
Step 3: Select the Layout tab at the top of the window.
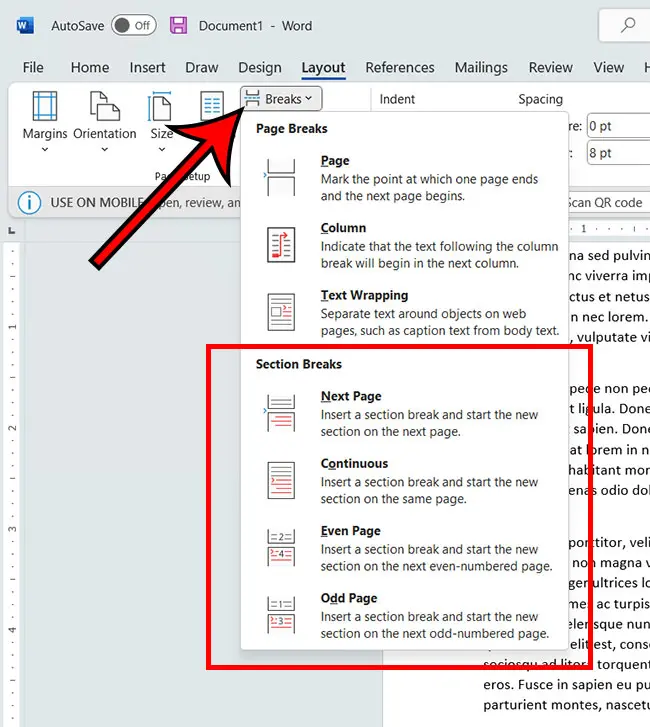
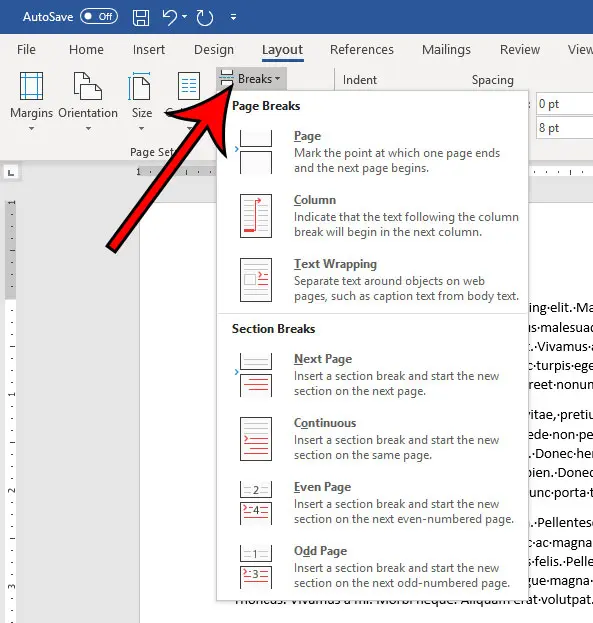
Step 4: Click the Breaks button in the Page Setup group in the ribbon, then select the desired type of section break.
As you can see in the image above, the types of section breaks you can add to a Word document include:
- Next Page – this type of break lets you start the new section on the next page of the document.
- Continuous – this adds a new section on the current page.
- Even Page – this will start the next section on the next even-numbered page.
- Odd Page – this will start the next section on the next odd-numbered page.
Our article continues below with more about these breaks, as well as answers to some common questions about them.
More Information on How to Delete Microsoft Word Section Breaks
When you have displayed the formatting marks in your document, the section break that you are trying to remove will be identified with a word in parentheses after the section break indicator.
If you actually do want a section break in your document, but the one that is there currently isn’t correct, then you will need to delete that section break and replace it with one of the options from the list that you see when you expand the breaks drop down menu.
One other type of similar formatting mark that you might need to remove involves manual page breaks.
These are very similar in that a page break appears at a point within the document where it wouldn’t normally be. These can be seen if a paragraph in your document should be displayed on the same page as the previous paragraph, but has been forced to the next page.
If you would like to remove a page break in Microsoft Word then you can use the steps above to display the paragraph marks in your document, then you can place your cursor below the page break and press Delete on your keyboard. You can also read our how to remove a page break in Word guide for more information.
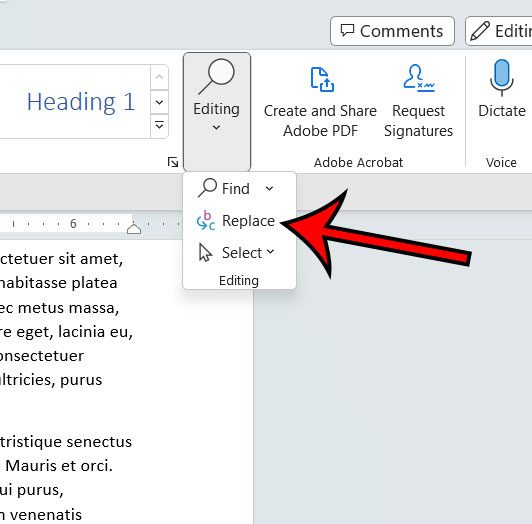
One other way to remove section breaks, especially if you have more than one that you want to get rid of, is with the Find and Replace dialog box. You can find this by selecting the Home tab at the top of the window, then clicking the Editing button in the ribbon and choosing the Replace option.
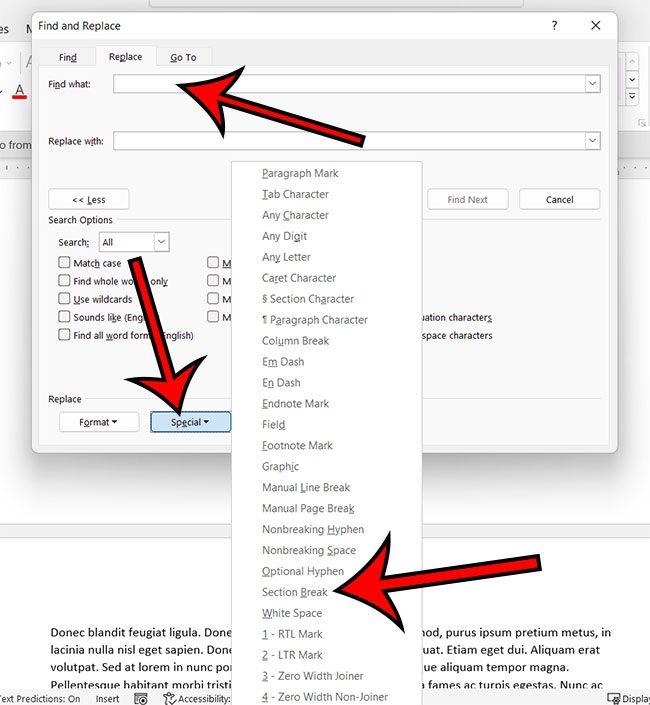
You can then select the More button to expand the Find and Replace box. Next, you will click inside the Find what field, then you will click the Special drop down menu at the bottom of the window and choose the Section Break option.
Finally, you will need to make sure that the Replace with field is empty, then you can click the Find Next button and navigate between the different section breaks in your document and delete them individually. Or you could choose the Replace All button which will delete all of the section breaks in the document by replacing them with nothing, as indicated by the empty “Replace with” field.
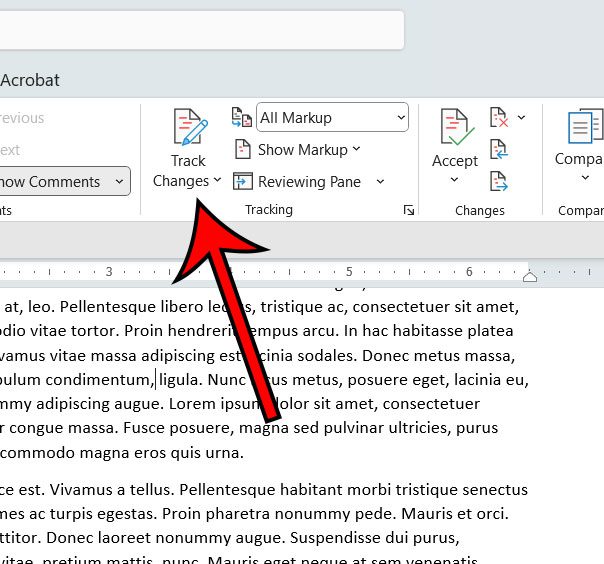
If you are having trouble removing your section breaks, then it might be because you currently have “Track Changes” enabled. You can turn this off by selecting the Review tab at the top of the window, then clicking the Track Changes button in the Tracking group of the ribbon.
If you work with Google Docs in addition to Microsoft Word, then you may want to know how to remove space in Google Docs when the standard options aren’t working.
Does your document have a lot of formatting that is proving difficult to remove? Find out how to clear all formatting in Word if you would rather start over with plain text.
Frequently Asked Questions When Working With Microsoft Word Section Breaks
Why can’t I delete a section break in Word?
After you create a new section break in your document and start making changes or formatting adjustments, you might discover that you no longer actually need to use section breaks.
I’ve run into this problem in the past, and it can be a little frustrating when it seems like you’re doing everything right and it’s still not working.
The main reason why many people can’t delete a section break is that they have the “Track Changes” feature enabled.
You can turn this off by going to the Review tab and clicking the Track Changes button in the Tracking group of the ribbon.
How do I delete all section breaks in a Word document?
If you’ve added more than one section break to your document and you want to get rid of all of them, then you can do so with the Find and Replace tool.
1. Press the F5 key on your keyboard.
2. Select the Replace tab at the top of the Find and Replace window.
3. Type ^b into the Find what field.
4. Click the Replace All button.
You can find the ^ key by holding down Shift on your keyboard and pressing the “6” key.
You can also open the Find and Replace window by selecting the Home tab at the top of the window, then clicking the Editing button and choosing Replace.
How do I delete a section break in Word for Mac?
Select the Home tab at the top of the window, then click the Show/Hide button to display the formatting marks.
You can then click the section break character that you wish to remove, then press the Delete key on your keyboard.
How do I select all sections in Microsoft Word?
If you want to select everything in your document, then you can press Ctrl + A on your keyboard to quickly select all content.
What are the different types of section breaks?
When you start to create different sections in your documents, such as when you want to use different formatting, margins, or other types of section formatting, you might be wondering which one to use.
Microsoft Word has four types of section breaks:
– Next Page – the next section will start on the next page
– Continuous – the next section starts on the current page
– Even Page – the next section will begin on the next even-numbered page
– Odd Page – the next section will begin on the next odd-numbered page
Can I delete a section break in Word Online?
No, unfortunately, the Web version of Microsoft Word does not support the removal of a section break from a document.
You will need to open the Word doc on a desktop or mobile version of the Microsoft Word application if you would like to remove an existing section break from one of your Word documents.
If you have a Microsoft Excel spreadsheet that contains a lot of links, then visit our how to break Excel links guide and learn about a quick way to remove all of them at once.
Removing the page break is another formatting choice you have.
In the event that your papers include any manual page breaks, the next section will explain how to delete them.
Page Breaks in Google Docs: Removing Them
You can manually insert page breaks in Google Docs by choosing Insert > Break > Page break, even though automated page breaks in Google Docs might be useful in a variety of situations.
See our remove page break in Google Docs tutorial for more details.
However, this page split can become problematic if the document’s layout changes.
Fortunately, by taking the following actions, a page break can be avoided:
- First, open the file.
- Place your cursor at the beginning of the first line, just below the page break.
- Hit the Backspace button.
The page break should have disappeared by this point, and the document’s content should flow naturally.

Matthew Burleigh has been writing tech tutorials since 2008. His writing has appeared on dozens of different websites and been read over 50 million times.
After receiving his Bachelor’s and Master’s degrees in Computer Science he spent several years working in IT management for small businesses. However, he now works full time writing content online and creating websites.
His main writing topics include iPhones, Microsoft Office, Google Apps, Android, and Photoshop, but he has also written about many other tech topics as well.


