Normally if you are editing a document that consists of just text, the automatic page breaks that occur when you fill one page will be fine for the document’s layout.
But different documents require different structures, and it’s possible that you will need to manually add a page break in Microsoft Word when you need a new page that isn’t at the end of the previous one.
Our tutorial below will show you how to insert a page break in Microsoft Word using an option that is found on the Insert tab of the application.
How to Put a Page Break in a Microsoft Word Document
- Click at the point in the document where you want to add the page break.
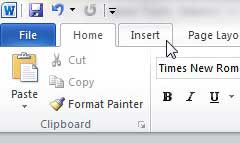
- Click the Insert tab at the top of the window.
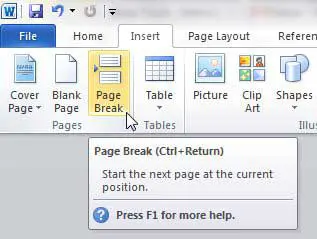
- Click the Page Break button.
Our guide continues below with additional information on how to insert a page break in Microsoft Word, including pictures of these steps.
Does your document have sections it doesn’t need? Read our how to delete section break in Word article for more on how to remove them.
It becomes necessary to know how to insert a page break in Word 2010 when you have something on a current page that you would prefer to display at the top of a new page.
Whether this is a table or the start of a new section or chapter, there are plenty of reasons why you might not want to rely on Word’s automatic method for starting new pages.
The default action in Microsoft Word 2010 is for a new page to be created when the previous page has been filled.
When you are typing a regular paper or report that follows the typical Word layout this is probably fine but, occasionally, you will need to force Word 2010 to start a new page.
This is accomplished with a page break, which is a command that you insert into your Word 2010 document that tells the program that the current page has ended, and you want to begin typing on a new page.
In situations where a page has an atypical structure, this can be helpful, such as a table of contents or a title page, or when you want to isolate an object on its own page, such as a large image.
You can learn more about how to insert a page break in Word 2010 by following the procedure below.
Do you edit documents in Google Docs, too? Our insert page break Google Docs guide can show you how to do this in that application as well.
How to Add a New Page in Word 2010 (Guide with Pictures)
A page break is not a command that tells Word to skip a designated amount of space in your document but is simply an early indicator that the current page has ended.
Therefore, if you need to add information to a page in which you have inserted a page break, you can add it before the page break without altering the structure of the data that begins on the next page.
The only instance where that is not the case is if you add so much information that the page break is pushed to the next page, in which case the page break will occur on that page instead, forcing the data after the break to the next page again.
Step 1: Open the document in Word 2010.
Step 2: Scroll to the page in which you wish to insert the page break.
Step 3: Position your mouse cursor at the point that will be the end of the page.
Step 4: Click the Insert tab at the top of the window.
Step 5: Click the Page Break button in the Pages section of the ribbon at the top of the window.
Now that you know how to insert a page break in Word you will be able to perform this action whenever you want to start a new page in a document that you are working on.
Related: How to Remove a Google Docs Page Break
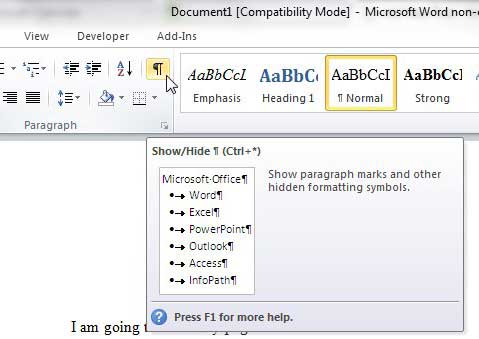
If you want to be able to see where the page break is inserted, then you can click the Show/Hide button in the Paragraph section of the ribbon on the Home tab.
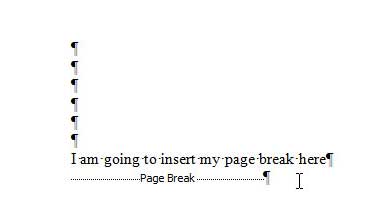
The page break, as well as the rest of your paragraph marks and formatting symbols, will be shown linke this –
As mentioned previously, you can add information to a page with a page break by entering the information before the page break.
Is there a lot of unmatching or inconsistent formatting in your document? Learn how to clear all of the formatting in Word 2010 so that you can start over with default text instead of manually trying to remove every unwanted formatting element.
Additional Sources
- How to insert a check mark in Microsoft Word
- How to do small caps in Microsoft Word
- How to center text in Microsoft Word
- How to merge cells in Microsoft Word tables
- How to insert a square root symbol in Microsoft Word

Matthew Burleigh has been writing tech tutorials since 2008. His writing has appeared on dozens of different websites and been read over 50 million times.
After receiving his Bachelor’s and Master’s degrees in Computer Science he spent several years working in IT management for small businesses. However, he now works full time writing content online and creating websites.
His main writing topics include iPhones, Microsoft Office, Google Apps, Android, and Photoshop, but he has also written about many other tech topics as well.


