An Excel spreadsheet, like other documents that you might create in Microsoft Office programs such as Word or Powerpoint, will print as much information on one page as it can. One way around this is to use page breaks to force content onto a new page. But you might need to know how to remove a page break in Excel if it’s negatively impacting your print job.
Printing spreadsheets has long been a problem for Excel users, due simply to the fact that spreadsheets are primarily meant to be viewed on a computer screen. But they often contain important information which will inevitably need to wind up on the printed page.
One option that an Excel user might take to solve a printing problem is to manually insert page breaks. This may work fine for some people, but if that document is shared and edited by another person, then those page breaks might no longer be relevant.
Fortunately, you can learn how to remove a page break in Excel 2010 by following the steps outlined below.
How to Remove Page Breaks in Excel 2010
- Open your spreadsheet.
- Select the Page Layout tab.
- Click in a cell directly under the page break.
- Click Breaks, then Remove Page Break.
Our article continues below with additional information on removing page breaks in Excel 2010, including pictures of these steps.
Related: How to Remove a Google Docs Page Break
How to Delete a Page Break in Excel 2010 (Guide with Pictures)
There are horizontal and vertical page breaks in Microsoft Excel 2010, and they can both be removed in a similar fashion. We will first show you how to remove a horizontal page break, then will follow by showing you how to remove a vertical page break.
Step 1: Open the spreadsheet in Excel 2010.
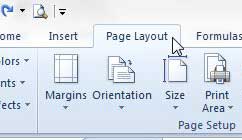
Step 2: Click the Page Layout tab at the top of the window.
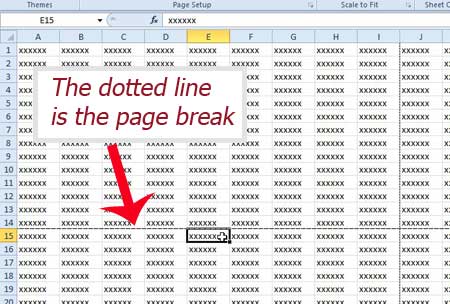
Step 3: Click in a cell underneath the page break that you want to remove.
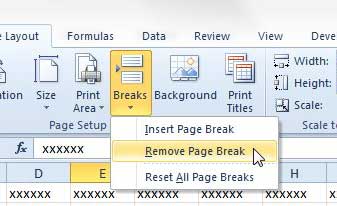
Step 4: Click Breaks in the Page Setup section at the top of the window, then click the Remove Page Break option.
Now the page break that had previously been causing a new page to print will be gone and the spreadsheet will print based on automatic page breaks and any other page breaks that may have been added to the worksheet.
If you have a vertical page break in your spreadsheet then you can follow a similar process to remove that page break with the steps in the section below.
More Information on How to Remove Page Break in Excel 2010
If you are trying to get rid of a vertical page break, click in a cell to the right of the page break.
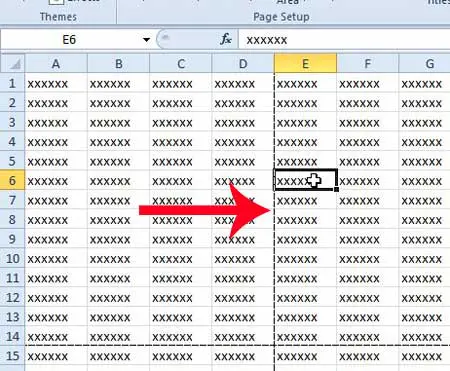
Then click Breaks at the top of the window, and then click Remove Page Break.
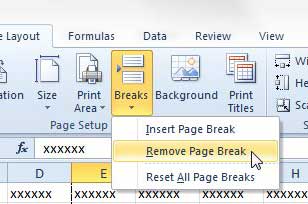
You will note that there is an option at the bottom of the Breaks drop down menu that says “Reset All Page Breaks.” While manually removing one or two page breaks is a relatively fast process, you might simply want to start over if you need o to redo a lot of page breaks. Clicking the Reset All Page Breaks button will delete all of the manual page breaks in the spreadsheet.
If you reset all of the page breaks it will only occur in the current spreadsheet. If you would like to reset all of the page breaks in every worksheet in the workbook then you will first need to right-click on a worksheet tab at the bottom of the window and choose the Select All Sheets option. You can then go to Page Layout > Breaks > Reset All Page Breaks to delete every manual page break in the Excel file.
The Page Setup group on the Page Layout tab contains a number of other options that you might need to change if you want to adjust the print layout of your data. Here you will find:
- Margins
- Orientation
- Size
- Print Area
- Background
- Print Titles
Many of the most common adjustments that you need to improve the appearance of a printed Excel spreadsheet can be found here.
If you go to the View tab in your workbook you will notice a Page Break Preview button in the Workbook Views section of the ribbon. Clicking that button will show you all of your data, but will also show you where each manual page break and automatic page break are located. There are dotted blue lines and gray page numbers that help you see what the spreadsheet will look like when printed.
You can also use the Insert Page Break and Remove Page Break options while in this view to make it a little easier to add or remove manual page breaks. Once you are done you can go back to the View tab and click Normal to restore the Normal View mode for your Excel spreadsheet.
The status bar at the bottom of the Excel window (specifically at the right side of it) also includes some small icons that you can use to switch between different worksheet views.
You can also learn how to fit all of your spreadsheet columns on one page in Excel for another option to simplify your spreadsheet printing.
Additional Sources

Matthew Burleigh has been writing tech tutorials since 2008. His writing has appeared on dozens of different websites and been read over 50 million times.
After receiving his Bachelor’s and Master’s degrees in Computer Science he spent several years working in IT management for small businesses. However, he now works full time writing content online and creating websites.
His main writing topics include iPhones, Microsoft Office, Google Apps, Android, and Photoshop, but he has also written about many other tech topics as well.