Microsoft Excel can be a difficult application to work with when you need to print a spreadsheet. One common problem involves getting your column to fit correctly. Fortunately, you can learn how to print all columns in Excel on one page.
How to Fit All Columns on One Page in Excel 2010
- Open your Excel file.
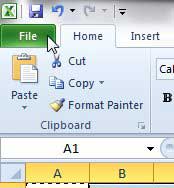
- Click the File tab.
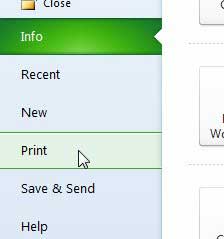
- Select the Print button.
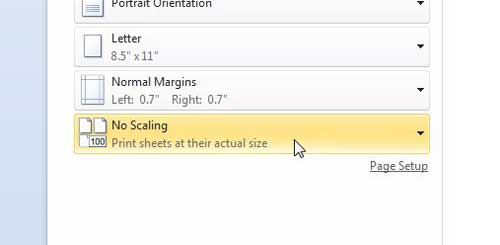
- Click the No Scaling button.
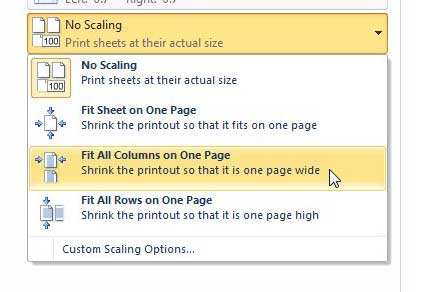
- Choose the Print all Columns on One Page option.
- Click Print.
Our guide continues below with additional information on how to print all columns in Excel on a single printed page, including pictures of these steps.
The Microsoft Excel Print Preview window is a useful tool when you are trying to make sure that your completed spreadsheet looks good before you print it.
One area where you can have trouble with printed pages in your spreadsheet is simply getting your Excel spreadsheet to fit on one page. It may have seemed like the Excel expand all rows option was what you needed, but that doesn’t do much to affect printing.
You may have tried using manual page breaks, or switching between the normal view and the print window to check the Print Preview screen each time you changed a column width to see if that helped.
If you need to fit an Excel sheet on one page you can go to File > Print > and click the No Scaling button, then choose the Fit All Columns on One Page option.
Excel 2010 is a perfect program for a lot of different uses, but one area that can be frustrating is when you need to print a spreadsheet.
If your spreadsheet doesn’t perfectly fit on the paper in your printer, then Excel will automatically push extra columns to their own page, which can result in a lot of confusion and wasted paper.
Manually resizing columns can also be a futile effort, as adjusting one column can end up creating another problem.
Fortunately, Excel 2010 has a print setting that allows you to automatically fit all of your columns on one page, ensuring that the data is in a more print-friendly layout.
if you aren’t focused on printing, but simply want your data to be visible, then read our guide on how to autofit all columns in Excel for a quick and easy way to resize everything.
How to Print Multiple Columns on One Page in Excel 2010 (Guide with Pictures)
One thing to keep in mind when you are doing this, however, is that the size of your cells and text will be shrunk to accommodate the reduction in print real estate.
So Excel will fit 100 columns on one page if you tell it to, but the resulting printout will likely be very difficult to read.
This is a good situation to take advantage of the Print Preview on the right side of the Print screen, as it will give you an idea of how small the text is going to become.
Step 1: Open your spreadsheet in Excel 2010.
Step 2: Click the File tab at the top-left corner of the window.

Step 3: Click the Print option in the column at the left side of the window.

Step 4: Click the No Scaling button.

Step 5: Select the Fit All Columns on One Page option.
If you are happy with how the preview looks, click the Print button.

Now that you know how to print all columns in Excel on one page you should be able to save yourself a lot of time and frustration in trying to configure everything manually.
Our tutorial continues below with additional discussion about using the different “fit” options on the Excel Print menu.
More Information on the Microsoft Excel “Fit All Columns on One Page” Setting
If the text is just slightly too small, consider switching to a landscape orientation instead.
You can also configure your Excel 2010 spreadsheet so that you can fit the entire spreadsheet on one page. When you click the No Scaling button on the Print menu there are options for:
- No Scaling
- Fit Sheet on One Page
- Fit All Columns on One Page
- Fit All Rows on One Page
There is also a Custom Scaling Options button at the bottom of this dropdown menu. If you select that then it will open the Page Setup menu, where you can try one of the other options found in that location.
Multi-page spreadsheets can greatly benefit when you print the top row on every page. This option is found on the Page Layout tab when you click the Print Titles button.
One other place that you can find a way to customize the print layout of your spreadsheet is the Page Setup dialog box. You can go to the Page Layout tab and click the small Page Setup dialog box launcher button at the bottom-right corner of the Page Setup group to open it.
There you will see a number of different tabs at the top of the window, including a Page tab. On this tab, you can choose the page orientation, adjust scaling, and even specify the number of pages to which you would like to fit your printed spreadsheet.
If you have tried everything you can to make your single-page worksheet look good and it’s still too small, then try hiding some of the less important columns. You can do this by right-clicking a column letter, then choosing the Hide option.
Do you have Netflix, Hulu, or Amazon Prime, and you want an easy way to watch them all on your TV? The Roku is an affordable way to do this, and the device is very easy to set up and use. Click here to learn more about the Roku.

Matthew Burleigh has been writing tech tutorials since 2008. His writing has appeared on dozens of different websites and been read over 50 million times.
After receiving his Bachelor’s and Master’s degrees in Computer Science he spent several years working in IT management for small businesses. However, he now works full time writing content online and creating websites.
His main writing topics include iPhones, Microsoft Office, Google Apps, Android, and Photoshop, but he has also written about many other tech topics as well.