You will need to know how to change the page margins in Excel 2010 if you encounter a spreadsheet that is either slightly too big to fit on a printed page or if the spreadsheet might look better if it had larger margins.
But the method for changing page margins in Excel is a little different than other programs, such as Word, where you can immediately see the effects of adjusting the margins.
Fitting all of the information on a printed Microsoft Excel 2010 sheet is a pretty important element to consider when you are printing them out for reading purposes.
If you have a few extra columns or rows that spill over onto a second sheet, it can make for a difficult reading situation.
Additionally, if you have not printed column headings on that second page (which you can do by learning how to repeat rows in Excel 2010) then your readers might have difficulty determining what the outlying columns or rows are telling them.
Luckily Excel 2010 provides you with the necessary tools for learning how to set print margins in Excel 2010, which you can use to your advantage to make as much of your spreadsheet fit on one page as possible.
How to Change Page Margins in Excel 2010
Adjusting the margins in Excel 2010 will not have any effect on how the spreadsheet appears on your computer screen.
The adjustment that the following methods will teach you to make is solely an element that will affect your printed documents.
One thing that you will need to take into consideration is your printer. Every printer is different, and you could theoretically encounter a situation where the printer will not be able to print the entire document if you make your margins too small.
In my experience, most printers are capable of creating documents with .2″ margins, even if you receive a warning that the document might not fit on the page.
However, your own experiences might vary. We offer three methods for changing the page margins in Excel 2010 below.
Method 1 – how to change the page margins from the Page Layout tab in Excel 2010
Step 1: Open your file in Excel 2010.
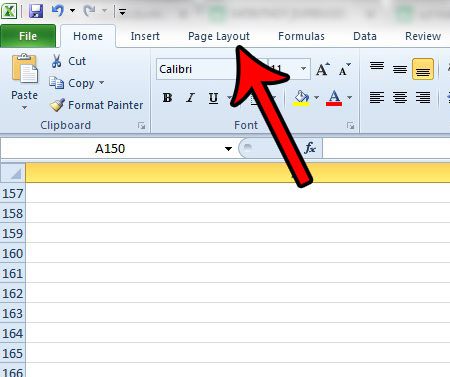
Step 2: Click the Page Layout tab at the top of the window.
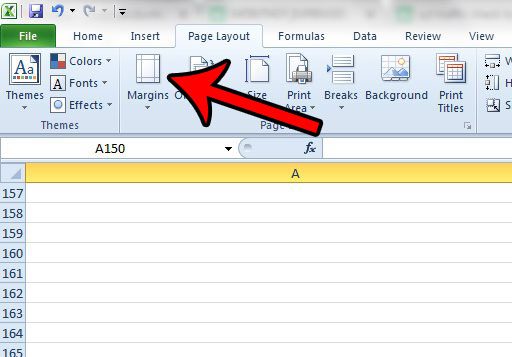
Step 3: Click the Margins button.
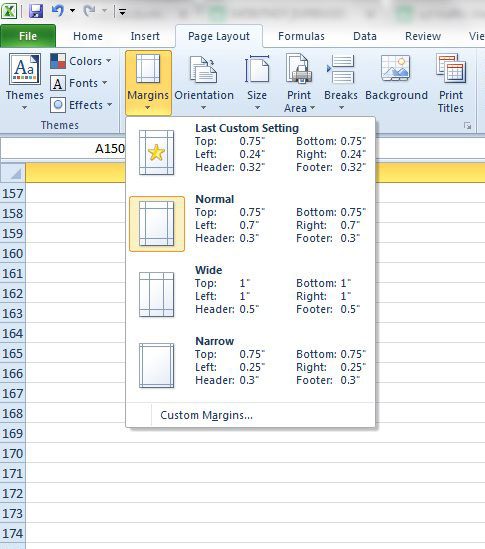
Step 4: Click the desired margin setting, or click Custom Margins to specify your own. If you clicked Custom Margins, continue to the next step. Otherwise you are done changing your page margins.
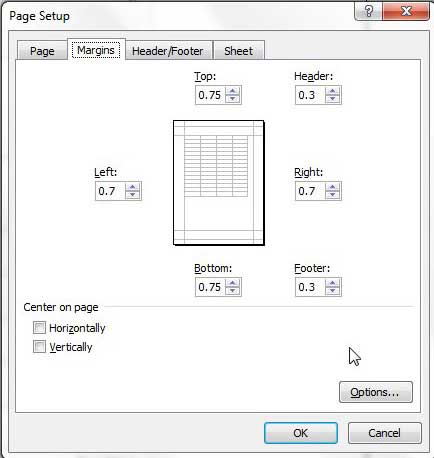
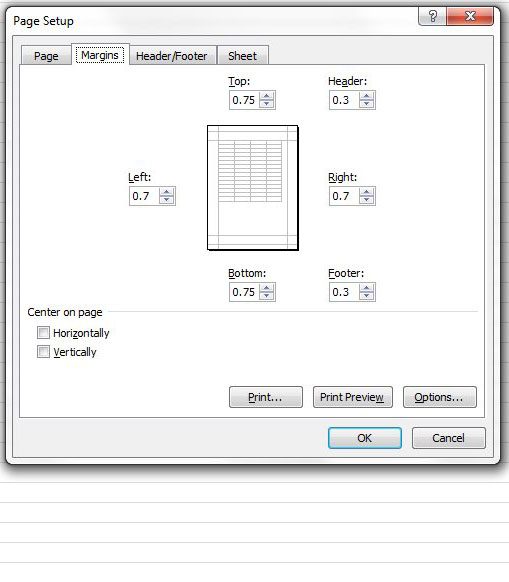
Step 5: Enter your desired margin sizes into the appropriate fields, then click the OK button.
Method 2 – change the page margins from the Print menu in Excel 2010
Step 1: Open the Excel spreadsheet for which you want to set the print margins.
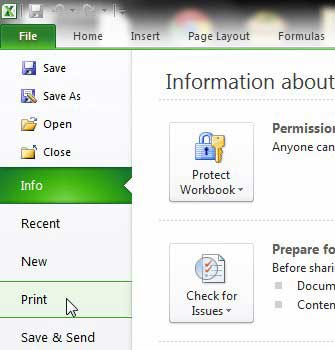
Step 2: Click the File tab at the top-left corner of the window, then click the Print option in the column at the left side of the window.
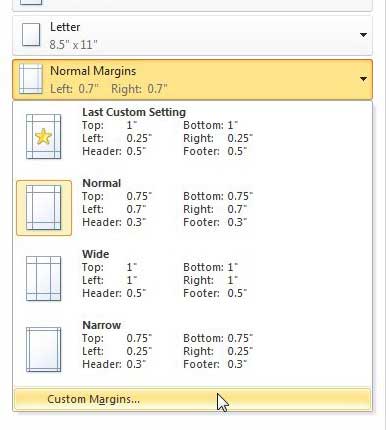
Step 3: Click the Normal Margins drop-down menu, then click the Custom Margins option at the bottom of the window. There are actually several preset options on this drop-down menu, so feel free to use on of them instead if it will suit your spreadsheet.
Step 4: Adjust the values in the individual margin fields until your document is fitting on the page as you would like it to. Since Excel 2010 does not offer a preview window for the margin adjustments, you may need to exit and re-enter this menu a few times to get it right.
Method 3 – Change page margins by clicking the Page Setup button on the Page Layout tab
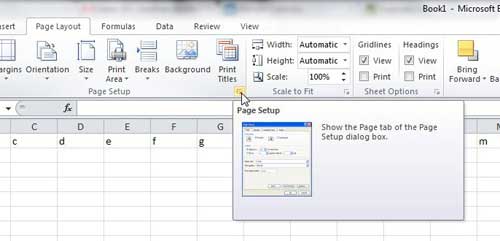
Note that you can also open the Page Setup window by clicking the Page Layout tab at the top of the window, then clicking the Page Setup button in the Page Setup section of the ribbon. You will then be taken to the Page Setup menu shown in Method 2.
Now that you know how to set print margins in Excel 2010, you can use whichever of these options you prefer to set that information for your spreadsheets.
Summary – How to change page margins in Excel 2010
- Click the Page Layout tab.
- Click the Margins button.
- Select one of the default page margin settings, or click Custom Margins to specify your own.
- Adjust the settings on the Page Setup window as needed.
- Click the OK button when you are finished.
Learning how to change page margins in Excel 2013 is one of several options available for you to improve the way your spreadsheets print. You can read our guide to printing in Excel for additional options and features that are available which can lead you to spreadsheets that print in a more optimal way.

Matthew Burleigh has been writing tech tutorials since 2008. His writing has appeared on dozens of different websites and been read over 50 million times.
After receiving his Bachelor’s and Master’s degrees in Computer Science he spent several years working in IT management for small businesses. However, he now works full time writing content online and creating websites.
His main writing topics include iPhones, Microsoft Office, Google Apps, Android, and Photoshop, but he has also written about many other tech topics as well.
