Print areas in Microsoft Excel are a good solution when you need to print some of the data in a file, but not all of it. But occasionally a print area has been set and is no longer correct. Fortunately, you can use a similar process to remove a print area from your Excel spreadsheet if you don’t need it anymore.
Microsoft Excel 2010 allows you to customize most aspects of your spreadsheet, including the way that it prints. If you had previously set the print area for a document, then you know that you can force Excel to print out an area of cells that you have specified, regardless of whether there is information in those cells, or if there is additional information on the spreadsheet.
Unfortunately, while the print area is set, that is the only range of cells that you will be able to print. So if you need to learn how to clear the print area in Excel 2010 because the designated print area is either no longer accurate, or because you want to print a different area of your spreadsheet, then you can follow the instructions below.
How to Clear Print Area – Excel 2010
- Open your Excel file.
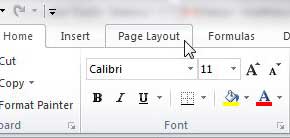
- Select the Page Layout tab at the top of the window.
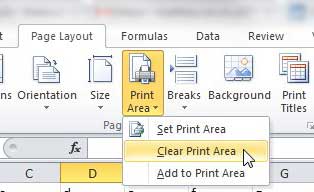
- Click the Print Area button.
- Choose the Clear Print Area option.
Our article continues below with additional information on clearing the print area in Excel, including pictures of these steps.
How to Stop Excel 2010 From Printing a Specified Print Area (Guide with Pictures)
Designating a print area in Excel 2010 is very helpful when you have a large spreadsheet and only periodically need to print a specific part of it. You do not need to remember to change your printer settings whenever you create a copy of the spreadsheet, and you can configure all of your page layout settings so that the spreadsheet prints to fit on a set number of pages. But when that print area changes and you need to remove the settings, you can clear the print area in Excel 2010.
Step 1: Open the Excel document with the set print area that you want to clear.
Step 2: Click the Page Layout tab at the top of the window.
Step 3: Click the Print Area drop-down menu in the Page Setup section of the ribbon at the top of the window, then choose the Clear Print Area option.
Note that after you clear the print area for your worksheet, all of the data on that sheet is going to print the next time you click the Print button. Often a worksheet that had a set print area is going to have some formatting options set which took that print area into consideration.
More Information on How to Clear the Print Area in Excel
After clearing the print area it’s a good idea to check the Print Preview before you click the Print button. This can save a lot of wasted paper, especially if you are dealing with a very large spreadsheet.
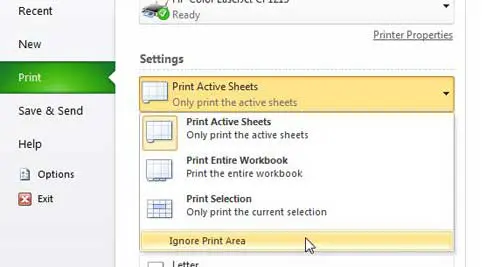
If you want to print your spreadsheet and ignore a print area this one time, while still leaving it intact for future printings you can also choose the Ignore Print Area option on the Print menu.
You can find this setting by clicking the File tab, clicking Print, clicking the Print Active Sheets drop-down menu, then choosing Ignore Print Area.
You can set a print area if you highlight the cells that you want to print, go the Page Setup group, click Print Area, then choose the Set Print Area option.
Additionally, if you would like to add more cells to an existing print area you can do so by choosing those cells, selecting the Page Layout tab, then clicking the Print Area button and selecting the Add to Print Area button.
You can have multiple print areas in Excel. However, if you do have multiple print areas and they aren’t connected to one another, they will print on separate pages. Creating multiple print areas is possible by either adding a selection of cells to an existing print area, or making a selection of cells, then holding down the Ctrl key before choosing another selection of cells. Once both print areas are selected you go to the Page Layout tab, go to the Page Setup group, click Print Area, then Set Print Area.
When you save the workbook in Excel, any defined print areas will be saved as well. However, print areas only apply to a worksheet, not an entire workbook. Therefore, if you go to print the entire workbook Excel will print only the print area on your worksheet, but will print the rest of the worksheets in their entirety, assuming that there are no print areas on those other sheets.
Conclusion
As we outlined above, you can clear a print area in Excel by going to Page Layout > Print Area > Clear Print Area. When there is no range of cells that is specified as a print area, Excel will print the entire worksheet.
After you have cleared a print area in Excel you can always choose to set a new area if you select the cells to include in the print area, then go to Page Layout > Print Area > Set Print Area.
Continue Reading
- How to subtract in Excel
- How to sort by date in Excel
- How to center a worksheet in Excel
- How to select non-adjacent cells in Excel
- How to unhide a hidden workbook in Excel
- How to make Excel vertical text

Matthew Burleigh has been writing tech tutorials since 2008. His writing has appeared on dozens of different websites and been read over 50 million times.
After receiving his Bachelor’s and Master’s degrees in Computer Science he spent several years working in IT management for small businesses. However, he now works full time writing content online and creating websites.
His main writing topics include iPhones, Microsoft Office, Google Apps, Android, and Photoshop, but he has also written about many other tech topics as well.


