While adding a table to Microsoft Word is accomplished from the Insert tab, simply adding the table may not be enough.
Complex Word documents can often need to take advantage of various settings like line and page breaks and settings found on menus like the Paragraph dialog box to make their documents look the way they need.
One place where you can run into trouble in Word concerns tables. While you might be comfortable making changes in an Excel spreadsheet, like how to change a table boundary, row boundary, or column boundary, or how to perform basic data alignment so that you get the right cell spacing, the table adjusting tools in Word are a little less extensive.
Microsoft Excel and Word integrate very well with one another, which is convenient when you are copying and pasting data between the programs. You can even learn how to create tables in Excel for an easy way to sort and filter your data.
But Excel does not work with the same page size limitations that Word does, which can make it difficult to copy large amounts of data from Excel into Word.
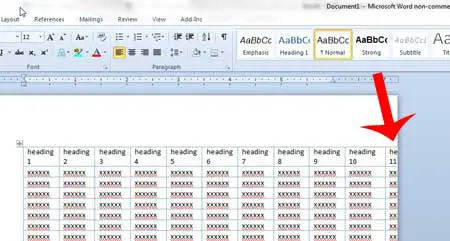
This is especially problematic when you need to copy an area from Excel with a lot of columns, as the columns that do not fit in the Word document are simply not displayed on the page.
Fortunately, there is a simple way to fix this problem and make your Excel table columns fit on one page in Word 2010.
You can make a Microsoft Word table fit onto one page by clicking inside the table, choosing the Layout tab, selecting Autofit, then Autofit Contents.
Use these steps to make a table fit to one page in Word 2010. We also discuss some other options that you can use to customize your desired Word document so that you can make your entire table look the way that you want it to in the Microsoft Office word processor.
How to Adjust Table Columns in Word with Autofit
- Click inside the table.
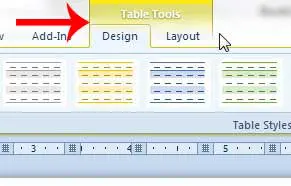
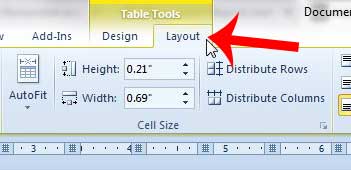
- Choose the Layout tab under Table Tools tab at the top of the window.
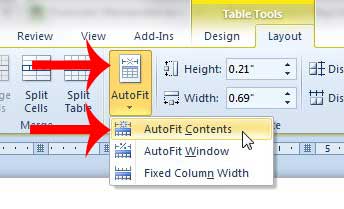
- Click the Autofit button.
- Select Autofit Contents.
Our guide continues below with additional information on how to get a table to fit on one page in Word, including pictures of these steps.
Deal of the Day
- HIGH-QUALITY SOUND — Powered by the Apple H1 headphone chip, AirPods deliver rich, vivid sound.
- EFFORTLESS SETUP — After a simple one-tap setup, AirPods are automatically on and always connected. They sense when they’re in your ears and pause when you take them out. And sound seamlessly switches between your iPhone, Apple Watch, Mac, iPad, and Apple TV.
Last update on 2025-07-12 / Affiliate links / Images from Amazon Product Advertising API | As an Amazon Associate, I earn from qualifying purchases.
You can read this article if you would like to quickly expand all of the rows in an Excel spreadsheet to make all of your data visible.
How to Fit an Excel Table to One Page in Word 2010 (Guide with Pictures)
This tutorial will focus specifically on making a table from Excel fit on one page in Word 2010, but the method below will work on tables from any program that you paste into Word, as everything that we will be doing is occurring within Microsoft Word.
This will also only make it possible to fit all of the columns of the table on one page.
If there are too many rows, then the table will still extend to a second page.
You can read this article to learn how to paste your Excel table as an image, which can be a much simpler solution when you are working with a very large table where you need to fit all of the rows and columns on one page.
Step 1: Open the Microsoft Word document containing the table that is too large to fit on one page.

Step 2: Click somewhere inside the table so that the Table Tools tabs appear at the top of the window.

Step 3: Click the Layout tab under Table Tools.

Step 4: Click the AutoFit button in the Cell Size section of the ribbon at the top of the window, then click the AutoFit Contents option.

Our tutorial continues below with more information on using some of the other table autofit options for your MS Word document.
Would you like to edit your table in a spreadsheet? Our export Word table to Excel article can help you to do it.
What Happens If I Use Fixed Column Width for a Table in a Microsoft Word Document?
If you are curious about what happens if you choose Fixed Column Width from that drop-down list, then you might be looking for a solution to distribute columns or adjust column width in a different manner than what is accomplished with the autofit setting.
The Fixed Column Width option will stop Microsoft Word from automatically resizing the table to fit your content, and any column width you enter will not be adjusted, even if the cell content doesn’t fit inside that column.
The only major difference between these two options is that it can make it difficult to fit all of your columns on one page if they are too wide, as Word displays the columns with the width that you specify.
This means that when you choose Fixed Column Width, the table will automatically adjust to accommodate the value that you enter. If that corresponding adjustment will make a table cell go to another page, then you would need to change the width or click Cell Margins to automatically resize the document until it fits again.
Our tutorial continues below with additional discussion about making a table fit to a single page if it’s currently on two pages in a Word document.
Related: How to Break All Links in Excel 2013
More Information on How to Use the AutoFit Window to Adjust Tables in an existing or New Word Document
Making a table fit to one page in Microsoft Word is a much more common problem when the table has been added from a different location, such as a Microsoft Excel table. Specifically, these large tables often extend off the side of the page, which can be resolved by using the steps above to fit the table to the document.
However, large tables added through Word may extend to multiple pages if there are too many rows.
While there isn’t a simple solution to making a Microsoft Word table fit to one page in a document, you can try different options, such as selecting all of the content in the table and making it a smaller font or adjusting the padding of the cells.
Alternatively, you may want to try adding a page break before the table so that it’s on its own page. This allows the table to be the top element on its own page, providing additional space to try and fit it on one page.
You probably noticed that there are Distribute Rows and Distribute Columns buttons in the Cell Size group on the Layout tab.
If you have multiple rows or multiple columns in your table that don’t seem to be sized properly, then this can be a convenient way to make all the rows or columns fit better.
Learn how to print two pages of your document on one sheet in Word 2010 to help save paper.
Continue Reading
- How to insert a check mark in Microsoft Word
- How to do small caps in Microsoft Word
- How to center text in Microsoft Word
- How to merge cells in Microsoft Word tables
- How to insert a square root symbol in Microsoft Word

Matthew Burleigh has been writing tech tutorials since 2008. His writing has appeared on dozens of different websites and been read over 50 million times.
After receiving his Bachelor’s and Master’s degrees in Computer Science he spent several years working in IT management for small businesses. However, he now works full time writing content online and creating websites.
His main writing topics include iPhones, Microsoft Office, Google Apps, Android, and Photoshop, but he has also written about many other tech topics as well.
