Documents that we create in applications like Google Docs or Microsoft Word are rarely perfect in the first draft.
Most documents need a lot of editing or revisions before they are acceptable. This applies to more than just the content that you type in paragraphs. It can go for other documents objects as well, such as images or tables
Tables are an effective way to display certain types of data, and Microsoft Word 2010 makes it easy to create and edit tables.
If you find after creating your table that it doesn’t have enough room for all of the information that you want to include, then you may be looking for a way to add additional cells to the table.
One good way to do this is by adding a new column to the table. Word 2010 makes it possible to insert a new column at any point inside your existing table, ensuring that you will not need to delete and re-create an entirely new table.
You can follow our instructions below to add a column to a table that you have already created in your document.
How to Insert a Column Into a Table in Word 2010
- Open the document.
- Click in a cell next to where you want the new column.
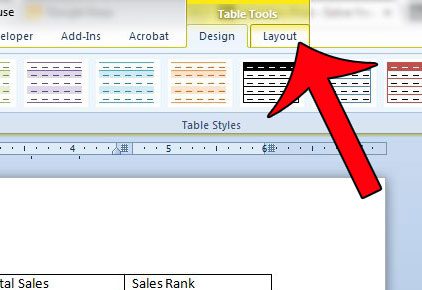
- Select the Table Tools Layout tab.
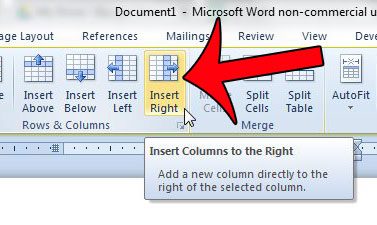
- Click Insert Right or Insert Left.
Our tutorial continues below with additional information on adding columns in Word 2010, including pictures of these steps.
How to Add Column to Table in Word 2010 (Guide with Pictures)
This article was written for users of Microsoft Word 2010. However, these steps will be very similar in other versions of Word as well.
Step 1: Open the document in Word 2010 that contains the table that you want to modify.
Step 2: Click inside a table cell in the column to the left of where you want to insert the new column.

Step 3: Click the Layout tab under Table Tools at the top of the window.

Step 4: Click the Insert Right button to insert a column to the right of the column that you selected in Step 2. If you would instead prefer to insert a column to the left of this column, then click the Insert Left button.
Note that these buttons are located in the Rows & Columns group in the ribbon.

Now that you know how to add table columns in Word 2010, you can use these steps ot easily add more data to an existing table in a document.
Our guide continues below with additional discussion on how to add columns to a table in Word 2010.
More Information on How to Add Table Columns in Word 2010
If your table is already taking up the full width of the page, then Word will adjust the widths of the existing columns to accommodate the addition of the new column.
You will notice that there are also buttons in the Rows and Columns group that let you add new rows to the table, too. You can do this by clicking either the Insert Above button or the Insert Below button.
If you need to add a table to your document then you can select the Insert tab at the top of the window, then click the Table button and specify the number of rows and columns that you would like in the table. Note that if you can’t add a large enough table using the cell icons then you can click the Insert Table button and specify the number of rows and columns that way as well.
If you add too many columns or rows to your table then you can select one of the cells in the row or column you wish to remove, then click the Delete button and choose to Delete Columns or Delete Rows. There are also options to delete individual cells or delete the entire table.
Is your table not entirely contained on the page? This can happen if you copy and paste a table from a different document, or from a different program. This article will show you how to make your Word tables fit on the page.
Can I Make a Microsoft Word Document With More Than One Column?
While the bulk of our article has discussed adding table columns in Microsoft Word, you may be interested in adding two columns or multiple columns to your document instead. This is common when creating newspaper articles or newsletters.
You can add a new column to a document by selecting the Page Layout tab at the top of the window, then clicking the Columns button and choosing the number of columns that you want in the document. You could alternatively elect to click the More Columns button, which opens the Columns dialog box. There you will be able to specify the number of columns in the document. You can also specify different widths and spacing for all the columns in the document, or you can simply have them all be of equal column width.
Can I Add a Column Break or Remove Column Breaks in Word 2010?
When you are adding columns to a document in Microsoft Word 2010, rather than adding columns to a table, you may find yourself using column breaks. Much like page breaks, a column break tells Word that you want the next part of the document to begin in the next column.
The first thing you will need to do is make sure that your cursor is at the point in the document where you wish to add the column break. You can then add a column break by selecting the Page Layout tab at the top of the window, then click the Breaks button in the Page Setup group in the ribbon. There you will find the Column Break button. Selecting that option will insert a column break at that point in the document.
If you want to remove a column break then you will need to select the Home tab at the top of the window and display formatting marks by clicking the Show/Hide button in the Paragraph group of the ribbon.

Matthew Burleigh has been writing tech tutorials since 2008. His writing has appeared on dozens of different websites and been read over 50 million times.
After receiving his Bachelor’s and Master’s degrees in Computer Science he spent several years working in IT management for small businesses. However, he now works full time writing content online and creating websites.
His main writing topics include iPhones, Microsoft Office, Google Apps, Android, and Photoshop, but he has also written about many other tech topics as well.