Do you need to put some of the text in your document in the middle of the page?
While you may have found the button that lets you center your text horizontally, it can be a little more difficult to find that option that will center your text vertically.
Our tutorial below will show you the steps to take so that you can find the menu where you will be able to vertically center text in your Microsoft Word document.
How to Vertically Align Text in Word 2013
- Click the Page Layout tab.
- Click the Page Setup button.
- Click the Layout tab on the Page Setup window.
- Click the Vertical alignment drop-down menu, then click the Center option.
- Click the Apply to drop-down menu, then click the Whole document option.
- Click the OK button.
Our guide continues below with additional information on vertically centering text in a Word document, including pictures of these steps.
If you have been formatting the content in a document that you are creating for work or school then you may have needed to change some of the alignment.
If so, then you most likely found the Left, Center, and Right Alignment options in the Paragraph group on the Home tab.
But you probably noticed that there weren’t the corresponding alignment or centering options that affected the vertical layout of the document.
You can use center vertical alignment in a Microsoft Word document by going to Page Layout > Page Setup > selecting the Layout tab > then choosing Center on the Vertical Alignment dropdown menu.
Microsoft Word 2013 has a lot of formatting options, although some of the less commonly used ones can be difficult to locate.
One of the settings that can be difficult to find is the selector for vertical alignment. But this is an option that is adjustable, which means that you are able to vertically center text in Microsoft Word 2013.
When you are adjusting your document’s vertical alignment, you will have the option to set it as Top, Center, Justified, or Bottom.
For the purposes of this tutorial, we will be selecting the Center option, but you can experiment with each of the different options if you are not sure which one is best for your situation.
You can also read our article on how to center text in Word for other ways to align your content in the middle of the page.
How to Center Text in the Middle of the Page in Word 2013 (Guide with Pictures)
The default vertical-alignment setting in Microsoft Word 2013 is “Top.” This means that if you create a new document and enter one line of text, it will appear at the top of the page.
The steps below will change that setting so that the single line of text would appear at the center of the page instead. This is ideal if you need to vertically center a title in your Word document.
Our guide below will give you a document where every page is centered vertically. This is because we will be selecting the Whole Document option when applying our vertical alignment.
However, you can also choose the option to apply your vertical alignment From this point forward, which will cause everything after your current location to be centered vertically instead.
These steps will show you how to vertically center text in Word documents.
Step 1: Open your document in Word 2013.
Open your Word document.
Step 2: Click the Page Layout tab at the top of the window.
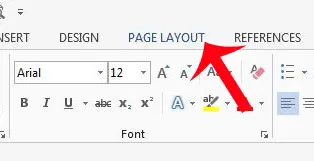
Select the Page Layout option.
Step 3: Click the Page Setup button at the bottom-right corner of the Page Setup section of the navigational ribbon.
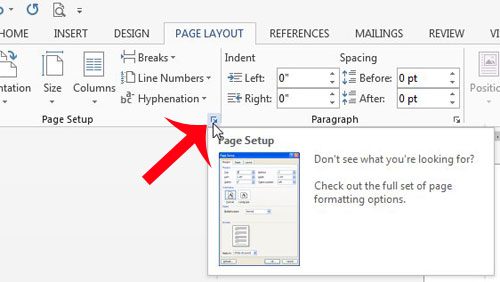
Click the small Page Setup button.
As shown in the image above, the Page Setup dialog launcher in the Page Setup group of the ribbon is quite small. It’s very easy to miss it.
Step 4: Click the Layout tab at the top of the window.
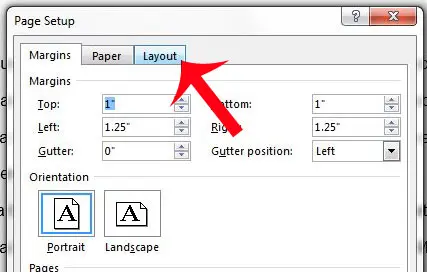
Choose Layout at the top of the Page Setup dialog box.
Step 5: Click the drop-down menu to the right of Vertical alignment, then select the Center option.
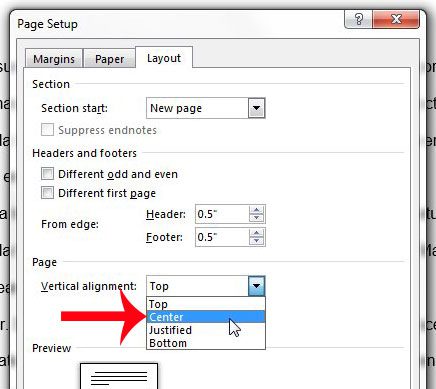
Select the Vertical alignment dropdown, then choose Center.
Step 6: Confirm that Whole document is selected in the drop-down menu to the right of Apply to, then click the OK button.
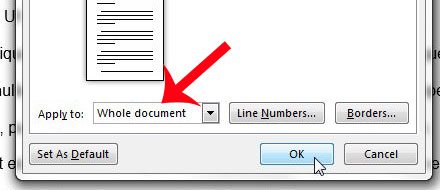
Make sure that Whole document is selected next to Apply to, then click OK.
Now that you know how to vertically center text in Word you will be able to use this option whenever you need to put text in the middle of the page on a title page or other part of your document.
You can continue reading below for additional discussion about vertical centering in documents with Microsoft Word.
More Information on How to Vertically Align the Text in the Center of the Current Page
As we mentioned above, you have the option of choosing which part of your document you would like to center. If it’s everything that you have already written, then the “Whole document” option is probably what you want.
If you would like to center everything from the point where you currently are until the end of the document, then you can choose the “From this point forward” option.
But if you only want to center text on a single page, such as if you are centering text vertically on a title page, then you are going to want to place your cursor after the text on the title page, go to Page Layout > Breaks > then select the “Next Page” section break.
Now when you go back to the Page Setup dialog box menu and the Vertical alignment menu, you will be able to apply the centering formatting to “This section.” if you choose that after turning your title page into its own section then you only center that one page.
Taking advantage of sections when you are dealing with alignments that only affect one part or one page of your document is a great way to simplify tasks that can become difficult or annoying in Microsoft Word.
Does your document contain a lot of sensitive information that you only want certain people to be able to read? Learn how to password protect a document in Word 2013 so that anyone that wants to read the document will need to know the password that you create.
Frequently Asked Questions About the Word Center Text Vertically Option
How do I change the top and bottom margins in a Word document?
If you are trying to adjust the amount of space at the top and bottom of your document, then you may want to make the margins larger or smaller.
You can find this setting by choosing the Layout tab at the top of the window, clicking the Margins button, then choosing one of the options there.
You can choose the Custom Margins option if you need different margin sizes than the default options.
What other options are there in the vertical alignment box in Microsoft Word?
When you need to align text vertically in your document, but when you click Center it doesn’t offer the desired result, then there are a few other options in the vertical alignment list that you can try instead.
These options include:
– Top
– Center
– Justified
– Bottom
What is a dialog box launcher in Microsoft Word?
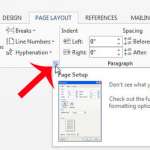
We make reference to something called a dialog box launcher in this article.
This is a very small button that looks like a square with a diagonal arrow inside of it.
It is found at the bottom-right corner of the Page Setup group in the ribbon on the Layout tab.
There is another dialog box launcher on that tab as well, in the Paragraph group.
Where is the new page Word button?
If you are trying to add a new page to the middle of your document, then you might be looking for a button called “New Page” or something similar.
Word doesn’t actually have something like this, so you will need to insert a page break if you want to position text at the start of a new page.
You will find this by first clicking at the desired insertion point for the new page, then going to Layout > Breaks > Page Break.

Matthew Burleigh has been writing tech tutorials since 2008. His writing has appeared on dozens of different websites and been read over 50 million times.
After receiving his Bachelor’s and Master’s degrees in Computer Science he spent several years working in IT management for small businesses. However, he now works full time writing content online and creating websites.
His main writing topics include iPhones, Microsoft Office, Google Apps, Android, and Photoshop, but he has also written about many other tech topics as well.