The iPhone reset options are in Settings > General > Transfer or Reset iPhone > Reset, and none of them deletes your photos, apps, or messages. They return one group of settings (or all settings) to the factory defaults. Only Erase All Content and Settings, a separate button on the Transfer or Reset iPhone screen, wipes the phone.
This covers iOS 27 and earlier versions back to iOS 15, which use the same Transfer or Reset iPhone menu. On iOS 14 or earlier, the same options are under Settings > General > Reset. Option descriptions come from Apple’s iPhone User Guide page Reset iPhone settings to their defaults and Apple’s Reset All Settings on iPhone or iPad article.
Quick Answer: Which Reset Do You Need?
| Problem or goal | Option to use | Deletes your data? |
|---|---|---|
| Screen frozen or an app won’t respond | Force restart (buttons, not a menu option) | No |
| Wi-Fi, cellular, Bluetooth, or VPN trouble | Reset Network Settings | No |
| Strange behavior you can’t trace to one setting | Reset All Settings | No |
| Autocorrect keeps suggesting wrong words | Reset Keyboard Dictionary | No |
| Home Screen is cluttered | Reset Home Screen Layout | No |
| Apps have permissions you want to review again | Reset Location & Privacy | No |
| Moving cellular service off the phone | Delete All eSIMs | No, but cellular service stops |
| Selling, trading in, or giving away the phone | Erase All Content and Settings | Yes |
| Forgot the passcode | Lock Screen reset or a computer restore | Yes |
Apple says resetting settings is rarely necessary and suggests restarting the iPhone first. Updating iOS in Settings > General > Software Update fixes many problems too. To check which version you have, follow the steps for checking your iOS version and updating.
Before You Reset Anything
- Back up the iPhone. The settings resets keep your content, but a backup lets you return to your current settings if the reset doesn’t help. For Erase All Content and Settings, a backup is the only way to get your data back. Make an iCloud backup before you start.
- Know your passcode. Every option asks for it before anything changes.
- Have your Wi-Fi passwords ready if you choose Reset Network Settings or Reset All Settings, since saved networks are removed.
- Keep your Apple Account password handy if you plan to erase the phone. You need it to turn off Activation Lock, the Find My feature that stops anyone else from setting up your iPhone.
How to Open the Reset Options
- Open the Settings app.
- Tap General, then scroll to the bottom.
- Tap Transfer or Reset iPhone. You see Prepare for New iPhone at the top and two buttons at the bottom: Reset and Erase All Content and Settings.
- Tap Reset. A menu opens with seven options.
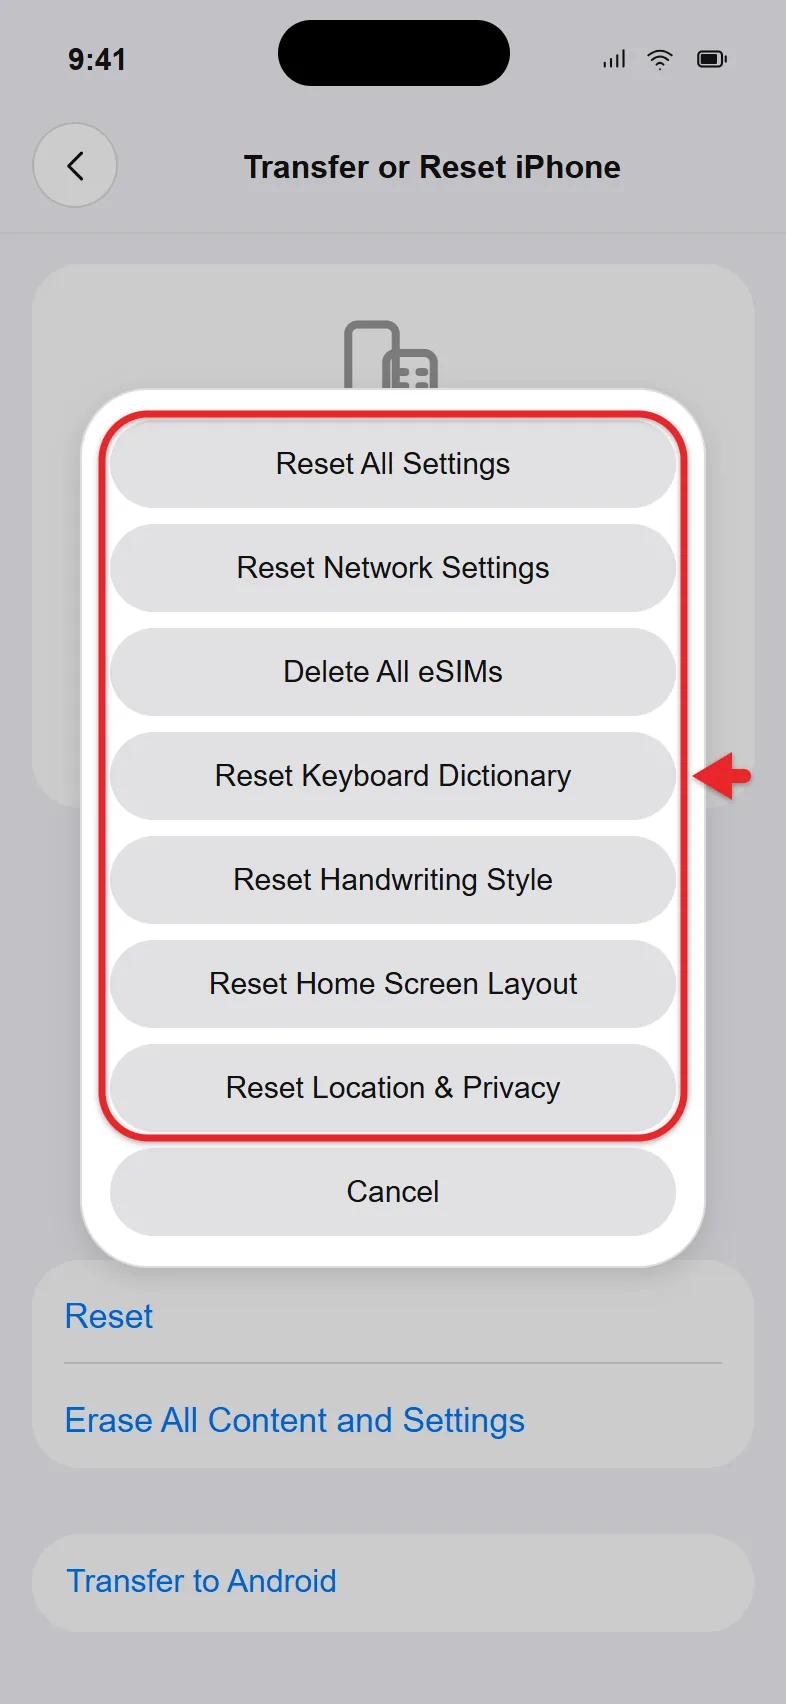
- Tap the option you want, enter your passcode, and tap the red confirmation button.
Nothing changes until you confirm, so you can open this menu to look and tap Cancel to back out.
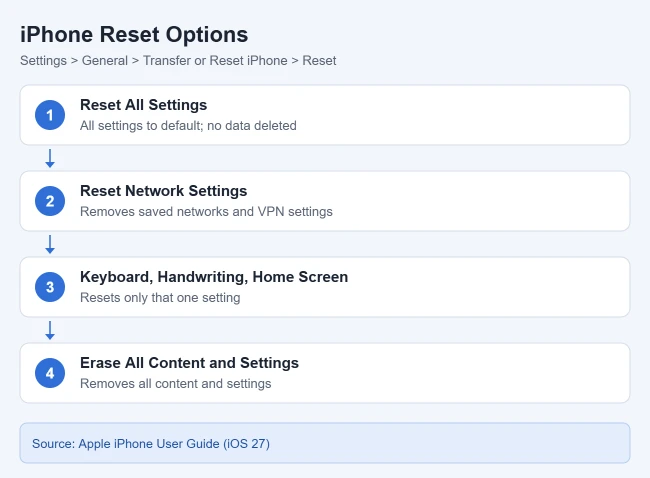
What Each Reset Option Does
Reset All Settings
This returns every setting to its default but keeps your content. Apple’s Reset All Settings article lists what is removed or reset, including:
- Wi-Fi networks and passwords, Bluetooth pairings, and VPN configurations
- Apple Watch pairings
- Face ID and Touch ID settings
- Apple Pay cards
- Home Screen layout and wallpaper
- Keyboard dictionary
- Notification, Sounds & Haptics, Display & Brightness, and Accessibility settings
- Location Services and Privacy & Security settings
- Previously trusted computers and accessories
Your photos, videos, music, apps and their data, messages, call history, contacts, calendars, documents, and downloads stay on the phone. Afterward, you rejoin Wi-Fi, pair your Bluetooth devices and Apple Watch again, set up Face ID or Touch ID, and add your Apple Pay cards back.
Reset Network Settings
This removes all network settings, including Wi-Fi networks you’ve used before and VPN settings that weren’t installed by a configuration profile or device management. Your device name also returns to “iPhone,” manually trusted certificates become untrusted, and cellular data roaming may turn off. Wi-Fi turns off and back on, so you’re disconnected from your current network.
It’s the right choice for Wi-Fi that won’t connect, calls that drop, or a VPN that misbehaves. It doesn’t delete your eSIM or your cellular plan. The steps for resetting network settings on iPhone walk through what to set up again.
Delete All eSIMs
An eSIM is a digital SIM card built into the phone. This option deletes every eSIM stored on the iPhone, and you’ll need to set up a new eSIM or insert a physical SIM card to connect to a cellular network again. Use it only when you’re moving service off this phone, and check with your carrier first.
Reset Keyboard Dictionary
This deletes the words the keyboard has learned from your typing, so autocorrect and predictive text stop suggesting them. Apple’s keyboard guide says custom words and shortcuts are deleted and the dictionary returns to its default state, so write down any text replacements you want to recreate.
If you only want to stop one word from being changed, you can change the auto-correct setting on an iPhone instead.
Reset Handwriting Style
This resets your custom handwriting preferences to their defaults.
Reset Home Screen Layout
This returns the built-in apps to their original Home Screen layout. No apps are deleted. You can then move apps around the Home Screen to arrange them again.
Reset Location & Privacy
This returns Location Services and privacy settings to their defaults. Apps lose the location and privacy permissions you granted, and they ask again the next time they need access. It’s a quick way to review which apps get your location. To see where your phone has been recorded, you can view and clear your location history.
How to Erase All Content and Settings
This is a factory reset. It removes your content, settings, and accounts and returns the phone to the setup screen. Use it when you’re selling, trading in, or giving away the iPhone, or as a last step when nothing else fixes a software problem.
Warning: erasing can’t be undone. Make sure your backup has finished before you start.
If you have an Apple Watch paired to this iPhone and plan to keep using the watch, unpair it before you erase the phone.
- Back up your iPhone so you can restore your content to a new or erased device.
- Go to Settings > General > Transfer or Reset iPhone.
- Tap Erase All Content and Settings, then tap Continue.
- If the phone uses an eSIM, choose Keep eSIM and Erase Data or Delete eSIM and Erase Data.
Keep the eSIM if you’re going to keep using this phone with the same plan. Delete it if you’re giving the phone away. If you delete it, Apple’s factory reset article says you’ll need to contact your carrier to reactivate your plan.
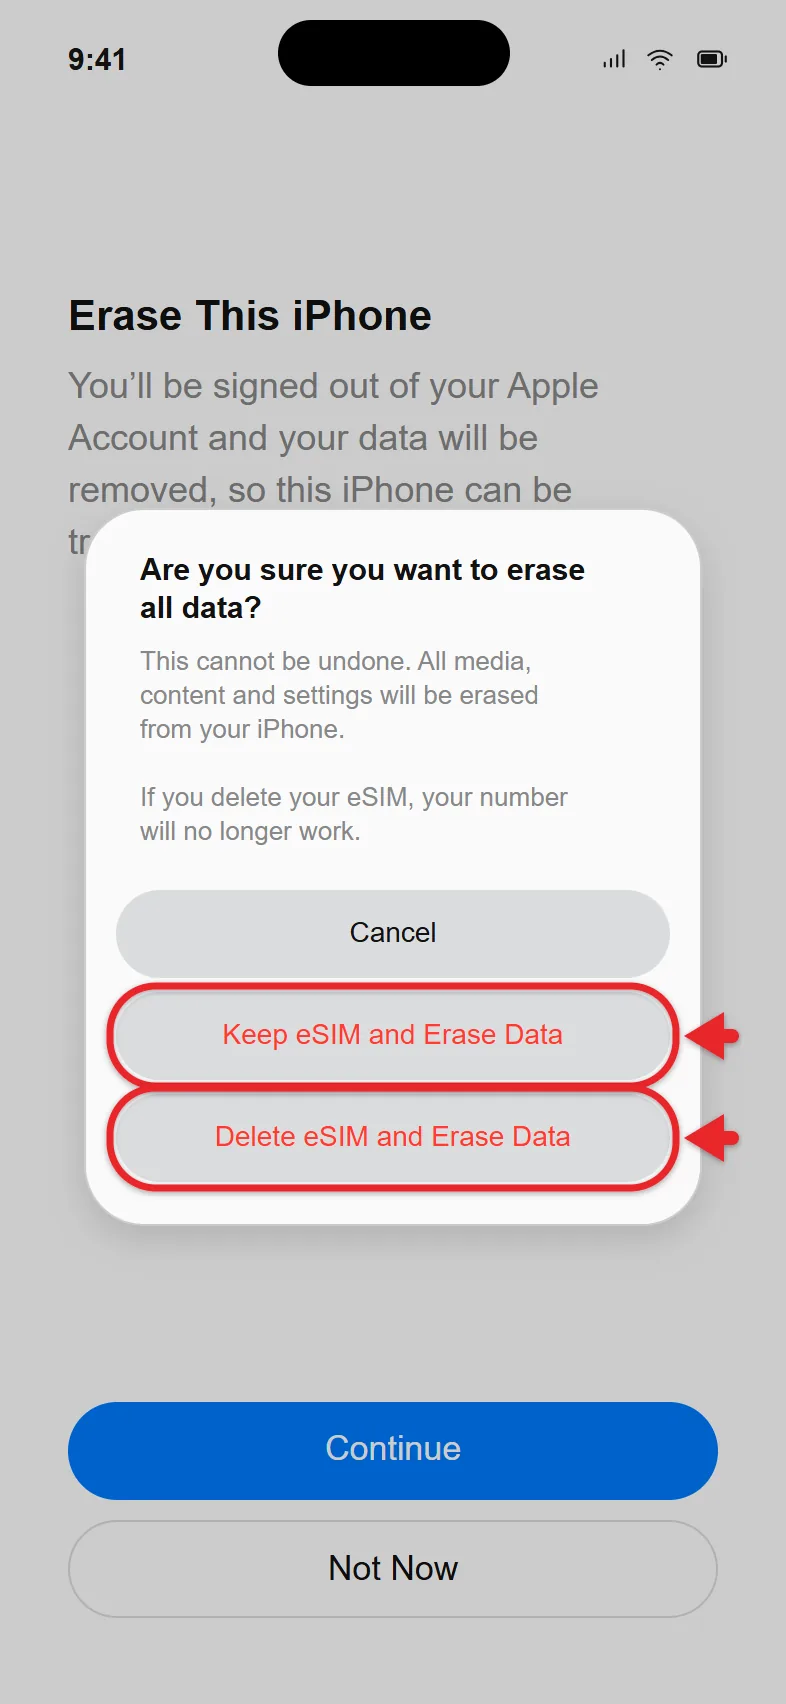
- Enter your passcode.
- Wait for the iCloud backup to finish uploading if the phone offers to finish it.
- Enter your Apple Account password and tap Done on the keyboard. This turns off Find My and Activation Lock.
- Wait while the iPhone erases. It restarts, and the Hello screen appears when it’s finished.
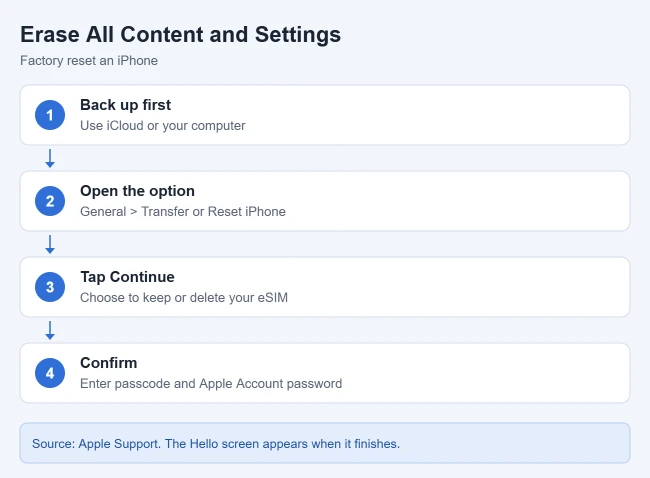
From the Hello screen, you can turn on and set up the iPhone again. Your apps and data come back when you restore the iPhone from a backup. Moving to a new phone instead? You can transfer your data from one iPhone to another.
Extra Steps Before Selling or Giving Away the iPhone
Apple’s checklist for selling or giving away an iPhone adds a few steps around the erase:
- Cancel or transfer your AppleCare plan if you have one.
- On iOS 26 or later, you can also start from Settings > [your name] > Sign Out, where you choose Erase this iPhone or Sign Out But Don’t Erase.
- If you’re switching to a non-Apple phone, deregister iMessage so texts reach your new phone.
- After the erase, remove the old phone from your Apple Account’s trusted devices.
- Hand the phone over only after the Hello screen appears, and take out any physical SIM card.
Other Ways to Reset an iPhone
Force Restart a Frozen iPhone
Many people say “hard reset” when they mean a force restart. It turns the phone off and on with the buttons and doesn’t delete anything. Apple’s steps for an iPhone that won’t turn on or is frozen depend on the model:
- iPhone 8 or later, including iPhone SE (2nd generation and later): Press and quickly release volume up, press and quickly release volume down, then press and hold the side button. Keep holding past the power-off slider and let go when the Apple logo appears.
- iPhone 7 or 7 Plus: Press and hold the side button and volume down together until the Apple logo appears.
- iPhone 6s or earlier, including iPhone SE (1st generation): Press and hold the Home button and the side or top button together until the Apple logo appears.
The logo can take longer than 10 seconds to appear. If the phone still doesn’t turn on, charge it for an hour and try again. The steps for force restarting or factory resetting an iPhone cover this in more detail. For an ordinary restart, turn the iPhone off and back on.
Reset an iPhone When You Forgot the Passcode
You can’t use the Settings menu without the passcode, but Apple offers three routes in its forgotten passcode article. The last two erase the phone.
- Passcode Reset (iOS 17 or later): If you changed your passcode in the last 72 hours, tap Forgot Passcode? on the iPhone Unavailable screen, tap Enter Previous Passcode, and set a new passcode. Your data stays. See Apple’s Passcode Reset steps.
- Reset from the Lock Screen: Enter the wrong passcode until iPhone Unavailable appears, tap Forgot Passcode?, tap Start iPhone Reset, enter your Apple Account password, and tap Erase iPhone. This needs iOS 15.2 or later, Find My turned on, and a Wi-Fi or cellular connection. On iOS 15.2 and iOS 16, the button is Erase iPhone instead of Forgot Passcode?. Apple’s reset without a computer article has the details.
- Restore with a computer: Use this when the first two options aren’t available. It’s described in the next section.
Restore the iPhone With a Mac or PC
A computer restore erases the iPhone and reinstalls iOS. Apple’s recovery mode steps work even when the phone won’t start normally or you can’t unlock it.
- On a Mac, open Finder. On a Windows PC, open the Apple Devices app. Update the Mac or the app first.
- Connect the iPhone with a USB cable.
- Put the iPhone in recovery mode with the same button sequence as a force restart for your model, but keep holding the last button until the Connect to computer screen appears.
- Select the iPhone on the computer. When you’re offered Update or Restore, choose Update first if you want to try keeping your data, or Restore to erase it.
- If the download takes more than 15 minutes and the phone leaves the recovery screen, let the download finish and repeat step 3.
- When the restore finishes, disconnect the phone and set it up.
The process can take up to 60 minutes. If you don’t have a computer, an Apple Store or Apple Authorized Service Provider can help.
Erase a Lost or Stolen iPhone Remotely
If you no longer have the phone, sign in to iCloud.com, open Find Devices, select the iPhone, and choose to erase it. Changing your Apple Account password stops a new owner from deleting your iCloud data, but it doesn’t erase the phone by itself.
Troubleshooting
- There’s no Reset option under General. Scroll to the very bottom of General and look for Transfer or Reset iPhone. On iOS 14 or earlier, tap Reset at the bottom of General instead.
- The phone asks for an Apple Account password you don’t remember. Reset it with Apple before you erase, or the erase can’t turn off Activation Lock.
- A work or school iPhone won’t let you reset. Phones managed by an organization can block some options, and VPN settings from a profile aren’t removed. Ask your IT administrator.
- You reset network settings and lost cellular data. Check Settings > Cellular to make sure Cellular Data is on. If you travel, turn Data Roaming back on under Cellular Data Options.
- The erase seems stuck. Plug the phone into power and leave it on Wi-Fi. If it stays on the Apple logo for a long time, force restart it or use the computer restore.
- Only one app is misbehaving. You don’t need a reset. Close and restart the app on iPhone first.
How to Confirm the Reset Worked
After a settings reset, the phone usually restarts or returns to Settings. Open Settings > Wi-Fi after a network reset and you’ll see no saved networks. After a Home Screen reset, the built-in apps are back in their original spots. After an erase, the Hello screen appears.
If a settings reset didn’t fix the problem, try the next option in the table above. To get your old settings back, you can restore the backup you made beforehand, which means erasing the phone first.
FAQs
Will Reset All Settings delete my photos?
No. No data or media are deleted. You’ll need to set up your settings again, including Wi-Fi passwords, Bluetooth devices, Apple Pay cards, and Face ID.
Does Reset All Settings sign me out of my Apple Account?
No. Your Apple Account, iCloud data, and apps stay. Only erasing the phone or signing out removes the account.
Does Reset Network Settings delete my eSIM?
No. The eSIM is removed only by Delete All eSIMs or by choosing Delete eSIM and Erase Data during an erase.
Is a hard reset the same as a factory reset?
No. A hard reset usually means a force restart, which keeps everything. A factory reset is Erase All Content and Settings, which deletes everything.
Does resetting remove a Screen Time passcode?
No, and restoring from a backup won’t remove it either. If you forgot the passcode, go to Settings > Screen Time > Manage Screen Time, tap Change Screen Time Passcode, tap it again, and enter the Apple Account email and password used to set it up. See Apple’s Screen Time passcode guide.
Next step: if you’re resetting because of a Wi-Fi problem, start with Reset Network Settings. It fixes most connection trouble without touching anything else.

Matthew Burleigh is the founder, head writer, and editor of Solve Your Tech, which he launched in 2012. He has written technology tutorials since 2008 and worked in IT since 2003, including small-business support, IT management, and consulting. He holds Bachelor’s and Master’s degrees in Computer Science from Arizona State University.
Matthew writes practical guides for Windows, iPhone and iPad, Microsoft Office, Outlook, Google apps, and Android. Solve Your Tech’s guides are checked step by step against the device or app maker’s own documentation and tested on his own devices whenever he has the hardware or software, with clear steps, sources, and update dates.
Read more about Matthew and how Solve Your Tech writes and updates its guides, or report a correction.