This post contains affiliate links. As an Amazon Associate, solveyourtech.com earns from qualifying purchases, at no extra cost to you.
To record video on a Nikon D3200, press the Lv button on the back to switch to live view, half-press the shutter-release button to focus, then press the red movie-record button on top. Press it again to stop.
The buttons and menus match every D3200, new or used, and come from Nikon’s D3200 user’s manual (PDF). The D3300, D3400, and D3500 record video in a similar way, but some buttons and options differ.
What the D3200 Can Record
Before you start, it helps to know what you’ll get. The D3200 records MOV files with H.264 compression and sound from a built-in mono microphone.
| Frame size | Frame rates (NTSC) | Frame rates (PAL) | Bit rate (High quality / Normal) |
|---|---|---|---|
| 1920 x 1080 (Full HD) | 30p, 24p | 25p, 24p | 24 / 12 Mbps |
| 1280 x 720 (HD) | 60p | 50p | 24 / 12 Mbps |
| 640 x 424 | 30p | 25p | 5 / 3 Mbps |
Each clip can run up to 20 minutes or 4 GB, whichever comes first. When a clip hits the limit, the camera stops recording, and you press the movie-record button again to start a new clip. The time remaining for the current clip shows on the monitor while you record.
The flash can’t be used during a movie, and the AF-assist lamp stays off in live view, so give the subject some light.
Record a Video on the Nikon D3200
You can record video in any shooting mode, including AUTO. If you’re new to the camera, leave the mode dial on AUTO for your first clips and let the camera handle exposure.
- Flip the power switch around the shutter-release button to ON. The information display lights up on the rear monitor.
- Press the Lv button on the back of the camera. The mirror flips up with a click, the viewfinder goes dark, and the scene appears on the rear monitor. This is live view, and the camera can only record video in live view.
- Point the camera at your subject and press the shutter-release button halfway. The focus area turns green when the camera locks focus. If it blinks red, the camera couldn’t focus; try a spot with more contrast or move back a little.
- Press the movie-record button, the small button with a red dot next to the shutter-release button. A red recording indicator and the time remaining appear on the monitor, and the camera starts recording.
- Press the movie-record button again to stop. The camera saves the clip to the memory card, and you’re back in live view, ready to record another.
- Press Lv again to leave live view and go back to using the viewfinder for photos.
Pressing the shutter-release button all the way down while you’re recording takes a still photo and ends the movie, so keep your finger off it unless you want a picture.
Play Back, Trim, or Save a Frame From a Clip
To check your clip, press the playback button (the triangle) on the back of the camera. Movies show a movie icon and their length. Highlight a movie and press OK to play it. Press the multi selector down to pause, and OK to resume.
To trim a clip or save one frame as a photo:
- Play the movie and pause it at the point you want.
- Press the AE-L/AF-L button to open the movie edit options.
- Choose Choose start/end point to cut footage from the beginning or end of the clip. The camera saves the trimmed version as a new copy and keeps the original.
- Choose Save selected frame instead to save the paused frame as a JPEG photo.
Change the Video Quality, Frame Rate, and Microphone
The D3200 keeps all of its video options in one place. Change them before you start recording.
- Press MENU and open the Shooting menu (the camera icon).
- Select Movie settings and press OK.
- Pick the option you want to change:
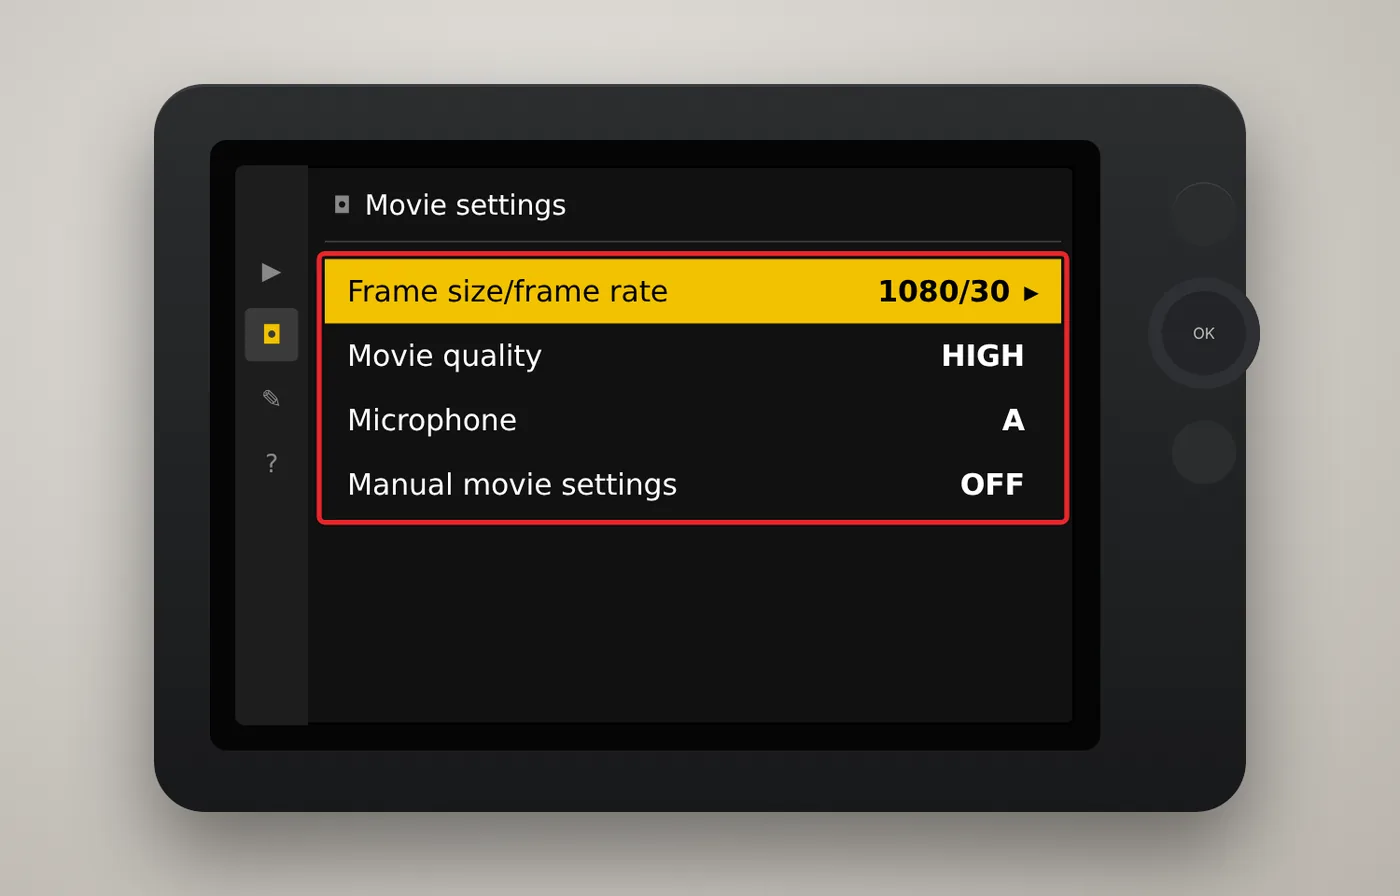
- Frame size/frame rate sets the resolution and frame rate from the table above. Choose 1920 x 1080 at 30p for everyday clips, 24p if you want a more film-like look, or 1280 x 720 at 60p for smoother motion when you plan to slow the footage down later.
- Movie quality has two choices, High quality and Normal. High quality uses about double the bit rate, which looks better but makes larger files.
- Microphone has three choices: Auto sensitivity, Manual sensitivity, and Microphone off.
- Manual movie settings lets you set shutter speed and ISO yourself when the mode dial is on M. Leave it off if you want the camera to set exposure.
- Press OK to save each change, then press MENU to close the menu.
If the frame rates on your camera show 25p and 50p instead of 30p and 60p, the camera is set to PAL. Change it under Setup menu > Video mode. Choose NTSC in the US. For more on that setting, read how to adjust the video frame rate on the Nikon D3200.
Get Sharper, Better-Sounding Video
The defaults work, but a few changes make a real difference.
Choose a focus mode for video. In live view, press the i button on the back of the camera to open the settings on the monitor, then choose Focus mode:
- AF-S focuses once when you half-press the shutter-release button. It’s the best choice for a subject that stays the same distance from the camera, like someone talking at a table.
- AF-F (full-time servo) keeps refocusing while you record. It helps with moving subjects, but it can hunt back and forth, and the built-in microphone may pick up the sound of the lens focusing.
- MF is manual focus. Switch the lens to M and turn the focus ring yourself. It’s silent and won’t jump to the wrong subject. Before you start recording, press the zoom-in button (the magnifying glass with a plus sign) to enlarge the live view picture, focus on a detailed spot such as the subject’s eyes, then zoom back out.
In the same display you can also choose the AF-area mode: face-priority, wide-area, normal-area, or subject tracking. Face-priority works well for filming people, although Nikon notes it detects fewer faces while a movie is recording.
Set white balance for your light. The i display also has a White balance option. Auto is fine outdoors. Under household bulbs or office lights, the matching preset (such as Incandescent or Fluorescent) keeps skin tones from looking orange or green.
Set exposure before you start. In AUTO and the scene modes, the camera handles exposure for you. In A or M mode, set the aperture before you press Lv, because you can’t change it while live view is on. In P, S, and A modes, you can brighten or darken the picture during recording with exposure compensation, up to 3 stops either way.
Watch the shutter speed. If you turn on Manual movie settings, a shutter speed around double your frame rate (1/60 second at 30p) gives natural-looking motion. Nikon lists these limits for manual movie exposure:
| Setting | Range in manual movie mode |
|---|---|
| Shutter speed at 24p, 25p, or 30p | 1/4,000 to 1/30 second |
| Shutter speed at 50p | 1/4,000 to 1/50 second |
| Shutter speed at 60p | 1/4,000 to 1/60 second |
| ISO | ISO 200 to Hi 1 |
Pan slowly. Nikon’s manual warns that fast horizontal pans and quick-moving objects can look distorted. Slow, steady moves and a tripod avoid most of it.
Use an external microphone for better sound. The built-in microphone is mono and sits on the front of the camera body, so it hears button presses, lens noise, and your breathing. Don’t cover it with your fingers while you record. The D3200 has a 3.5mm microphone input on the side of the camera, under the rubber cover. Nikon’s own option is the ME-1 stereo microphone, which records stereo sound and picks up less lens noise.
Check the sound level. The sound level meter turns red when the sound is too loud. If that happens, choose Manual sensitivity under Microphone and pick a lower level.
Memory Card and Storage Tips
Video fills a card much faster than photos. At 1080p in High quality, the D3200 records at about 24 megabits per second, which works out to roughly 180 MB per minute, or around 10 GB per hour. A 32 GB card holds a little under three hours of Full HD video at that setting.
Use an SD, SDHC, or SDXC card rated Class 6 or faster. A slower card can make the camera stop recording partway through a clip. If you need more space, you can pick up a larger SD card at Amazon. Any current card with a Class 10, U1, or V10 rating or better is fast enough for this camera.
To copy your videos to a computer, remove the card and put it in a card reader, or connect the camera with its USB cable. The steps for transferring photos from a camera to a Windows computer cover both methods, and movies copy the same way photos do.
After you’ve copied everything and checked that the files play, you can clear the card in the camera with Setup menu > Format memory card. Formatting erases everything on the card, including protected files, so copy anything you want to keep first.
Watch on a TV or External Monitor
The D3200 has an HDMI port under the side cover, so you can connect it to a TV or monitor with an HDMI cable to see live view or play movies on a big screen. If the TV shows no picture, go to Setup menu > HDMI > Output resolution and choose 1080i. If the TV supports HDMI-CEC (TV remote control of other devices), Nikon says to set Setup menu > HDMI > Device control to Off before you shoot in live view. Nikon’s manual doesn’t say the HDMI signal is suitable for an external recorder, so test before relying on one.
If Your D3200 Won’t Record Video
- Nothing happens when you press the movie-record button. The camera has to be in live view first. Press Lv, then press the movie-record button.
- The camera won’t record at all. Check that a card is inserted, that it isn’t full, and that the small lock switch on the side of the card is slid up to the unlocked position.
- Recording stops on its own. The clip may have reached 20 minutes or 4 GB. If it stops much sooner, the card is probably too slow. Try a faster card. Turning the mode dial or removing the lens also ends the clip.
- A countdown appears on the monitor. The camera is getting warm. Live view shuts off to protect the circuits when the 30-second countdown ends, even mid-clip. Turn the camera off and let it cool in the shade.
- The video flickers or shows bands under indoor lights. Go to Setup menu > Flicker reduction and pick the frequency that matches your local power supply. In the US, that’s 60 Hz.
- Focus keeps drifting. Switch from AF-F to AF-S and half-press the shutter-release button only when you need to refocus, or switch to manual focus.
- The video is too dark or too bright. Use exposure compensation in P, S, or A mode, or set the camera to AUTO so it picks exposure for you.
- There’s no sound. Open Shooting menu > Movie settings > Microphone and make sure it isn’t set to Microphone off.
Frequently Asked Questions
How long can the Nikon D3200 record video?
Each clip can be up to 20 minutes long or 4 GB in size, whichever comes first. You can record as many clips as the card and battery allow by pressing the movie-record button again after each one stops.
Does the Nikon D3200 record in 4K?
No. The highest resolution is 1920 x 1080 (Full HD) at up to 30 frames per second. For 60 frames per second, you need to drop to 1280 x 720.
Can I take a photo while recording video?
Yes, but pressing the shutter-release button all the way ends the movie and takes a still photo. You can also save a single frame from a clip later as a JPEG photo with Save selected frame during playback.
Can I use the viewfinder to record video?
No. The mirror has to be up for the camera to record, so the viewfinder goes dark. You compose the shot on the rear monitor in live view.
Does the D3200 autofocus while recording?
Only if you set the focus mode to AF-F. In AF-S, the camera focuses when you half-press the shutter-release button and holds that focus until you half-press it again.
Can I use the flash while recording?
No. Nikon’s manual says the flash can’t be used during movie recording. Add light from a lamp or a window instead.

Matthew Burleigh is the founder, head writer, and editor of Solve Your Tech, which he launched in 2012. He has written technology tutorials since 2008 and worked in IT since 2003, including small-business support, IT management, and consulting. He holds Bachelor’s and Master’s degrees in Computer Science from Arizona State University.
Matthew writes practical guides for Windows, iPhone and iPad, Microsoft Office, Outlook, Google apps, and Android. Solve Your Tech’s guides are checked step by step against the device or app maker’s own documentation and tested on his own devices whenever he has the hardware or software, with clear steps, sources, and update dates.
Read more about Matthew and how Solve Your Tech writes and updates its guides, or report a correction.