Managing file sizes when it comes to images is important if your work is going online. Google values site speed when it ranks Web pages, and large images are a big contributing factor to that speed. Therefore you may be wondering how to reduce file size in Adobe Photoshop CS5.
The ability to add layers and make high-resolution images in Adobe Photoshop CS5 is great when you are designing images. If that image is then going to be printed, then you probably will not need to worry about the file size of the design that you are creating.
However, if you need to email your design to someone or if you need to post it on a website, then the file size of a JPEG image that you create must be taken into consideration. There are some basic preparations that you can make if you want to reduce the size of a JPEG file in Photoshop CS5, but there is one particular utility that will allow you to compress your image as much as possible for online posting.
How to Reduce File Size in Adobe Photoshop CS5
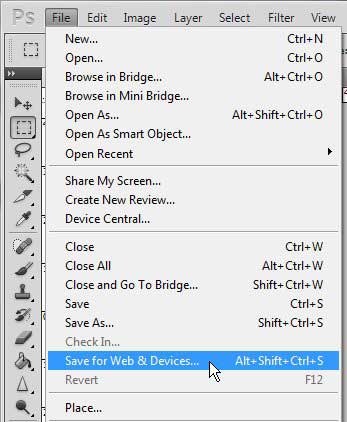
- Click File.
- Choose Save for Web & Devices.
- Select the File type.
- Adjust the quality.
- Click Save.
Our article continues below with additional information on reducing the size in Adobe Photoshop. This includes information on making the actual image dimensions smaller, as well as more information on using the “Save for Web & Devices” feature.
How to Make a JPEG File Smaller with Photoshop CS5 (Guide with Pictures)
When you determine that reducing the file size of your JPEG is the solution for your situation, then there are a couple of factors that you must realize. There are two main image properties that make your file size greater – the dimensions of the image and the resolution of the image. If you want to decrease the file size, you have to decrease these elements. You can either do this manually, or you can use a specific Photoshop utility to do it in a slightly more automated way.
Begin the process of reducing the size of a JPEG in Photoshop CS5 manually by opening the image in Photoshop. Before changing the dimensions and resolution of your image, it is best to know the dimensions that are best suited to your needs. If you do not know what size image your website requires, contact the designer or developer of the site for their preferred image specifications.
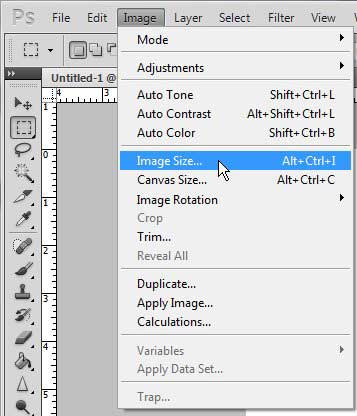
Step 1: Click Image at the top of the window, then click Image Size.
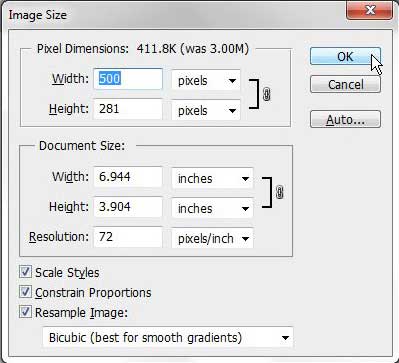
Step 2: Confirm that the box to the left of Constrain Proportions is checked at the bottom of the window.
This will ensure that any modifications you make to the height or width of your image will be made to the other dimension as well, thereby keeping the image at scale. You can also adjust the resolution of your image on this window, as well. When you have finished making changes to these settings, click the OK button.
Step 3: Click File at the top of the window, then click Save As.
Step 4: Type a name for your file into the File name field, then click the drop-down menu to the right of Format and choose the JPEG option. Click Save when you are done.
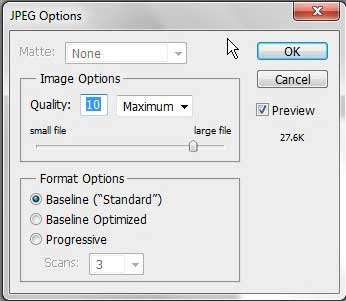
Step 5: Click the slider at the center of the window to choose a different quality for the image.
As you move the slider, you will notice that the file size number at the right side of the window will adjust accordingly. Click the OK button when you have selected the preferred image quality.
How to Use Save for Web & Devices in Photoshop CS5 (Guide with Pictures)
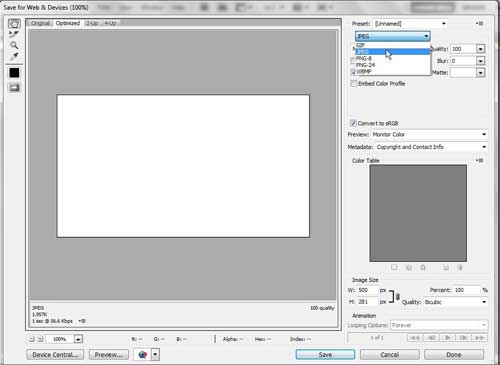
You can also use the Save for Web & Devices option on the File menu once you have specified the dimensions and resolution for your image.
Click the drop-down menu at the top-right corner of the window, then choose the JPEG option. The file size with the current settings is displayed at the bottom-left corner of the window. If you want to reduce this file size more, click the drop-down menu at the top-right of the window to the right of Quality, then drag the slider until you find a number that gives you the preferred file size. Click the Save button to save the image with your chosen settings.
Now that you know how to reduce the file size of a picture in Photoshop, you can use one of these options whenever you are working on an image that has too large of a file size.
If you have been working on your design in Photoshop, then you have probably added some layers or elements to the image that prevent you from natively being able to save the file in the JPEG format. If this is the case, be sure to use the Save command on the File menu to save your original file, as the JPEG you just created produces a different copy of the image.
In newer versions of Adobe Photoshop you may not be able to find the “Save for Web & Devices” option. However, you can still use the keyboard shortcut of Ctrl + Alt + Shift + S to open the Save for Web option. Alternatively you can find it at File > Export.

Matthew Burleigh has been writing tech tutorials since 2008. His writing has appeared on dozens of different websites and been read over 50 million times.
After receiving his Bachelor’s and Master’s degrees in Computer Science he spent several years working in IT management for small businesses. However, he now works full time writing content online and creating websites.
His main writing topics include iPhones, Microsoft Office, Google Apps, Android, and Photoshop, but he has also written about many other tech topics as well.
