When an image or picture that you are working with in Adobe Photoshop includes elements on separate layers, then you will likely need to work with some transparency.
This can be difficult depending on the pre-existing characteristics of the image, which can leave you wondering how to make a transparent background in Photoshop.
Fortunately there are a few ways to achieve this, which we will discuss in our tutorial below.
You may find yourself in the position of needing to make a transparent background in Photoshop when a project requires an image to be placed on top of an existing background.
The default setup in Adobe Photoshop CS5 includes the creation of new images with a white background.
There are many situations where a white background is ideal for your image creation, so you probably have not given much thought to adjusting that setting.
If you are planning to make a multi-layer image, or if you want to create a transparent PNG image for your website, then you have likely discovered that a white background actually has a pixel color value, and that value needs to be removed.
There are a couple of different options when you want to learn how to make a transparent background in Photoshop CS5, so you can read this tutorial to determine which solution is right for your situation.
How to Create a New Image with a Transparent Background in Photoshop CS5
This is the simplest of the two solutions, and is certainly where you should be starting, if possible.
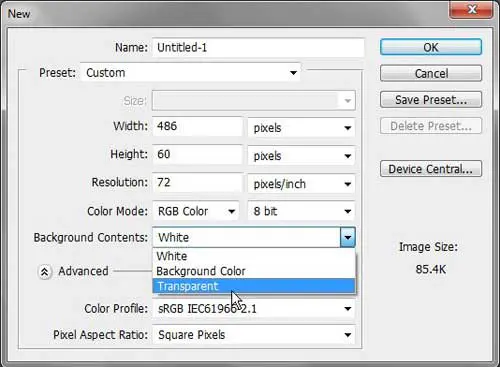
Step 1: Launch Adobe Photoshop CS5, click File at the top of the window, then click New. This will open the New window.
Step 2: Click the drop-down menu to the right of Background Contents, then click the Transparent option.
Step 3: Make any other necessary changes to the size and format of your new image, then click the OK button to generate your blank image.
All of the empty space on your image will be transparent, provided that it is saved in a file format that supports transparency.
If you are creating an image that will be posted on a website, you should probably use the PNG file format, as JPEG does not support transparency.
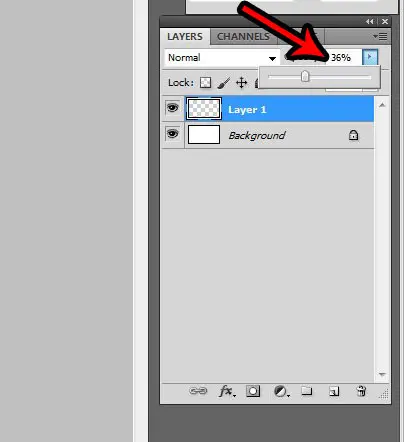
Anything you add to the image will have the transparency that you define. You can choose the opacity for each layer by adjusting the Opacity option at the top of the Layers panel.
Summary – How to make a new image with a transparent background in Photoshop
- Click File.
- Click New.
- Click the Background Contents drop-down menu, then click Transparent.
- Click the OK button to make a new image in Photoshop with a transparent background.
Unfortunately, every situation that involves transparency in photoshop won’t be with a new image, so you can continue below with our transparent background Photoshop guide and see a couple of ways to make a background transparent in an existing image.
How to Change an Existing Background to a Transparent Background in Photoshop CS5
The solution to this problem is a little more complicated than the solution to creating a transparent background from scratch.
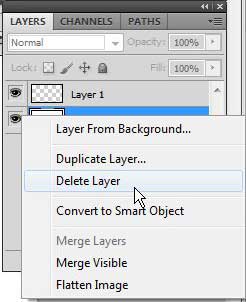
If you are working with a multi-layer image and the existing background layer is only the default white background, then you can delete that layer.
Step 1: Right-click on the Background layer in the Layers panel at the right side of the window, click the Delete layer option, then confirm that you want to delete the layer.
Any transparency in your image should now be in effect.
Summary – How to make a transparent background in Photoshop on an image with an existing background layer
- Locate the Layers panel.
- Right-click the Background layer, then click the Delete Layer option.
- Click the Yes button to confirm that you want to delete the background layer.
So if you had a solid color layer in your picture it should now be gone and there should be some transparency in the picture.
But if you aren’t able to delete an entire layer because it contains content that needs to remain in the image, then you will need to utilize some editing tools to change the background to transparent in Photoshop.
Our article continues below with additional options for how to make a transparent background in Photoshop.
How to Use the Magic Eraser to Delete Solid Color Backgrounds
If you have content on the Background layer that you want to save, then you will need to get a little creative to remove the unwanted background color.
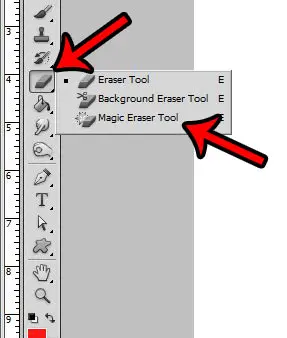
You can use the Magic eraser tool (right-click the Eraser tool in the toolbox, then click the Magic Eraser Tool) to delete all contiguous regions of that color on your layer.
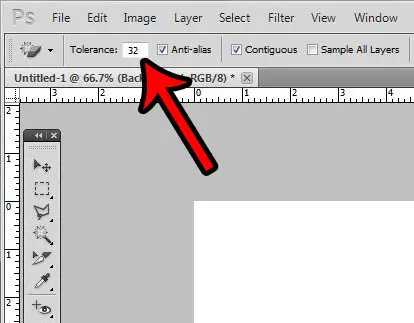
If you are finding that this method is deleting some of the content that you want to keep, you can undo the erase, then modify the Tolerance setting at the top of the window. The lower the tolerance number, the more precise the magic erase action will be.
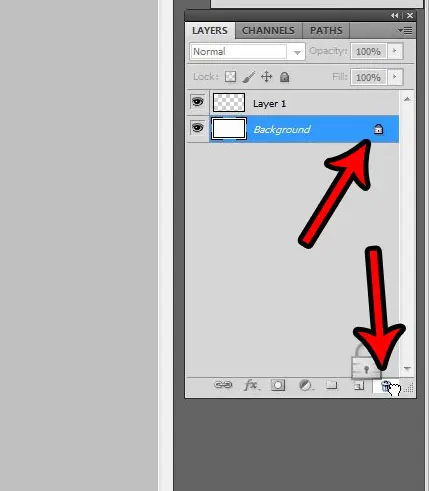
You can also unlock the background layer, then use the regular eraser tool to manually erase unwanted elements of the background.
An additional option involves changing the opacity for a layer.
One final option is to use one of the lasso tools to select the content you want to keep, press Shift + Ctrl + I to invert the selection, then press Ctrl + X to delete the unwanted background.
You could also consider using the magic wand tool to remove background content from an image.
For example, if you want to make a logo background transparent but the logo is on a layer with a solid color, then you could go about creating transparent backgrounds from that layer by selecting the magic wand tool, clicking on the solid color, then delete it to create a transparent background on that layer.
Once you have your picture set up with the transparency that you want, you will find that it’s usually easier to create a new layer in the image when you want to add more content. That new layer should be a transparent layer, but you can always use the steps in the section at the start of this article to make a white background transparent.
There is no one solution that is going to work in every possible scenario concerning transparent backgrounds in an image file, but if you become comfortable with each of these tools you should be able to make a transparent background in Photoshop CS5 for just about any image that you encounter.

Matthew Burleigh has been writing tech tutorials since 2008. His writing has appeared on dozens of different websites and been read over 50 million times.
After receiving his Bachelor’s and Master’s degrees in Computer Science he spent several years working in IT management for small businesses. However, he now works full time writing content online and creating websites.
His main writing topics include iPhones, Microsoft Office, Google Apps, Android, and Photoshop, but he has also written about many other tech topics as well.
