There are a lot of different tools in Adobe Photoshop, and even very experienced users won’t touch a lot of them.
This means that there are often a lot of ways to accomplish a task, such as creating a white background on your picture.
One way to make a background white in Photoshop is to open the Levels tool, choose the “Sample in image to set white point” option, then click a point in the background.
If you take a lot of pictures of products or items and post them to Facebook, Pinterest, or your own website, then you know how difficult it can be to get those images to a point where you feel that they are of a good enough quality to go on a website.
You’ve probably experimented with using different kinds of backgrounds and lighting to make it as simple as possible, but even if you use a lightbox it can be difficult to accurately change your background to a pure white color without making the rest of the image look like it has been dramatically brightened.
So, ideally, you want a solution that will result in a good-looking image, with a minimal amount of work.
One easy way to accomplish this is to place your object on a white sheet of paper, in a white photo tent or lightbox, or in front of a white sheet.
Unfortunately, this will result in a grayish background color, which can be less than appealing. But with the use of the Levels tool in Photoshop CS5, it is possible to make the background white while preserving the color integrity of the rest of the picture.
How to Quickly Make a Background White in Photoshop
- Open the image.
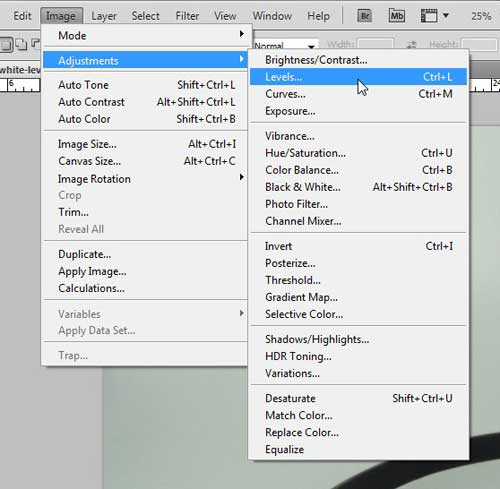
- Click Image, then Adjustments, then Levels.
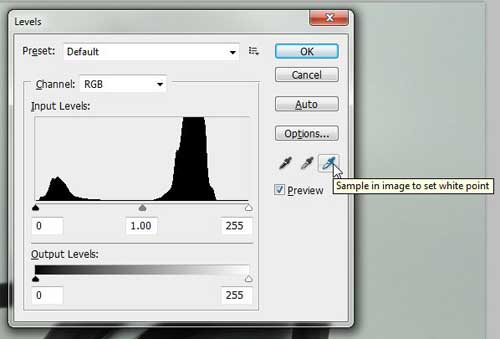
- Select the Sample in image to set white point button.
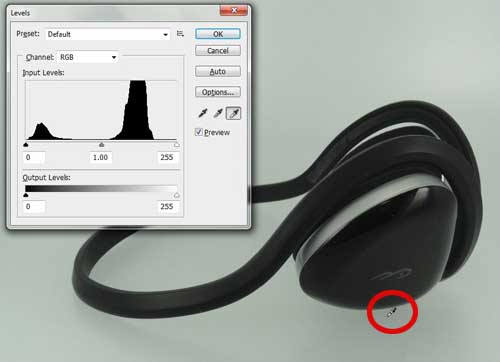
- Click a spot in the picture to make white.
- Click OK.
Our guide continues below with additional information on how to whiten a background in Photoshop, including pictures of these steps.
We discuss this process, as well as a couple of others, in our Photoshop create transparent background tutorial.
How to Set the White Level in Photoshop CS5 (Guide with Pictures)
I have had the best results using this method with objects that contrast sharply with the white background. If you are photographing something crystal, white, gray, or silver then this may not work as well.
You can often get better results with those lighter-colored objects on a gray or black background, then adjust the brightness and contrast manually. Since you will get fewer shadows with those background colors, there is usually less clean-up work involved.
So here is the image that I am going to start with. It’s just a simple pair of Bluetooth headphones. I shot the image with the automatic setting on a point and shoot camera in a lightbox.
Step 1: Open the image in Photoshop CS5.
Step 2: Click Image at the top of the window, then Adjustments, then Levels.
Note that you can also just press Ctrl + L on your keyboard to open this tool as well.
Step 3: Click the Sample in image to set white point button at the side of the window.
Step 4: Click on the point in your image that you want to set as the white point.
I typically like to use one of the darker shadow areas, but you will need to experiment with different locations in the image until you find the best results. If you do not like the spot you have selected, you can always press Ctrl + Z on your keyboard to undo the change.
Step 5: Once you are happy with how the adjusted image looks, click the OK button on the Levels window to apply the change.
My example image wound up looking like this.
Again, this is not the most professional or best-resulting way to do this, but you will end up with pretty good results in a lot of situations, and it will only take you a few seconds per image.
Our tutorial continues below with additional discussion on making white backgrounds in Adobe Photoshop.
More Information on How to Whiten a Background in Photoshop
What we are doing in the steps above is choosing a spot in the image to set as the white point. This means that Photoshop will automatically adjust everything in the image with the assumption that the selected color is white.
if your image was taken on something that looks white in real life, like white paper, a sheet, white cloth, etc., then that background probably looks grayish on a computer.
Since you are trying to use that real-life background as “white” then setting the white point in Photoshop will make it so. This often has the effect of making everything else in the picture brighter, which works out well for things like products and still images.
Another thing that you may want to try out is the background eraser. This is a tool in Photoshop that will attempt to smartly identify the focus of the image, then will erase everything around it. It can work really well when there is a lot of contrast in the picture but can be problematic when there isn’t a lot of color variation between the foreground and background.
If you were looking for a way to change the background layer color on images in Photoshop CS5, then you can read this article for more information on how to accomplish that task.
Additional Sources

Matthew Burleigh has been writing tech tutorials since 2008. His writing has appeared on dozens of different websites and been read over 50 million times.
After receiving his Bachelor’s and Master’s degrees in Computer Science he spent several years working in IT management for small businesses. However, he now works full time writing content online and creating websites.
His main writing topics include iPhones, Microsoft Office, Google Apps, Android, and Photoshop, but he has also written about many other tech topics as well.


