To center a layer in Photoshop, select the layer in the Layers panel, choose Select › All, and then choose Layer › Align Layers to Selection › Vertical Centers followed by Horizontal Centers. The layer’s content moves to the middle of the canvas. Choose Select › Deselect when you are done.
This guide covers Photoshop on desktop (Windows and Mac). The steps follow Adobe’s current help pages, and the same menu commands exist in older versions such as Photoshop CS5.
Before you start
- The layer must be a regular layer. A layer named Background is locked in place. Convert it first (see the troubleshooting section below).
- Know what “centered” means here. Photoshop lines up the center of the layer’s content with the center of the selection border. A selection is the area inside the moving dashed outline. When you select everything, that outline sits on the edge of the canvas, so the layer lands in the middle of the canvas.
- Nothing is deleted. Aligning only moves the layer. You can reverse it with Edit › Undo.
Center a layer on the canvas
- Open the Layers panel. If you do not see it, choose Window › Layers.
- Click the layer you want to center. It is highlighted when selected.
- Choose Select › All. The default shortcut is Ctrl+A on Windows or Cmd+A on a Mac. A dashed outline appears around the whole canvas.
- Choose Layer › Align Layers to Selection › Vertical Centers. The layer moves up or down to the middle.
- Choose Layer › Align Layers to Selection › Horizontal Centers. The layer moves left or right to the middle.
- Choose Select › Deselect (Ctrl+D or Cmd+D by default) to remove the dashed outline.
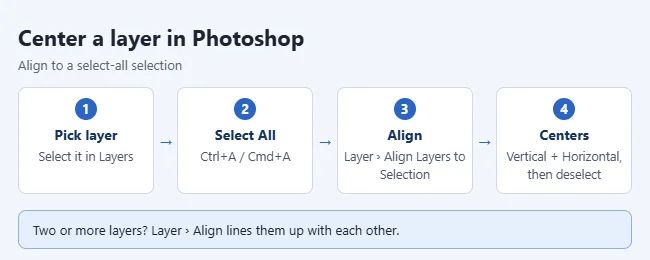
If the submenu in your version is simply called Align, use that. The center commands are the same. Adobe’s Align layers help page explains that Vertical Centers and Horizontal Centers line the layer up with the center of the selection border.
You only need one of the two commands if you want the layer centered in one direction. For example, use just Horizontal Centers to center a heading left to right while keeping it near the top.
The same commands appear as icons, which is faster when you center things often.
- Select the layer in the Layers panel.
- Choose Select › All.
- Select the Move tool in the Tools panel, or press V. Alignment and distribution icons appear in the options bar across the top of the window.
- Click the Align Vertical Centers icon, then the Align Horizontal Centers icon. Hover over an icon to see its name.
- Choose Select › Deselect.
Some recent versions are reported to include an Align To setting behind a three-dot button in the options bar, with a Canvas choice that centers without Select All. Adobe’s current align help page does not describe that setting, so if you do not see it, use the Select All steps above.
Center a layer inside part of the image
You do not have to center on the whole canvas. Draw a selection around the area you care about, such as a banner or a column, with the Rectangular Marquee tool. Then select the layer and use the same Vertical Centers and Horizontal Centers commands. The layer is centered inside the area you drew rather than the full canvas.
Center layers on each other
To line up one layer with another, no selection is needed.
- In the Layers panel, select two or more layers. Shift-click to select a range of layers.
- Choose Layer › Align › Vertical Centers, Horizontal Centers, or both.
The layers line up with each other instead of the canvas, so the result may not be in the middle of the document. This also works for shape layers, such as straight lines and arrows drawn in Photoshop.

Center by dragging with Smart Guides
Smart Guides are temporary pink lines that appear while you drag and show when a layer lines up with edges or centers. They are handy for a quick visual check.
- Choose View › Show › Smart Guides and make sure it has a checkmark.
- Choose View › Snap so it also has a checkmark. Snapping pulls the layer onto a guide when it gets close.
- Select the Move tool and drag the layer toward the middle. Release the mouse when the pink guides show it is centered.
Adobe describes these options in Work efficiently with Smart Guides. In a document with many layers the guides can refer to other layers rather than the canvas, so the align commands are the more reliable choice for an exact center.
Move a Text Layer Without Changing Its Words
Open Window > Layers if the panel is hidden, then select the text layer by its name. Choose the Move tool (V) and drag the text on the canvas to its new position. Use the arrow keys for small adjustments, or Shift with an arrow for larger movements. Adobe’s text-moving guide describes this method. Keep the type layer editable; moving it does not require rasterizing it.
Flip, Rotate, or Resize One Layer
Select the intended layer in the Layers panel. Use Edit > Transform > Flip Horizontal to mirror it, or choose Rotate 90° Clockwise or Counter Clockwise to turn it. Adobe’s rotation guide distinguishes these layer commands from Image > Image Rotation, which changes the whole canvas. Check the layer selection before applying the command.
For resizing, choose Edit > Free Transform (Ctrl + T on Windows; Command + T on Mac). Enable the link between the W and H percentage fields, then enter a percentage such as 50% to halve the layer’s dimensions without stretching it. Confirm with Enter on Windows or Return on Mac; Esc cancels. Adobe’s scaling guide explains the aspect-ratio control. Older CS5 also offers Edit > Transform > Scale and linked W/H fields. Small source images can look softer when enlarged.
Create, Rename, Hide, or Reorder Layers
In Window > Layers, click the Create a new layer icon at the bottom for a blank layer. Double-click a layer’s name, type a useful label and press Enter or Return to rename it. Click its eye icon to hide it; click the same visibility slot to show it again. Adobe’s Layers-panel guide covers these controls. Hiding preserves the contents, unlike deleting.
To put an existing layer in front of the others, drag its row upward in the Layers panel to the desired stacking position. Watch the insertion indicator and release it above the intended row; avoid dropping it inside a group unless that is your intention. Check the canvas afterward. Higher layers can cover lower ones, depending on transparency. These basic panel operations also apply to the older CS5 layer tasks; you do not need to flatten or merge the document to rearrange a layer.
Delete Only the Layer You Intend
Save a separate layered PSD copy before discarding content. Select the exact layer in the Layers panel, then choose Layer > Delete > Layer, or its Delete Layer panel command. Read the confirmation and approve only that selection. Adobe’s layer-management guide lists these deletion routes. Check that the correct row disappeared; use Edit > Undo immediately if it did not. Clicking the eye icon is the better choice when you only want to hide the layer temporarily.
Check the result or undo it
Run the same two center commands again with everything still selected. If the layer does not move, it is already centered. To put the layer back where it was, choose Edit › Undo right after aligning, once for each command you used.
Merge or Link Layers Without Confusing the Two
Save a separate layered PSD copy before merging. To combine two adjacent visible layers, select the top layer and choose Layer > Merge Down; check that the lower layer is a pixel layer. To combine several selected layers, select them in the Layers panel and choose Layer > Merge Layers. Layer > Merge Visible combines the visible layers instead. Adobe’s merging guide explains that merging combines the layer content and removes separate editing flexibility. Undo can reverse a recent merge in the open session; a saved merged file does not preserve its original separate layers.
To keep layers separate but move or transform them together, select them in the Layers panel and click the Link Layers chain icon. On Windows, Ctrl-click adds separate layers to your selection; on Mac, Command-click does. Check the link indicators and try a small move, undoing it if needed. Select a linked layer and click Link Layers again to unlink it. Adobe’s linking guide documents that the relationship persists until unlinked. Linking does not merge content into one layer or make every kind of edit identical across all linked layers.
Rotate a Layer by an Arbitrary Angle
For an angle other than 90 degrees, select the intended layer and choose Edit > Free Transform. Move the pointer just outside a corner of the transform box and drag to rotate; use the rotation-angle field in the options bar when you need a precise value. Confirm with Enter or Return, or cancel with Esc. Check the result against the other layers. This transforms the selected layer rather than rotating the whole canvas through Image Rotation; preserve your layered source before saving a flattened export.
Troubleshooting
- The align commands are grayed out. They need something to align to. Choose Select › All first, or select at least two layers. Also confirm that a layer is highlighted in the Layers panel.
- The layer is called Background and will not move. Select it and choose Layer › New › Layer From Background, then select OK. Adobe covers this in Convert background and regular layers.
- The layer looks slightly off-center. Photoshop centers all of the layer’s content, including faint pixels and soft edges you may not notice. Erase or mask stray pixels, then align again.
- No align icons in the options bar. They only show while the Move tool is active. Press V.
- Dragging will not settle on the center. Check that View › Snap is turned on. To place a layer freely instead, Adobe notes you can hold Ctrl (Windows) or Command (Mac) while dragging to turn snapping off temporarily.
Frequently asked questions
How do I center text in Photoshop?
Select the type layer, choose Select › All, and use the Vertical Centers and Horizontal Centers align commands. This centers the text layer on the canvas. It is different from the paragraph alignment buttons, which only control how lines of text sit inside their own layer. If the text looks off-center after you change the font in Photoshop, run the align commands again. If the words belong inside a shape, see how to create a speech bubble in Photoshop.
Can I center several layers at once?
Yes. To keep their spacing, put them in a layer group, select the group, choose Select › All, and align. Adobe’s align commands work on layer groups as well as single layers. If you select the layers individually instead, each one is centered on its own and they end up stacked.
Does this work in Photoshop CS5?
Yes. The Layer › Align Layers to Selection commands and the Move tool align icons are available in CS5. Smart Guides exist there too, though menu wording can differ slightly from current versions.
Why did my layer move off-center after I resized the canvas?
Aligning is a one-time move. If the canvas size changes afterward, the layer stays where it was. Select all and run the center commands again.
Next steps
If the content you need to center is in another file, see how to copy a layer to another image first. Once everything is lined up, you can export each layer as a separate image.

Matthew Burleigh is the founder, head writer, and editor of Solve Your Tech, which he launched in 2012. He has written technology tutorials since 2008 and worked in IT since 2003, including small-business support, IT management, and consulting. He holds Bachelor’s and Master’s degrees in Computer Science from Arizona State University.
Matthew writes practical guides for Windows, iPhone and iPad, Microsoft Office, Outlook, Google apps, and Android. Solve Your Tech’s guides are tested on current devices or checked against official product documentation, with clear steps, sources, and update dates.
Read more about Matthew and how Solve Your Tech writes and updates its guides, or report a correction.