There are several different ways in Photoshop CS5 that you can create an image with a transparent background.
You can adjust the settings when creating a new background so that the default background is transparent, or you can delete or convert an existing background layer so that it has transparency.
Both of these methods are thoroughly explained in this article, and will help you customize your image with the transparency that you desire.
However, creating multiple layers with transparency presents an additional problem. Most common image types are single-layered, and do not preserve transparency.
Fortunately, there is one image type you can use, though, that will help you save a picture with a transparent background in Photoshop CS5.
Preserve Transparency When Saving in Photoshop CS5
The default multi-layer files that you create in Photoshop will preserve transparency naturally. Whether it is a PSD or a PDF file, Photoshop will keep all of your layer elements in the format that you set.
But these file types can be difficult to view for people without Photoshop, and they cannot be uploaded as parts of a Web page, or inserted into a document.
Therefore, you need to utilize the PNG file type to create an image that will preserve all of the transparency on your layers, while still being compatible with Web browsers and word processing programs.
1. Begin by opening your multi-layer Photoshop file with the transparent background.
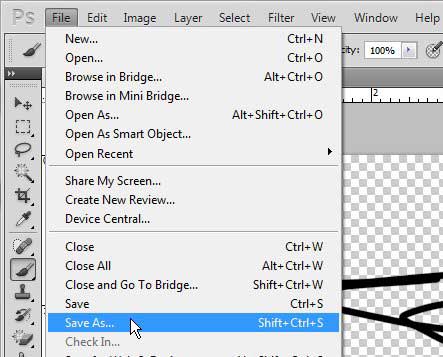
2. Click File at the top of the window, then click Save As.
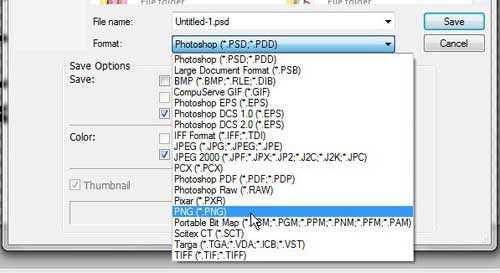
3. Type a name for the image into the File Name field, then click the Format drop-down menu and choose the PNG option.
4. Click the Save button to create your single-layered image with the preserved transparent background.
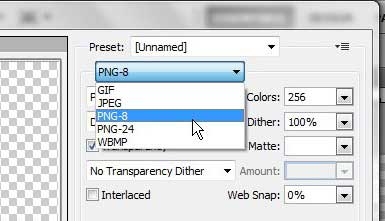
If your saved image has a large file size, you may be able to reduce it by using the Save for Web & devices option on the File menu instead of the Save As option. Click the drop-down menu at the top-right corner of the window, then choose the PNG-8 or PNG-24 option, depending upon which one is giving you the best image with the lowest file size.
You can see the expected output file size at the bottom-left corner of the preview window. Once you have adjusted your settings, click the Save button at the bottom of the window, then enter a file name for your picture.
Now that you know how to save a picture with a transparent background in Phootshop CS5, you will be able to use this image in a document or application where you need that transparency.

Matthew Burleigh has been writing tech tutorials since 2008. His writing has appeared on dozens of different websites and been read over 50 million times.
After receiving his Bachelor’s and Master’s degrees in Computer Science he spent several years working in IT management for small businesses. However, he now works full time writing content online and creating websites.
His main writing topics include iPhones, Microsoft Office, Google Apps, Android, and Photoshop, but he has also written about many other tech topics as well.


