The ability to use layers in Photoshop CS5 is one of the most important factors for many individuals that use the program.
However, the ability to store layers in files means that the files must be saved in a manner where that layer information can be preserved. Adobe Photoshop CS5 stores your files in the PSD file format by default, which will allow the files that you create to store all of the information and changes that you have made to the image.
While this process is ideal for easily changing the PSD file, that file format is not compatible with most other applications.
Therefore, you will find yourself in situations where you need to know how to convert PSD to JPEG in Photoshop to generate a file that you can easily send to other people, or post on the Internet.
Convert a PSD File to a JPEG in Photoshop CS5
While Photoshop CS5 will save your files to the PSD file format by default, it is actually capable of producing an impressive list of file types from your PSD files. The JPEG file format is one of the available options, as it is one of the most common file types that you will find among images. Photoshop users are typically creating their files for use in publications or on the Internet, so the ability to turn their creations into such a universal file format is a necessity for most users.
Begin the conversion process by opening the PSD file in Photoshop CS5. If you want to make any changes to your image before you create the JPEG file, you should make those changes now. The JPEG file that you are creating is essentially going to be a snapshot of your PSD file at the point that the conversion occurred. If you find that you need to make additional changes to the image after you have made the JPEG version of it, you will need to perform the PSD to JPEG conversion in Photoshop CS5 again.
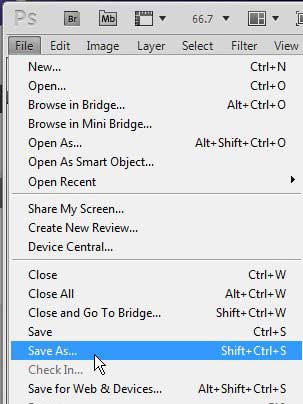
Once the PSD is finalized, click File at the top of the window, then click Save As.
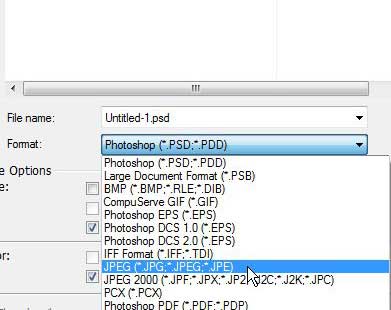
Click the Format drop-down menu at the center of the window, then click the JPEG option. Note that there is also a JPEG 2000 version, but that is probably not the version you are looking for. You can also change the name of the file by typing your desired file name into the File Name field above the Format drop-down menu. Once the file name and the format are correctly set, you can click the Save button to generate the JPEG version of your image.
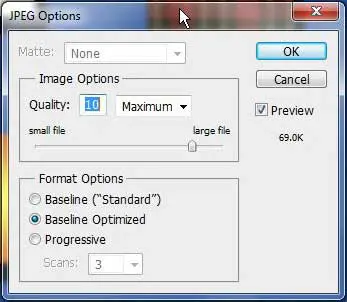
You will now see the JPEG window, on which you can set the compression level of the JPEG image by dragging the slider in the Image Options section. The file size of the image with the selected compression is displayed at the right side of the window. Increasing the quality of the image will also increase the size of the file. Once you have chosen your preferred image quality, click the OK button to complete the conversion process.
Now that you know how to convert from a PSD to a JPEG file in Photoshop, you will be able to create files that are more compatible with other applications.
This will result in two versions of your file; the JPEG file that you just created and the PSD original file. You can continue to make any changes that you want to the PSD file, but the JPEG file will stay the same as when you created it. Note that the created JPEG file can also be edited in Photoshop, if necessary.

Matthew Burleigh has been writing tech tutorials since 2008. His writing has appeared on dozens of different websites and been read over 50 million times.
After receiving his Bachelor’s and Master’s degrees in Computer Science he spent several years working in IT management for small businesses. However, he now works full time writing content online and creating websites.
His main writing topics include iPhones, Microsoft Office, Google Apps, Android, and Photoshop, but he has also written about many other tech topics as well.


