If you use your email address a lot and have a lot o communications with people for work, school, or personal emails, then your inbox might be pretty full.
All of these messages can make it difficult to find the ones that you really need, so you may have decided that you are going to sort them into folders.
Our tutorial below will help you to create folders in Outlook so that you can start moving the emails to their new locations.
How to Add a Folder in Microsoft Outlook
- Open Outlook.
- Right-click your email address in the left column.
- Select the New Folder option.
- Type a name for the folder and press Enter.
Our guide continues below with additional information on how to create folders in Outlook, including pictures of these steps.
If you use Google Docs for document editing, then read this can I create folders in Google Docs guide to learn how you can organize files there, too.
Your inbox can become difficult to sort and navigate when you receive a lot of emails. While searching can be an effective way to locate the message that you need, another way to stay organized is with the help of folders.
Our tutorial below will show you how to create a new folder in Outlook 2013.
You can then use those new folders to sort your emails manually by dragging and dropping them from your inbox, or you can create rules to let this sorting happen automatically.
Looking for a simple way to send emails to a large group of people? Find out how to create a distribution list in Outlook so that you don’t need to type all of the same email addresses for every email.
How to Make a New Folder in Outlook 2013 (Guide with Pictures)
The steps in this article were performed in Microsoft Outlook 2013, but will also work in newer versions of Outlook as well. Note that if you use IMAP for your email account and create a new folder, that folder will also be created on your email server.
Step 1: Open Outlook 2013.
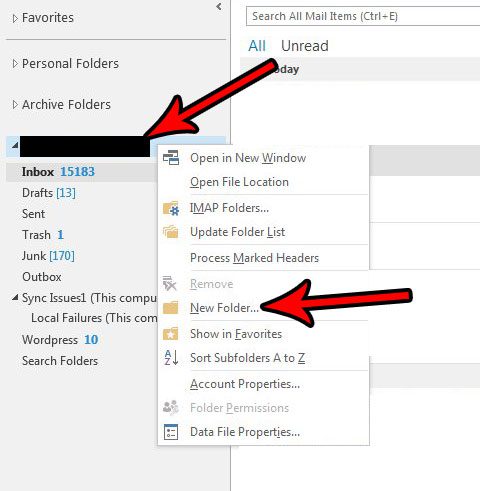
Step 2: Right-click on the email address at the left side of the window for which you wish to create a new folder, then click the New Folder option.

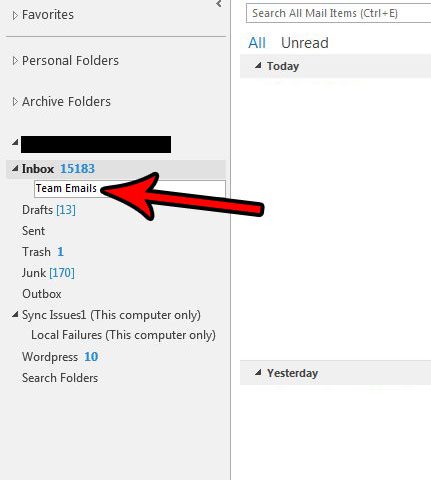
Step 3: Type the name for the folder, then press Enter when you’re done.

Now that you know how to create folders in Outlook you will be able to set up a useful organization system that will ultimately make it much easier for you to find emails based on the settings that you are using to filter those messages.
Does your company require certain settings for your signature? Find out how to add a picture to a signature if you need to include your company logo as part of it.
Would you like Outlook to check for new messages more often? Find out how to change the send and receive frequency in Outlook 2013 so that the program connects to your server more frequently to check for new emails.

Matthew Burleigh has been writing tech tutorials since 2008. His writing has appeared on dozens of different websites and been read over 50 million times.
After receiving his Bachelor’s and Master’s degrees in Computer Science he spent several years working in IT management for small businesses. However, he now works full time writing content online and creating websites.
His main writing topics include iPhones, Microsoft Office, Google Apps, Android, and Photoshop, but he has also written about many other tech topics as well.