When you are creating and downloading a lot of files to your Windows 7 computer, it can become difficult to locate those files over time.
Whether it is because the file has an unusual name or you saved it in a location other than where you normally save that type of file, looking for lost files can be maddening.
Many people incorporate their desktop into their file organization system simply because it is the most accessible place to look for a file, plus seeing a visual representation of each file icon can trigger your memory about the location of the file on your desktop.
But as you increase the amount of files that are on your desktop, the space can get cluttered and you start to lose the simplicity that this storage mechanism once provided. You can solve this dilemma by learning how to create a folder on your Windows 7 desktop.
Creating a Desktop Folder in Windows 7
Just to clear up any potential confusion, your Windows 7 desktop is the screen that you see after you have turned on your computer and entered your Windows 7 password. For the average person, a desktop would look something like the image below.
Now you may already have folders on your desktop that were created by someone else, or that you dragged to the desktop from another folder. What you are going to learn in this tutorial is how to directly create a folder on your desktop in Windows 7. Files and folders behave the same way on your desktop as they do in other locations on your computer. You can drag files on your desktop into the folders you create there, plus you can delete any files or folders that are on your desktop. At this point it is also worth mentioning that your desktop is actually just a folder that is displayed differently. You can navigate to it at C:\Users\YourUserName\Desktop. Just replace the “YourUserName” part of the file location with your own user name.
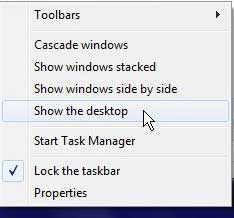
Proceed with creating your Windows 7 desktop folder by displaying the desktop. You can do this quickly by right-clicking the taskbar at the bottom of your screen, then clicking Show the desktop.
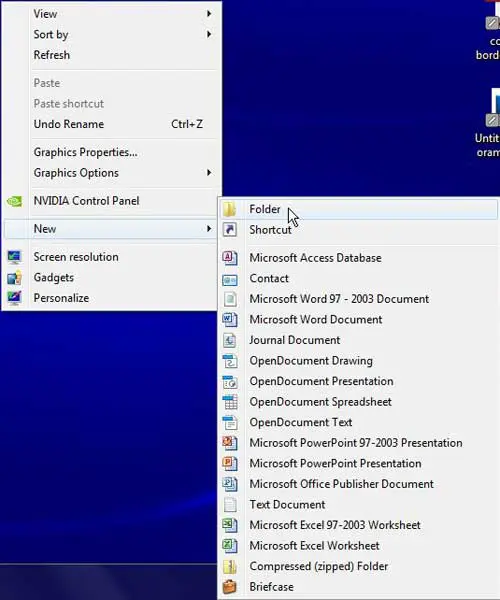
Right-click in any open space on your desktop, click New, then click Folder.
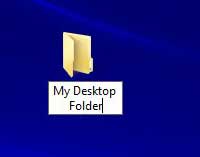
Type a name for the folder, then press the Enter key to complete the creation of your new desktop folder.
You can move the folder around on the desktop by clicking on the folder, then dragging it to your desired location. You can also rename a folder by right-clicking the folder, then clicking Rename.
Now that you know how to create a folder on your desktop in Windows 7, you will be able to incorporate this option into your file organization and make it easier to find the things you need.

Matthew Burleigh has been writing tech tutorials since 2008. His writing has appeared on dozens of different websites and been read over 50 million times.
After receiving his Bachelor’s and Master’s degrees in Computer Science he spent several years working in IT management for small businesses. However, he now works full time writing content online and creating websites.
His main writing topics include iPhones, Microsoft Office, Google Apps, Android, and Photoshop, but he has also written about many other tech topics as well.


