In many cases, the type of file that you have on your computer won’t matter.
Documents will probably open in Microsoft Word, PDFs will open in a Web browser or Adobe Reader, and images will open in one of the Windows image applications.
But you might occasionally have two files with the same name, or you may need to know a file type.
Our tutorial below will show you how to display Windows 10 file extensions so that this information is easier to find.
Summary – How to Display Filename Extensions in Windows 10
- Open File Explorer.
- Select the View tab.
- Click the Show/Hide button.
- Select the Show file extensions option.
Our guide continues below with additional information on how to show Windows 10 filename extensions, including pictures of these steps.
Related Topic: If your mouse is clicking too fast or too slow, then check out our Windows 10 double click mouse speed article and find out how to change it.
Every file on your computer has a file type. Whether it’s a Word document, an image file, or a downloaded application, the letters after the period in the file name indicate the type of file. Your Windows 10 computer will then use that information to determine which program to use to open the file.
If you have a lot of files with the same name, then it can be really beneficial to see what type of file something is. That’s why it’s so useful to know how to show file name extensions in Windows 10.
This can be a useful action to take when you have multiple files with the same name, such as when you are browsing your downloads folder using the steps in our find downloads on Windows 10 article.
How to Display Windows 10 File Extensions (Guide with Pictures)
Use the steps below to display file extensions in Windows 10.
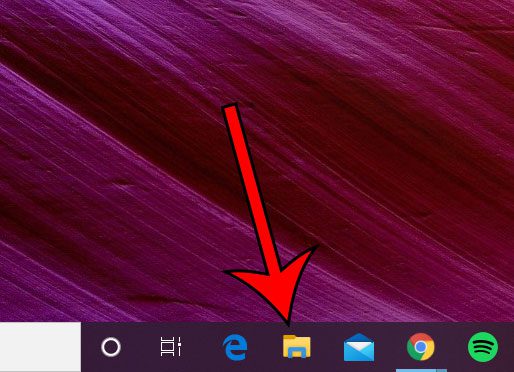
Step 1: Click the folder icon in the taskbar.

Alternatively, you could open any other folder on your computer.
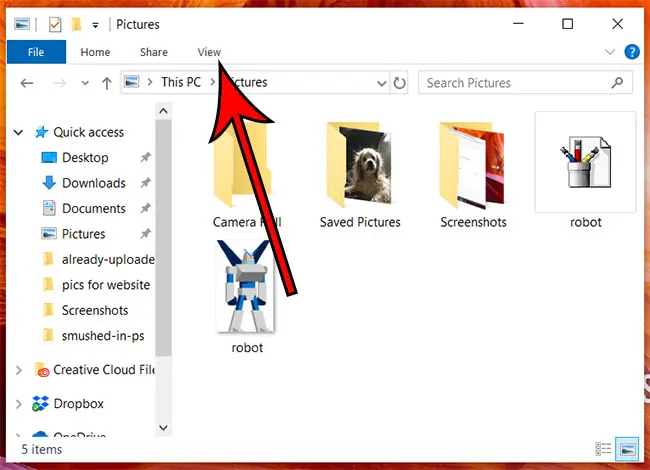
Step 2: Select the “View” tab at the top of the window.

Choose the View tab.
It is above the folder path field.
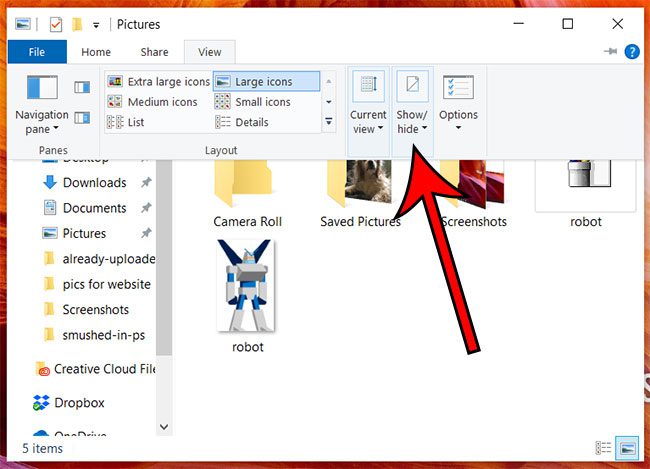
Step 3: Click the “Show/Hide” button.

Expand the Show/Hide section.
It’s at the right end of the ribbon.
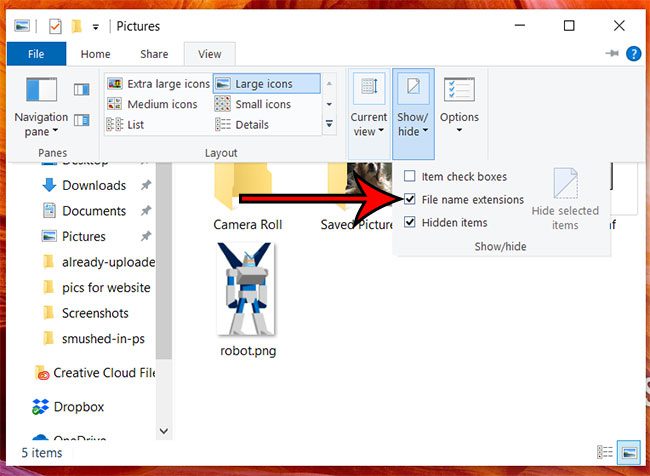
Step 4: Check the box to the left of “File name extensions.”

Check the File name extensions box.
The files in the current folder should switch immediately to display their file extensions.
Now that you know how to show file name extensions in Windows 10, you will be able to more easily identify the files on your computer so that you can find the ones you need.
The steps above were performed on a laptop computer using Windows 10, but will also work on any other Windows 10 laptop or desktop computer. You can also show file name extensions in other versions of Microsoft Windows, like Windows 7, Windows 8, or Windows Vista, but the method is slightly different in some of those operating systems.
If you would like to know how to create your own screen images, then read our guide on how to screenshot on Acer laptop to see an easy method for creating Windows 10 screenshots.
For example, to show file extensions in Windows 7 you would click the Organize tab in a folder, then Folder and search options, then the View tab and check the box next to Show file extensions.
Note that showing file extensions in Windows 10 makes it much easier to change those file extensions. While that might be desirable for some users, others may find that they accidentally change those file extensions, which can corrupt files.
If you only needed to show those extensions temporarily, then it’s a good idea to hide extensions when you’re done. You can hide file extensions the same way you displayed them. Double-click a folder to open File Explorer, select the View tab, then clear the check box next to “File name extensions” on the Show/Hide menu.
There are some additional File Explorer options in that ribbon that you might want to adjust. For example, you can adjust more folder options by selecting “Options” on the “View” tab, then clicking the “Change folder and search options” button. This menu shows additional personalization options to help you control you r file and folder display.
Frequently Asked Questions
How do I show file extensions?
The steps in the guide at the top of this article allow you to show file extensions in Windows 10. Open a folder, then go to View > Show/Hide > File name extensions.
How do I show file extensions in Windows Explorer?
Windows Explorer is the name of the file and folder system in the Windows operating system. While we describe the steps in this guide as how to show file extensions in Windows 10, it could also be renamed to “How to Show File Extensions in Windows Explorer.” You may also hear this referred to as File Explorer.
How do I show hidden files in Windows 10?
The method for displaying hidden files in Windows is similar to the method for showing file extensions.
Go to View > Show/Hide and check the box to the left of Hidden items.
This is how you would show the AppData folder, for example, if you needed to view a file in that location.
What are common file extensions?
There are tons and tons of different file extensions for tons of different file types, but some of the more common ones include:
– .docx – Microsoft Word
– .xlsx – Microsoft Excel
– .pptx – Microsoft Powerpoint
– .jpeg – Image file
– .gif – Image file
– .png – Image file
– .html – Web page
– .pdf – Portable Document Format, common in Adobe programs

Matthew Burleigh has been writing tech tutorials since 2008. His writing has appeared on dozens of different websites and been read over 50 million times.
After receiving his Bachelor’s and Master’s degrees in Computer Science he spent several years working in IT management for small businesses. However, he now works full time writing content online and creating websites.
His main writing topics include iPhones, Microsoft Office, Google Apps, Android, and Photoshop, but he has also written about many other tech topics as well.
