Being able to find the files and folders that you need on your Windows 7 laptop or desktop computer involves some familiarity with the file system.
The most important component of this system is the file explorer, which is the system of windows that displays your files and folders so that you can sort them, open them, rename them, and more.
Clicking on the folder icon in your taskbar is going to open Windows Explorer so that you can browse for files. Use these steps to change the default folder in Windows 7.
You can change the default File Explorer folder in Windows 7 by copying the file path for the folder you want to use, holding down Shift, clicking on the File Explorer icon, then choosing Properties. you can then enter the folder path into the Target field, then click Apply and OK.
Windows Explorer is the tool on your computer that is commonly used to browse files and folders. It is possible to open this application in a variety of ways but, if you open Windows Explorer directly, then it will always open in the same location. In many cases, this will be your user profile or your document folder.
But you might prefer to open it to your pictures, documents, downloaded folder, or another important folder that you have created on your desktop, for example.
Fortunately, it is possible to change the default Windows Explorer folder location in Windows 7 to any folder of your choosing.
Windows 7 includes a “Windows Explorer” icon in the taskbar at the bottom of the screen. This allows you to access your computer’s file system with one click, from any screen. However, the default folder that opens when you click the icon may not be as helpful for you as it could.
Our guide below will show you how to change the default Windows Explorer folder in Windows 7.
How to Use a Different Windows 7 File Explorer Default Folder
- Navigate to the folder to use as the Windows Explorer default.
- Right-click the folder and choose Properties.
- Highlight the file path at the top of the window, then copy it.
- Note the folder name at the top of the window.
- Hold down the “Shift” key on your keyboard, right-click the Windows Explorer icon, then click Properties.
- Click inside the Target field at the center of the window and paste the copied file path.
- Type “\your folder name” after the pasted path, but enter the folder name from step 4 instead of the “your folder name” part.
- Click Apply, then click OK.
Our guide continues below with additional information on changing the File Explorer default, including pictures of these steps.
How to Open Windows Explorer to a Different Location in Windows 7 (Guide with Pictures)
The steps below will change the default folder for Windows Explorer. This will affect any instance where Windows Explorer is opened directly, such as the taskbar, or through the All Programs menu.
It will not affect Windows Explorer when you double-click a file or folder on your desktop, or in any other way that you typically browse your computer’s files.
Step 1: Browse to the folder that you want to set as your default Windows Explorer folder.
Step 2: Right-click the folder, then click “Properties.”

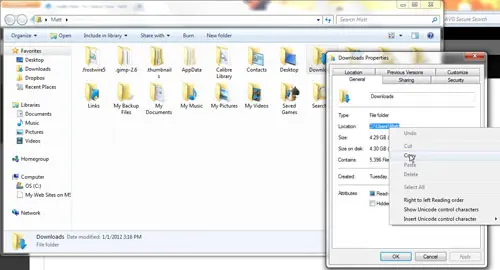
Step 3: Highlight the file path, right-click the highlighted path, then click “Copy.” Take note of the folder name at the top of the window, as you will need to append that to the path. The pictured example would require you to add “\Downloads” to the end of the path.

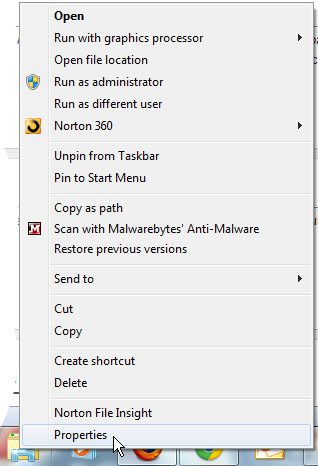
Step 4: Hold down the “Shift” key on your keyboard, right-click the “Windows Explorer” icon, then click “Properties.”

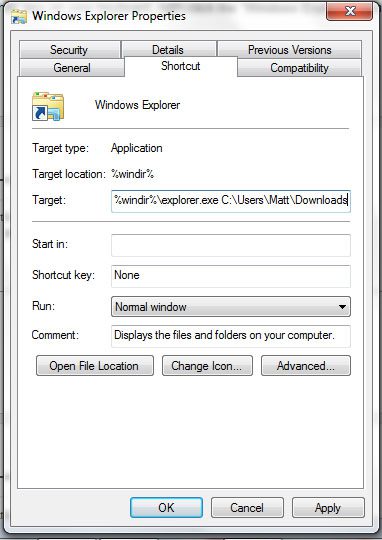
Step 5: Click inside the “Target” field at the center of the window, press “Ctrl + V” to paste your copied file path, then type “\your folder name” after the pasted path. Make sure to replace “your folder name” with the actual name of the folder that you want to set as the default.

Step 6: Click “Apply,” then click “OK.” The Windows Explorer tab will open to your specified folder the next time you click it.
Do you need to find a specific file for a Microsoft Office program, and it’s located in your AppData folder? Learn how you can find the AppData folder in Windows 7 if you are having difficulty with this hidden location.
Our tutorial continues below with additional discussion about Windows 7 File Explorer settings.
More Information on How to Change Windows 7 Explorer Settings
When you make this adjustment, any time you click on the File Explorer icon in the taskbar it will open to the folder that you choose.
There is also a column on the left side of the File Explorer window that you can use to navigate to certain files. You can also add more folders to that column, which can allow you to quickly navigate to a large number of different places on your computer.
If you follow the steps above and find that Windows isn’t opening to the folder that you want it to, then go back to the Properties window for the Windows Explorer folder and carefully expect the file path inside of the Target field. There’s usually a missing space, a letter in the wrong case, or a forward slash instead of a backslash.

Matthew Burleigh has been writing tech tutorials since 2008. His writing has appeared on dozens of different websites and been read over 50 million times.
After receiving his Bachelor’s and Master’s degrees in Computer Science he spent several years working in IT management for small businesses. However, he now works full time writing content online and creating websites.
His main writing topics include iPhones, Microsoft Office, Google Apps, Android, and Photoshop, but he has also written about many other tech topics as well.