USB flash drives are convenient ways to move large files between different computers.
But these drives can easily pick up a virus from a computer, so you may want to check it first before you let your computer access the files on it.
Our tutorial below will show you how to use Norton to scan a USB thumbnail drive for dangerous files.
how to Check a Thumbnail Drive for Malware With Norton
- Click the Start button.
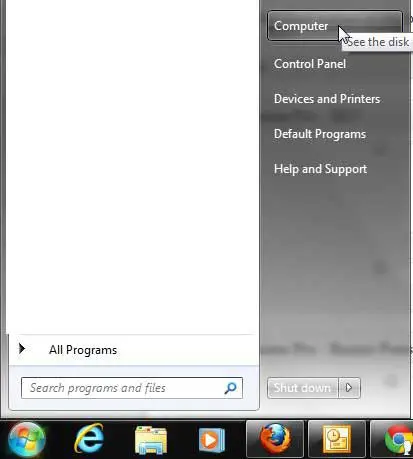
- Select the Computer option.
- Find the USB flash drive.
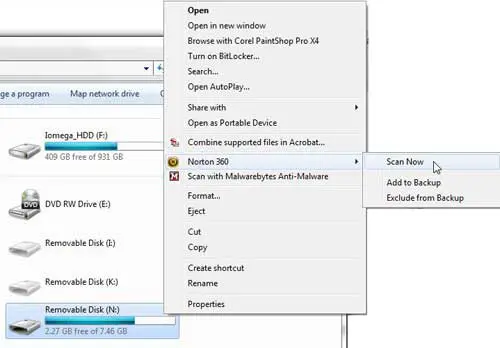
- Right-click the flash drive, choose Norton, then Scan Now.
Our guide continues below with additional information on scanning a USB drive with Norton, including pictures of these steps.
When you install Norton 360 on your computer, you are getting more than just a means to protect your computer from viruses.
You also get a firewall, some online backup storage, and some additional utilities to keep your computer running smoothly. But part of the anti-virus protection that comes with Norton 360 is an active scan that you can run on any of your computer’s drives, or connected drives.
This means that any USB storage that you connect to your computer can be scanned.
So if you are wondering how to scan a USB flash drive with Norton 360, you can follow the tutorial below.
Related Topic: If you are running into problems with the Norton backup utility, then our Norton backup settings can help you with them.
How to Run a Scan on Your USB Flash Drive with Norton 360 (Guide with Pictures)
One common way that viruses can be transferred from one computer to another is via external storage.
External hard drives, memory cards, and flash drives are devices that can easily be connected to any computer with a USB drive, which means that viruses can attach themselves to files on that device.
When the drive is then connected to another computer, a virus that was transported with the USB flash drive can be transferred to the computer.
Symantec, the makers of Norton 360, realize that this is a serious threat, so they have included an option that is automatically activated after you install Norton 360.
Once Norton 360 is installed, you can follow the instructions below to learn how to scan a USB flash drive with Norton 360.
Step 1: Insert the USB flash drive into a USB port on your computer.
If an AutoPlay window opens, you can close it.
Step 2: Click the Start button at the bottom-left corner of your screen, then click Computer.
Step 3: Right-click the icon for your USB flash drive, click Norton 360, then click Scan Now.
The scan will start automatically, and Norton 360 will inform you if it locates any threats.
If threats are located, then it will also instruct you as to the best way to remove them.
Now that you know how to scan a USB flash drive with Norton 360, you will be able to use this function anytime you are connecting a flash drive to your computer.
If you frequently connect an infected USB flash drive to a number of different computers, you should consider running a full manual scan on each of those computers to attempt and eliminate any discovered threats.

Matthew Burleigh has been writing tech tutorials since 2008. His writing has appeared on dozens of different websites and been read over 50 million times.
After receiving his Bachelor’s and Master’s degrees in Computer Science he spent several years working in IT management for small businesses. However, he now works full time writing content online and creating websites.
His main writing topics include iPhones, Microsoft Office, Google Apps, Android, and Photoshop, but he has also written about many other tech topics as well.

