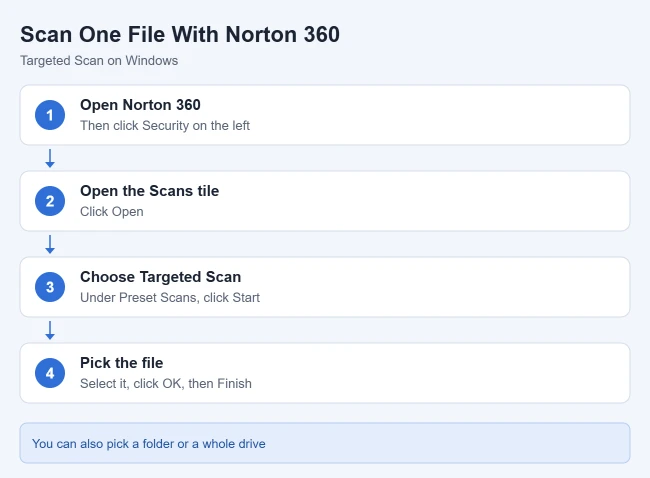
To scan an individual file with Norton 360 on Windows, open Norton, click Security, click Open in the Scans tile, and click Start next to Targeted Scan. Select the file you want to check, click OK, and wait for the scan to finish.
A Full Scan can take several hours. A Targeted Scan checks only the file, folder or drive you pick, so it is the quick way to check a download or a file someone sent you before you open it. The steps below follow Norton’s own instructions to scan a specific file, folder, or drive.
Before You Start
- Which version this covers: the current Norton 360 app for Windows and Mac, which has a Security item in the left pane. Older Norton 360 versions used a different layout, so the labels below may not match if your app has not been updated.
- The file must be saved on your computer or a connected drive. Targeted Scan asks you to browse to the file, so an email attachment has to be saved to a folder first. Save it, but do not open it until the scan is done.
- Nothing changes unless Norton finds a threat. A scan only reads the file. If Norton detects a risk, its default action is to remove the file from where it was and place it in Quarantine, which is an isolated storage area where the file cannot run or spread.
How to Scan an Individual File With Norton 360 on Windows
- Open Norton 360. You can find it in the Start menu or by clicking the Norton icon near the clock.
- In the left pane, click Security. The Security dashboard opens with several tiles.
- In the Scans tile, click Open. The Scans window appears with the Preset Scans tab selected.
- In the Targeted Scan row, click Start. A window opens that lets you browse your computer.
- Find and select the file you want to scan, then click OK. You can select a folder or a whole drive the same way. The scan starts right away.
- Wait for the scan to complete, then click Finish. Use View Results to see what Norton checked and whether it found anything.
A scan of one file usually finishes far sooner than a Quick Scan or Full Scan because Norton has much less to read. You can also stop a scan at any point if you picked the wrong item. If a longer scan keeps starting while you work, you can temporarily pause Norton 360 background scans.
How to Scan an Individual File With Norton on a Mac
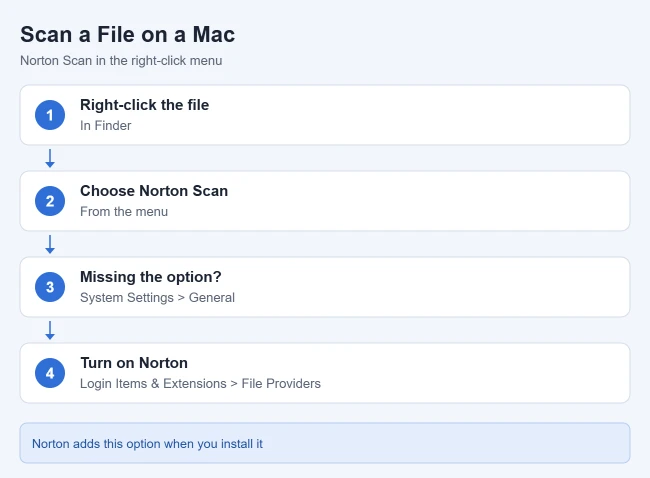
On a Mac you have two options. The faster one is the right-click menu. Norton says a Norton Scan option is added to that menu automatically when you install the app, so you can scan a file without opening Norton at all.
- Open Finder and locate the file.
- Right-click the file (or hold Control and click it).
- Choose Norton Scan.
The second option is a Targeted Scan from inside the app, as described in Norton’s guide to running scans on a Mac:
- Open Norton and click Security in the left pane.
- In the Scans tile, click Open.
- On the Preset scans tab, click Start next to Targeted Scan.
- Select the files or folders you want to scan and click Open. A progress screen appears, followed by a summary when the scan is complete.
If Norton Scan is missing from the right-click menu
The menu item depends on a macOS extension that can be switched off. It is listed under File Providers, not Finder. To turn it back on:
- Click the Apple menu and choose System Settings.
- Click General, then Login Items & Extensions.
- Scroll to the Extensions section and click the info button next to File Providers.
- Turn on the slider next to Norton, then click Done.
- If asked, type your Mac administrator password and click OK.
To undo this later, return to the same screen and turn the Norton slider off. That only removes the menu item. It does not turn off Norton’s protection.
Scan the Same Files Regularly With a Custom Scan
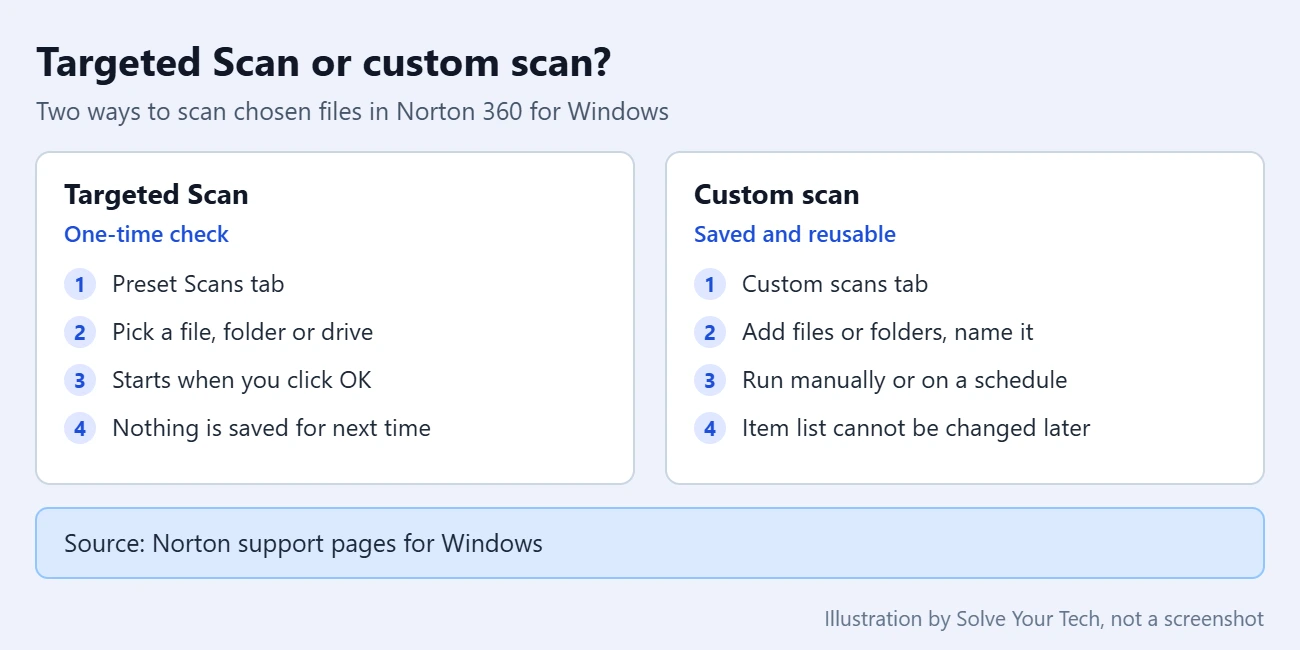
A Targeted Scan is a one-time check. If you want to scan the same file or folder again and again, such as a downloads folder, Norton 360 for Windows lets you save the selection as a custom scan. Norton’s Create your own custom Norton scans page has the setup.
- Open Norton, click Security, then click Open in the Scans tile.
- Click the Custom scans tab, then click Create Scan.
- Under Scan name, type a name you will recognize.
- Under Schedule your scan, choose how often it should run. Scheduling is optional, and a scheduled scan only runs if the computer is turned on at that time.
- Under Files or folders to scan, click Add and select the file or folder. Repeat for each item you want included.
- Click Create.
To run it, go back to the Custom scans tab and click the start icon next to the scan. One limit to know before you click Create: Norton does not let you add files or folders to a custom scan after it exists. To include something new, you have to create another custom scan.
Which Norton Scan Should You Use?
These are the preset scans for Windows. Pick the smallest one that answers your question.
| Scan | What it checks | Use it when |
|---|---|---|
| Targeted Scan | Only the files, folders or drives you select | You want to check one download, attachment or USB drive |
| Quick Scan | The whole system drive | You want a routine check |
| Full Scan | The entire computer, including boot records, storage drives and running processes | You suspect the PC is infected and can wait, since it may take several hours |
| Smart Scan | Malware plus out-of-date software, browser add-ons with poor reputations, network threats, and performance and privacy issues | You want a general health check |
| Startup Scan | The PC during the next startup, before malware can launch | You suspect a threat that hides while Windows is running |
For a single file, Targeted Scan is enough. If Norton removes a download before you get the chance to scan it yourself, you can turn off Download Intelligence in Norton 360, but only do that for a file you have good reason to trust.
What to Do If Norton Finds Something
If the results show items that need attention, review the risks and act on them. By default Norton removes a detected risk from its original location and quarantines it, so the file you scanned may no longer be in the folder where you saved it. That is expected.
To see what was quarantined on Windows, open Norton, click Security, click Security History, and choose Quarantine from the drop-down list. Viewing quarantined files in Norton 360 walks through that screen.
Warning: think carefully before restoring anything. By Norton’s own account, restoring files from Quarantine poses a high security risk and is meant only for specific situations, such as a needed file that was quarantined by mistake. Norton also does not repair a file when you restore it. If you believe the detection is wrong, the Quarantine menu includes Send for analysis, which submits the file to Norton instead of putting it back on your PC. Norton’s page on acting on quarantined risks or threats lists every option.
On a Mac, the scan summary lists detected files. Norton quarantines suspicious files by default, and you can select the detected files and click Resolve All.
Troubleshooting
I do not see Security or the Scans tile
Those labels belong to the current Norton 360 app. If your window looks different, update Norton and check again.
There is no Norton option when I right-click a file in Windows
Norton’s help pages describe the right-click Norton Scan option for Mac only. On Windows, use Targeted Scan as described above. It scans the same file.
The scan finished but I cannot find the results
Click View Results on the final scan screen before you click Finish. Afterward, Security History on the Security dashboard keeps a record of recent security events.
Norton keeps flagging a file I know is safe
Norton calls this a false positive. Its advice is to run LiveUpdate first, so you have the latest definitions, and scan again. If the detection continues, report the file to Norton. You can exclude a file from scans, but exclusions lower your protection, and an excluded file stays excluded even if it becomes infected later.
If the flagged file is a program you trust, follow stopping Norton 360 from blocking a program for the restore and exclusion steps.
Frequently Asked Questions
Can I scan more than one file at a time with Norton 360?
Yes. The simplest way is to put the files in one folder and select that folder in Targeted Scan. On Windows you can also create a custom scan and add each file or folder to it, which saves the list so you can run it again.
Can I scan an email attachment with Norton 360?
Yes, once it is saved. Norton gives a compressed file received by email as an example of something to scan individually. Save the attachment to a folder without opening it, then select it in Targeted Scan.
Does Norton scan inside ZIP files?
That depends on the scan’s settings on Windows. Click the settings icon next to a scan on the Preset Scans tab and look under Installers and archives. The choices are Scan only common installers, Scan all archives and Don’t scan archives. Scanning all archives can make scans take longer.
Can I scan a USB drive the same way?
Yes. Select the drive in Targeted Scan the same way you would select a file. For the full steps, read scanning a USB flash drive with Norton 360.
Can I scan a single file with Norton 360 on a phone?
Norton’s instructions for the Norton 360 mobile app on Android and iPhone describe one manual scan, Run Smart Scan on the app’s main screen, which checks the device as a whole. Norton does not document a way to pick one file there.
Why did my first Norton scan take so long?
The first scan after you install the product may take more time because it analyzes your entire system. A Targeted Scan of one file is not affected in the same way, since it reads only what you selected.
Next Steps
Once the file comes back clean, it is worth confirming that Norton’s automatic protection is switched on, so future downloads are checked without any action from you. To check, view your Norton protection status. If Norton’s backup feature is using space you need, you can also turn off Norton 360 backups.

Matthew Burleigh is the founder, head writer, and editor of Solve Your Tech, which he launched in 2012. He has written technology tutorials since 2008 and worked in IT since 2003, including small-business support, IT management, and consulting. He holds Bachelor’s and Master’s degrees in Computer Science from Arizona State University.
Matthew writes practical guides for Windows, iPhone and iPad, Microsoft Office, Outlook, Google apps, and Android. Solve Your Tech’s guides are checked step by step against the device or app maker’s own documentation and tested on his own devices whenever he has the hardware or software, with clear steps, sources, and update dates.
Read more about Matthew and how Solve Your Tech writes and updates its guides, or report a correction.