The ability to scan documents automatically is something that will come up for you in both work and personal situations.
But if you aren’t able to get to a computer to use the Windows scan app, then you might be wondering if it’s possible to use your phone.
Luckily, you can learn how to scan on iPhone with the process that we outline below.
How to Scan a Document with the iPhone’s Notes App Scan Feature
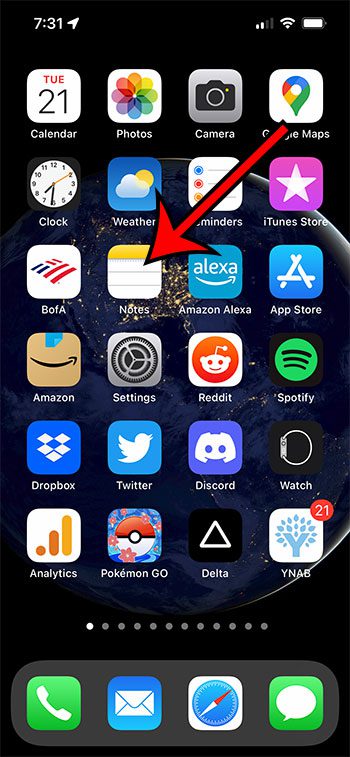
- Open Notes.
- Select an existing note or make a new one.
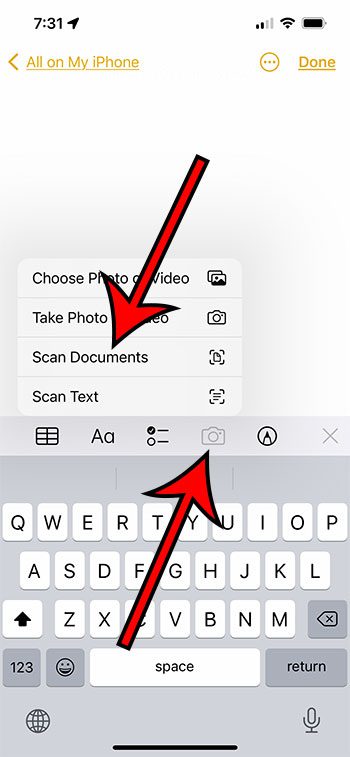
- Tap the camera icon in the center horizontal bar.
- Choose Scan documents.
- Put the document in front of the camera.
- Choose Keep Scan when you have one you’re happy with.
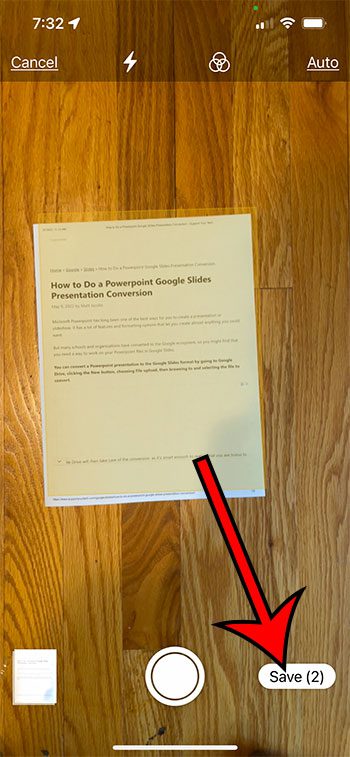
- Tap Save once all pages are scanned.
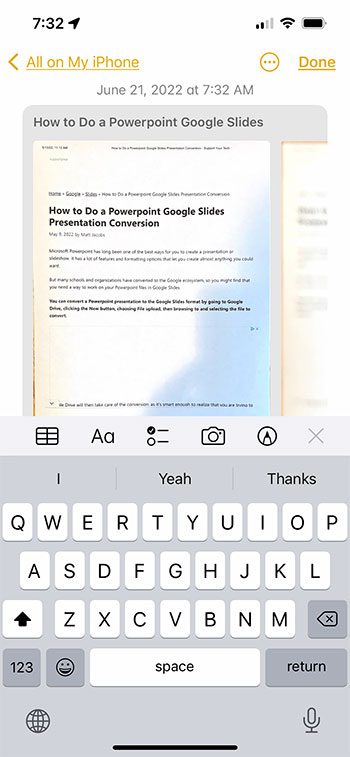
- Share or save the scanned document.
Our guide continues below with additional information on how to scan on iPhone, including pictures of these steps.
We all know how hard it is to keep track of physical documents. They get lost, they get damaged, and they’re a general pain to deal with.
But what if there were a way to scan and save your documents so that you could always have them with you and never have to worry about losing them again?
Well, there is! The Notes app on your iPhone has a built-in document scanning feature that allows you to quickly and easily scan any physical document and save it as a PDF. You do not need any additional apps or software to use this feature, meaning that the answer to the question of “can I scan with my iPhone” is a resounding “yes.”.
In this article, we’ll show you step-by-step how to scan on iPhone by using the document scanning feature in the Notes app to scan and save any document on your iPhone. Let’s get started!
Read our guide on how to keep iPhone screen on if you struggle with using the device before the screen turns itself off.
How to Work With Scanned Documents in the iPhone Notes App (Guide with Pictures)
The steps in this article were performed on an iPhone 13 in the iOS 15.5 operating system. These steps will also work on most other iPhone models using the iOS 15 operating system.
Note that the doc scan on iPhone feature is a part of the Notes app, so if you had previously deleted this app then you will need to download it again from the App Store.
Step 1: Open the Notes app on your iPhone.
First things first, you’ll need to open the Notes app on your iPhone. You can do this by tapping the Notes icon on your home screen. You normally would not have to download the app as it comes with iOS. If you can’t find it, you may need to search for it in the App Store.
Step 2: Create a new note, or open an existing one.
Once you’re in the Notes app, you’ll need to create a new note or open an existing one. To do this, click the little icon on the bottom right corner of the screen that looks like a pencil on a piece of paper.
New doc scans on iPhone will be added as new notes on the device.
Step 3: Tap the camera icon in the bottom left corner of the screen or above the keyboard.
Once you create a new note or open an existing one, you’ll see a camera icon down in the bottom left corner of the screen. There are many icons here, but the one you want to tap is the camera icon.
Once you tap the camera icon, you’ll see three options: “Choose Photo or Video,” “Take Photo or Video,” and “Scan Documents.” Tap “Scan Documents.”
Step 4: Place your document in front of the camera.
Once you tap “Scan Documents,” you’ll be taken to your iPhone’s camera. From here, you’ll need to place your document in front of the camera so that it’s completely visible on the screen.
As you move your document around, you’ll notice that a yellow border will appear around the edges of the document. This is the app’s way of detecting the document and ensuring that it’s properly scanned.
You may take a photo of your document as many times as you need to get a good scan. Once you’re satisfied with the scan, tap “Keep Scan.”
When you click on “Keep Scan,” it’ll redirect you to take another photo. You may use this option if your document has multiple pages. When you’re finished scanning all the pages of your document, tap “Save.”
Step 5: Share your document or save it to Files.
After you tap “Save,” you’ll see a few options for what to do with your newly scanned document. There’ll be three dots in the top right corner of the screen. If you click on these dots, you’ll see an option to share your document or save it to Files.
You can send the scanned file via email, iMessage, or any other app that you have installed on your iPhone. It’s a very easy and convenient way to share documents with others, and essentially works as a way to scan and fax from iPhone!
Now that you know how to scan iPhone documents, you can use it as an alternative to scanning software like the Windows Fax application, or something that you might have used on an Android device.
The steps above about how to scan from my iPhone are helpful when you have a physical document and want to create a digital copy of it, but another scanning option on the iPhone that you might want to know involves the scanning of QR codes.
How to Scan QR Codes on an iPhone
QR codes are everywhere, and they can often make it easier for you to see things like a restaurant’s menu or specials, a Web page with information about an event, or items that an online store might have for sale.
For more information about this topic, you can read our tutorial about how to scan QR code on iPhone 13.
But if you haven’t scanned a QR code on your iPhone before, then you might not be sure what you need to do to take advantage of this feature.
Fortunately, you can use the default Camera app on your iPhone to scan QR codes, and you just need to enable a setting first.
- Open Settings.
- Select Camera.
- Turn on Scan QR Codes.
- Open the Camera app and make sure you are in “Photo” mode.
- Position the QR code in the frame, and tap the yellow link.
Note that you will only need to enable the Scan QR Codes option once. After that you can simply open the Camera app and scan the code.
Now that you know how to scan a QR code with your iPhone you will be able to access information that is accessible via that format in just a few seconds.
Our tutorial continues below with additional information on the topic of how to scan from my iPhone.
More Information on How to Scan Documents on an iPhone
When the scan window opens after you click Scan, you are going to be able to scan either a single page document or a multiple page document.
In our article above, we focused on using the scan software on the device to scan a single page, but you could continue to add scan photos to your document by pressing the shutter button instead of electing to save the document.
This kind of works like an automatic document feeder you might have on a physical scanner that allows you to combine documents with multiple pages into one scanned file.
Once all of the scanned pages have been generated with your phone camera, you can save them as a document with the PDF file type. That saved file can be kept in your device storage, or you can include it as an attachment in an email message.
Rather than navigating through the Notes app, you could also long press on the Notes app and choose the Scan Document option that way. Once you try this out, you may find that the application for how to scan docs with iPhone actually creates some pretty good scans.
Conclusion
This feature of your iPhone is a great option if you are looking for a scan picture iPhone utility, or if you want to scan slides with iPhone so that you have a digital copy on your smartphone.
Our iPhones are extremely powerful devices, and they can do a lot of things that we never even dreamed of.
The document scanning feature in the Notes app is just one example of this and is very handy when you need to know how to scan papers on iPhone.
So next time you need to scan and save a document, don’t go through the hassle of finding a scanner. Just pull out your smartphone and follow our how to scan on iPhone steps! The quality of the scan will be just as good, if not better.

Matthew Burleigh has been writing tech tutorials since 2008. His writing has appeared on dozens of different websites and been read over 50 million times.
After receiving his Bachelor’s and Master’s degrees in Computer Science he spent several years working in IT management for small businesses. However, he now works full time writing content online and creating websites.
His main writing topics include iPhones, Microsoft Office, Google Apps, Android, and Photoshop, but he has also written about many other tech topics as well.


