Do you have multiple flash drives that you use for work or school, and you find it difficult to differentiate between them? This issue can be amplified if you have multiple flash drives of the same type, which can lead to situations where you accidentally bring the wrong flash drive with you when you need to transfer files.
One way to solve this problem is to change the name of your flash drive. You can set a custom name that makes it easier to distinguish between flash drives, and you can use these customized names to ensure that you are copying files to the correct flash drive.
With flash drives and other portable storage drives becoming more and more common as people move files between devices, it’s very possible that you could have several of these devices connected to your computer at once. Since the default naming convention that Windows uses for these devices can make it difficult to differentiate between, then using custom names can help to alleviate mistakes and save you some time.
So check out the few short steps below to learn how to change a flash drive name in Windows 7.
How to Rename a Flash Drive in Windows 7
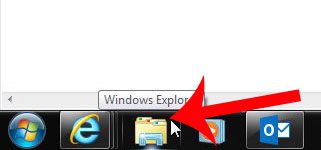
- Click the folder icon in the taskbar.
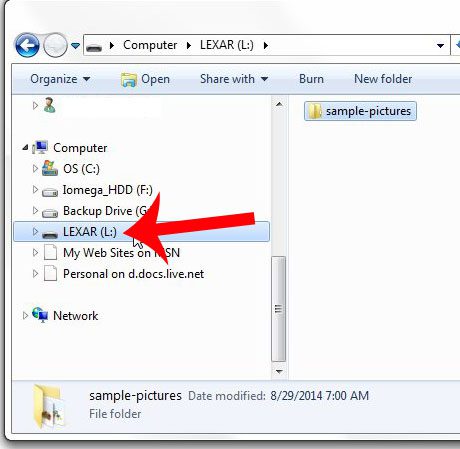
- Find the flash drive.
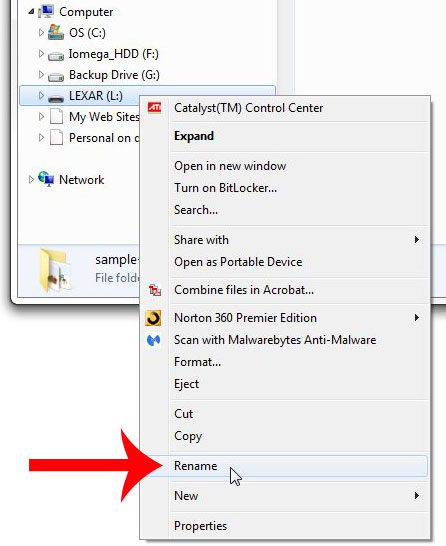
- Right-click the flash drive and choose Rename.
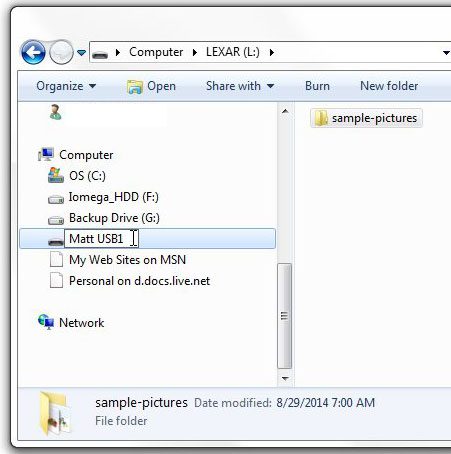
- Type the new name and press Enter.
Our guide continues below with additional information on changing the name of a flash drive in Windows 7, including pictures of these steps.
Related: Guide to Changing Firestick Name from an iPhone
How to Change a USB Flash Drive Name in Windows 7 (Guide with Pictures)
The steps in this article will show you how to modify the existing name of your USB flash drive to something different. This name is attached to the flash drive, so it will show on other computers to which you connect the flash drive as well.
Note that changing the name of the flash drive will not affect the files and folders that are stored on the device.
Step 1: Click the Windows Explorer icon at the bottom-left corner of your screen.

Step 2: Locate the USB drive in the column on the left side of the window.

Step 3: Right-click the USB flash drive, then click the Rename option.

Step 4: Type the new name for the flash drive, then press the Enter key on your keyboard to apply it.
Note that the name of the flash drive is limited to 11 characters (spaces count in that character limit).

Our guide continues below with additional discussion on how to give a different name to a flash drive that is connected to your computer.
Can I Rename Multiple USB Flash Drives on My Computer?
The file explorer application in Windows 7 is a great tool for computer management. It lets you search for files and folders and, as we saw above, provides you with a way to give your USB stick a new name.
But the biggest reason that many people will want to use the file explorer window for disk management and other organizational tasks is that it’s necessary to be able to quickly identify any removable disk, local disk, or network drive to which your computer is connected.
While the drive letter and the device icon that are assigned to your removable disk are something that you can’t easily configure, you are able to give a different name to any flash drive or removable hard drive that you have connected to the computer. In fact, having multiple drives of this nature is one of the main reasons that you would want to rename all of those drive.
While you won’t be able to bulk rename multiple flash drives at once, you can simply go through the list of connected drives and use the right-click > Rename method of giving them all newer, custom names that are easier for you to recognize.
More Information on How to Change the Name of a Flash Drive in Windows 7
While the steps in this article have focused primarily on changing a flash drive’s name in the Windows 7 operating system, these same steps will work for other versions of Windows as well, such as Windows 10 and Windows 11.
Note that changing the name of a flash drive on your computer will only affect the way that computer recognizes that device. If you connect that flash drive to another computer it will not have the name that you gave it on your Windows 7 computer.
Changing the name of a flash drive is very different than reformatting the drive. If you reformat a flash drive it is going to delete everything that is on that flash drive, and may even change the storage type of the device. Changing the storage type could result in some devices not recognizing the flash drive, or reducing the amount of usable storage space on the drive.
If you are looking for another way to rename a USB drive then you can also do so through the Properties window. Simply right-click on the drive like you did above, then choose the Properties option. The General tab should be selected at the top of the Properties window. Simply click inside the name field at the top of the tab, delete the default name for that drive, then enter the name that you would like to use. Once you are done you can click the Apply button at the bottom of the window, then click the OK button.
The letter assigned to your flash drive or other external drive is based on how the device was connected and recognized by your computer.
If you would like to add a link to your desktop for a connected USB flash drive then you can press and hold on the drive in the file explorer, then drag it to the desktop. This will create a shortcut that you can double click on in the future to open the drive. This can be a simpler way to access that device if it’s something that you need to do often.
Does your USB flash drive need to be in a different format? This article will show you how to reformat a USB flash drive so that you can use it on a computer or device that requires a specific file format.
Additional Sources

Matthew Burleigh has been writing tech tutorials since 2008. His writing has appeared on dozens of different websites and been read over 50 million times.
After receiving his Bachelor’s and Master’s degrees in Computer Science he spent several years working in IT management for small businesses. However, he now works full time writing content online and creating websites.
His main writing topics include iPhones, Microsoft Office, Google Apps, Android, and Photoshop, but he has also written about many other tech topics as well.