To stop text messages from going to your iPad, turn off three things: iMessage on the iPad (Settings > Apps > Messages), Messages in iCloud on the iPad (Settings > [your name] > iCloud > Messages), and the iPad’s switch under Text Message Forwarding on your iPhone (Settings > Apps > Messages > Text Message Forwarding). Once all three are off, new blue and green messages stop showing up on the iPad, and your iPhone keeps getting everything as usual.
These steps are for iPadOS 26 and iOS 26 or later, including iPadOS 27 and iOS 27. On older versions, Messages is listed directly in Settings instead of under Apps. Apple’s Set up Messages on iPad guide covers the same settings.
Why Your Texts Show Up on Your iPad
Your iPad can receive messages three ways, and each one has its own switch:
- iMessage (blue bubbles). The iPad gets these directly when it’s signed in to the same Apple Account as your iPhone and iMessage is on.
- Text Message Forwarding (green bubbles). Regular SMS, MMS, and RCS texts only reach the iPad when your iPhone forwards them.
- Messages in iCloud. This keeps your whole message history in sync across your devices. Text Message Forwarding is built into Messages in iCloud and is always on for every device using it, so turning off the forwarding switch alone won’t stop green texts on an iPad that still syncs with iCloud.
That’s why turning off just one setting often doesn’t work. Go through all three below, in order.
Which Settings to Turn Off
Not everyone wants the iPad cut off completely. Pick the row that matches what you want:
| What you want | Turn off |
|---|---|
| No messages of any kind on the iPad | All three steps below |
| Keep iMessage on the iPad, but stop your phone’s texts and history | Steps 2 and 3, and remove your phone number (see below) |
| Keep messages, but stop the alerts | Only notifications (see the last section) |
Step 1: Turn Off iMessage on the iPad
- Open Settings on your iPad.
- Tap Apps, then tap Messages.
- Turn off iMessage. The switch turns gray, and the iPad stops sending and receiving iMessages.
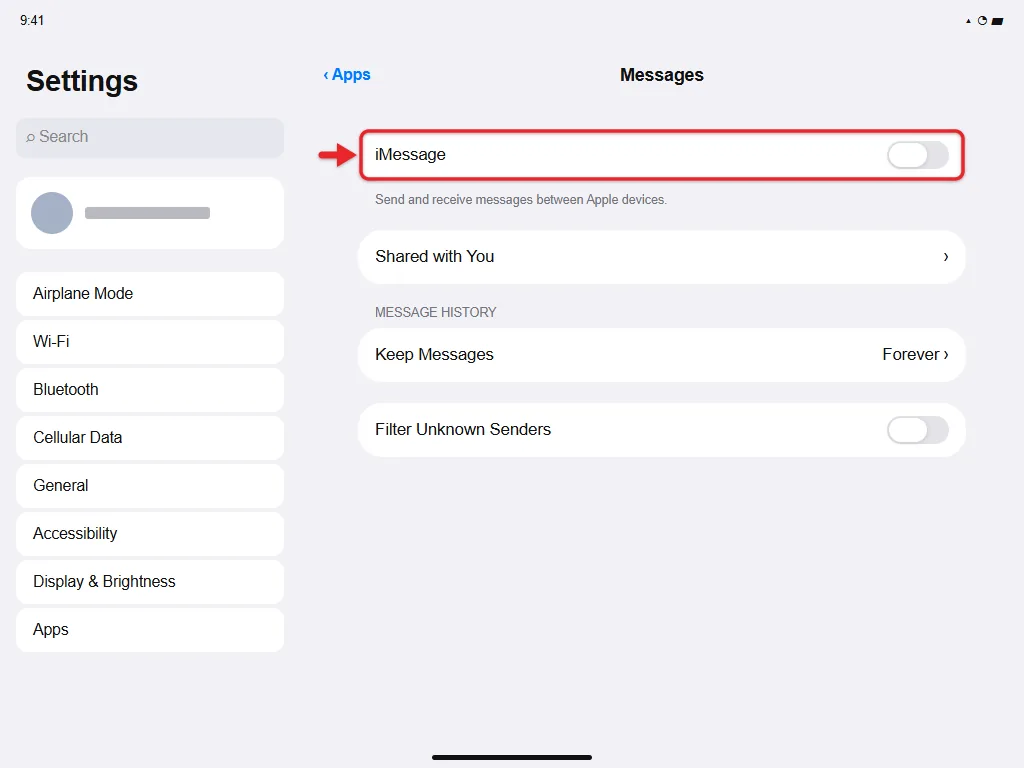
This only affects the iPad. Your iPhone keeps sending and receiving iMessages normally.
Step 2: Turn Off Messages in iCloud on the iPad
- Open Settings on your iPad and tap your name at the top.
- Tap iCloud.
- Under Saved to iCloud, tap See All, then tap Messages in iCloud.
- Turn off Use on this iPad. If the iPad asks what to do with the messages already on it, choose whether to keep or remove them from this iPad.
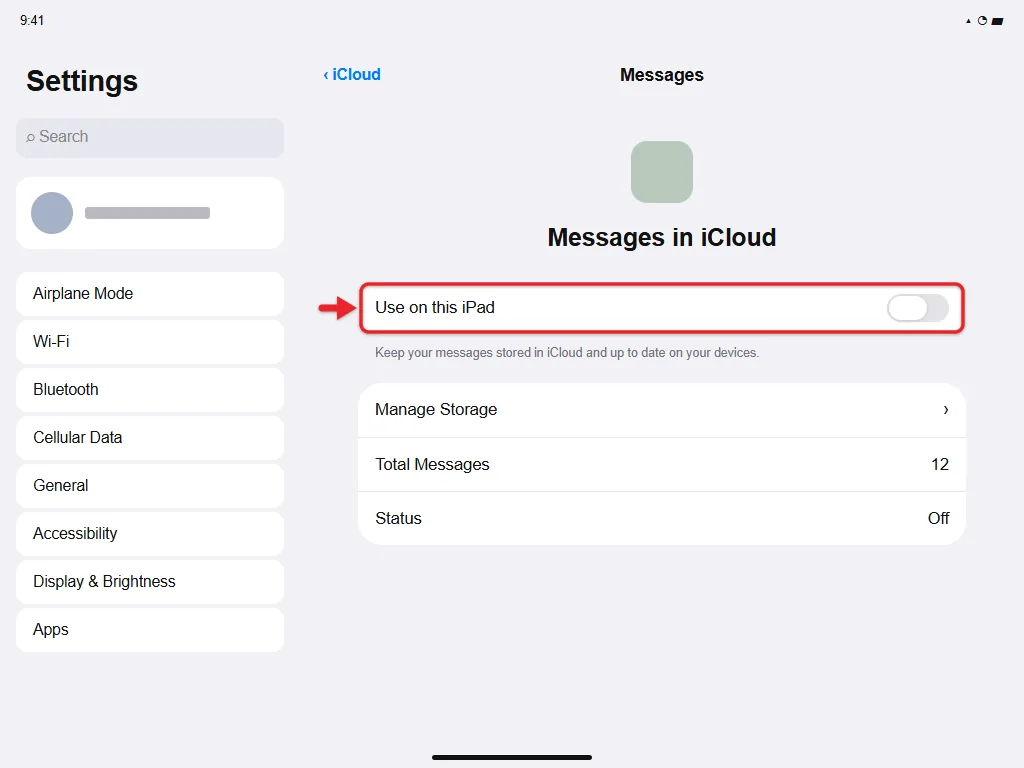
Your conversations stay in iCloud and on your iPhone. They just stop syncing to this iPad. Apple’s Messages in iCloud guide shows the same switch.
Don’t delete conversations on the iPad while Messages in iCloud is still on to get rid of them. With sync on, deleting a conversation on one device deletes it on all of them.
The same applies if you set your iPad to delete messages after 30 days, because synced devices lose those old conversations too.
Step 3: Turn Off Text Message Forwarding on the iPhone
- Open Settings on your iPhone.
- Tap Apps, then tap Messages.
- Tap Text Message Forwarding. You’ll see a list of your other devices.
- Turn off the switch next to your iPad.
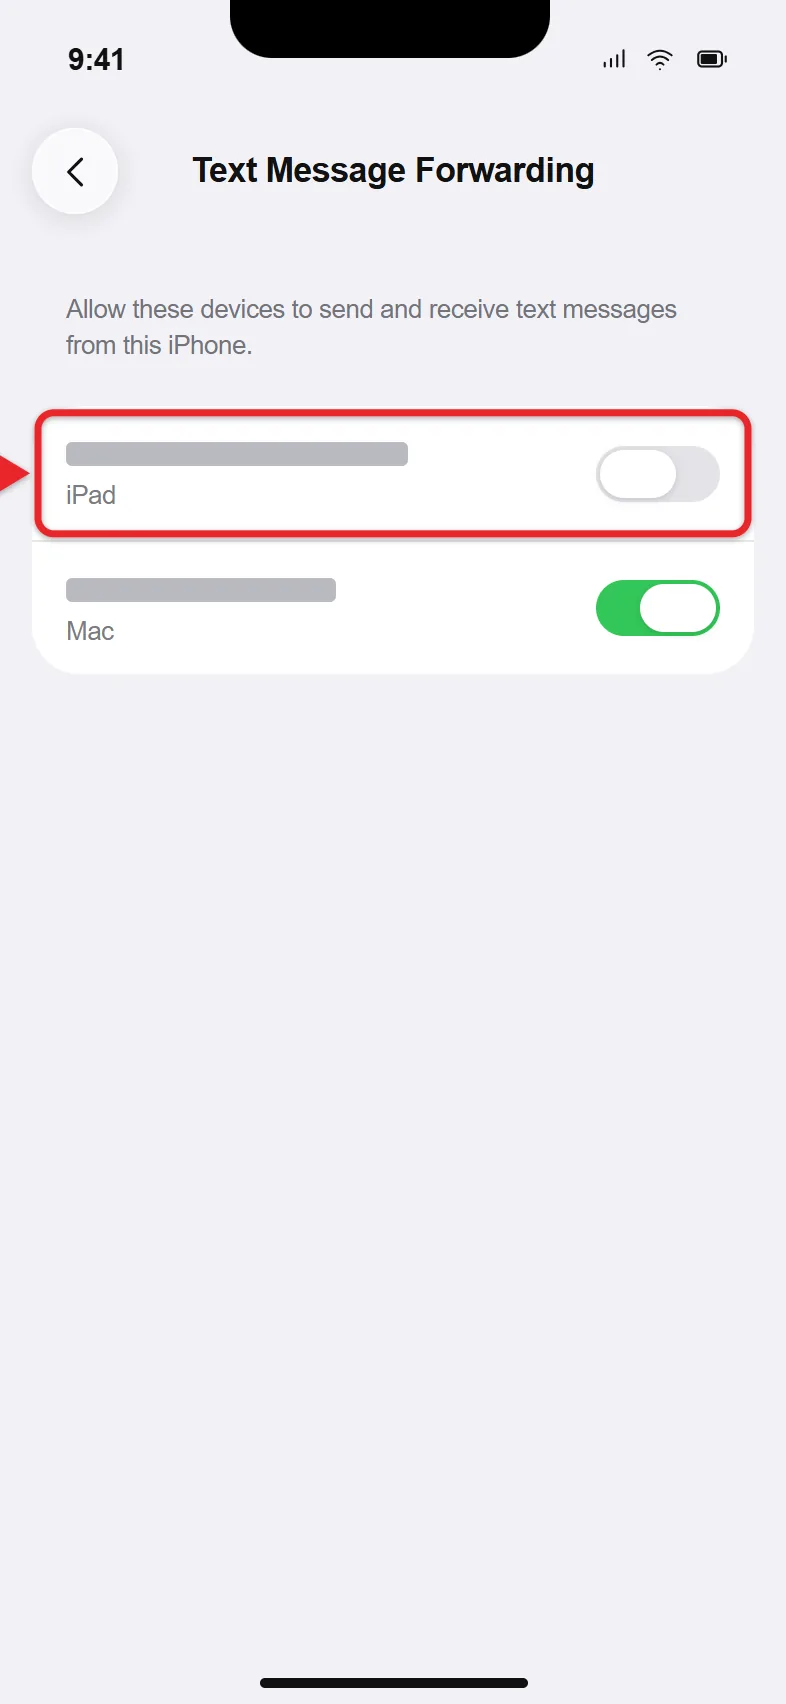
If your iPad isn’t in the list, there’s no forwarding switch to turn off for it, and Steps 1 and 2 are what stop texts on that iPad. For more detail, including how to turn it back on later, read about Text Message Forwarding on iPhone. Apple’s text forwarding article describes the same list.
This setting only covers your own devices; to send one specific text to someone else, forward the text message from your iPhone instead.
Check That It Worked
Ask someone with an iPhone to send you an iMessage, and ask someone with an Android phone (or use a second number) to send a regular text. Both should arrive on your iPhone but not on your iPad. Older conversations that were already downloaded to the iPad can stay in the Messages app. Swipe left on a conversation and tap the trash icon to remove it from the iPad once sync is off.
Keep iMessage on the iPad, but Not Texts to Your Phone Number
If you like using Messages on your iPad with your email address but don’t want texts sent to your phone number to show up there, you can remove just the number. The full steps are on Apple’s page about adding or removing your phone number in Messages or FaceTime.
- On your iPad, open Settings > Apps > Messages and make sure iMessage is on.
- Tap Send & Receive.
- Under You can be reached by iMessage at, tap your phone number to uncheck it. Leave your email address checked.
Messages sent to your phone number now go only to your iPhone. People who text your email address still reach you on the iPad. Not sure which number or email your iPad is using? Here’s how to find the phone number on an iPad.
If Someone Else Uses Your iPad
This is the most common reason people want texts off an iPad, such as when a child uses a parent’s iPad. If you share an Apple Account with someone, you can’t stop them from seeing your conversations. The three steps above work, but anyone with the iPad can turn the settings back on.
For a permanent fix, sign the iPad out of iMessage completely. On the iPad, go to Settings > Apps > Messages > Send & Receive, tap your Apple Account at the bottom, and tap Sign Out. If the iPad will belong to someone else long term, set it up with their own Apple Account through Family Sharing instead of sharing yours. A full sign-out of your Apple Account on iPad goes further and also stops your photos, notes, and other iCloud data from syncing there.
If your phone number belongs to an iPhone you no longer have, changing your Apple Account password removes that number from your iPad and Mac.
If You Only Want the iPad to Stop Buzzing
Maybe you still want messages on the iPad, just without the alerts. Go to Settings > Notifications > Messages on the iPad and turn off Allow Notifications. Messages still arrive, but the iPad stays quiet. To mute one person instead, open their conversation in Messages, tap their name at the top, and turn on Hide Alerts. What appears while the iPad is locked is a separate choice, and you can show or hide text messages on the iPad Lock Screen.
If Texts Still Arrive
- Texts still arrive after all three steps. Restart the iPad and the iPhone, then test again. Open Send & Receive on the iPad to make sure it isn’t signed in to iMessage with a different Apple Account that also uses your number.
- Text Message Forwarding is missing on the iPhone. Turn iMessage off and back on, then tap Send & Receive and sign in again. The list only shows devices that use iMessage with the same Apple Account.
- Messages in iCloud isn’t under Saved to iCloud. Tap See All. On iPadOS 17.1 or earlier, the switch is called Sync this iPad instead of Use on this iPad.
- The settings turned themselves back on. This usually happens after someone else changes them, or after you sign in again on a new or restored device. Repeat the steps, and use the sign-out option above for a shared iPad.
iPad Text Message Questions
Will turning off iMessage on my iPad affect my iPhone?
No. Each setting in Step 1 and Step 2 only applies to the iPad you change it on. Your iPhone keeps receiving all your messages.
Why do texts still appear on my iPad after I turned off iMessage?
Green-bubble texts reach the iPad through Text Message Forwarding or Messages in iCloud, not iMessage. Turn off Use on this iPad under Messages in iCloud on the iPad, then turn off the iPad under Text Message Forwarding on your iPhone.
Can I stop texts from just one person going to my iPad?
No. These settings apply to all your messages. You can hide alerts for that one conversation on the iPad, as described above, but the messages still arrive.
How do I stop phone calls from ringing on my iPad too?
Calls use different settings. On your iPhone, go to Settings > Apps > Phone > Calls on Other Devices and turn off your iPad. If FaceTime calls still ring on the iPad, open Settings > Apps > FaceTime on the iPad and uncheck your phone number.
How do I turn text messages back on for my iPad?
Reverse the steps: turn iMessage back on in Settings > Apps > Messages on the iPad, turn Use on this iPad back on under Messages in iCloud, and turn the iPad’s switch back on under Text Message Forwarding on your iPhone.

Matthew Burleigh is the founder, head writer, and editor of Solve Your Tech, which he launched in 2012. He has written technology tutorials since 2008 and worked in IT since 2003, including small-business support, IT management, and consulting. He holds Bachelor’s and Master’s degrees in Computer Science from Arizona State University.
Matthew writes practical guides for Windows, iPhone and iPad, Microsoft Office, Outlook, Google apps, and Android. Solve Your Tech’s guides are checked step by step against the device or app maker’s own documentation and tested on his own devices whenever he has the hardware or software, with clear steps, sources, and update dates.
Read more about Matthew and how Solve Your Tech writes and updates its guides, or report a correction.