Web browser extensions are a great way to make things on certain websites simpler or to conveniently utilize a service that can evaluate information on the Web pages you are visiting. But it might become necessary to know how to remove Chrome extensions when one of them starts to cause a problem with your Web browsing experience.
How to Delete an Extension from Google Chrome
Use these steps to remove an extension that you have installed in Google Chrome.
Step 1: Open Google Chrome.
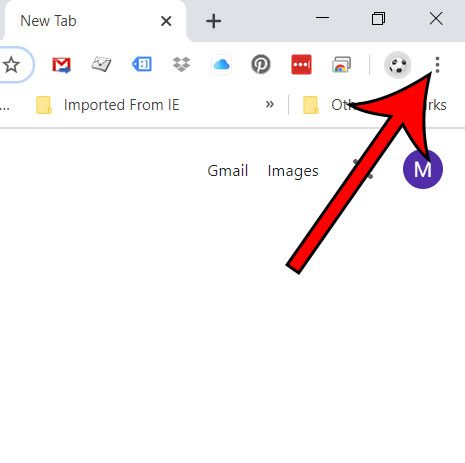
Step 2: Click the icon with three dots at the top-right of the window.
If you hover over the icon it says “Customize and control Google Chrome.”
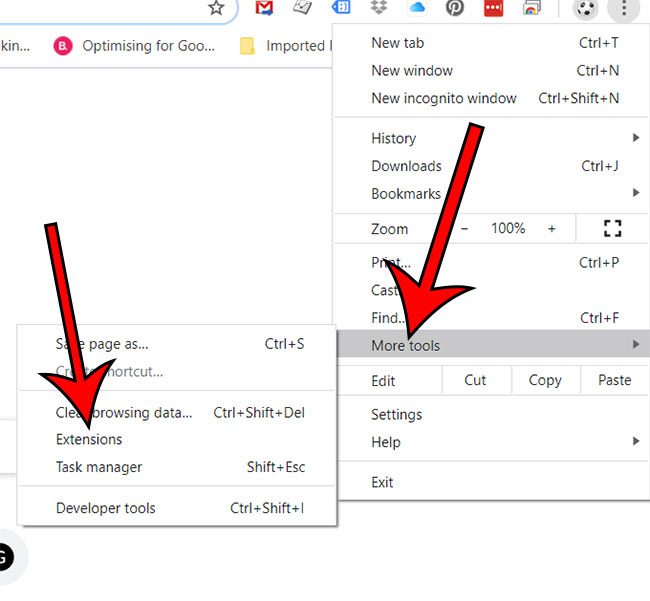
Step 3: Choose “More tools,” then “Extensions.”
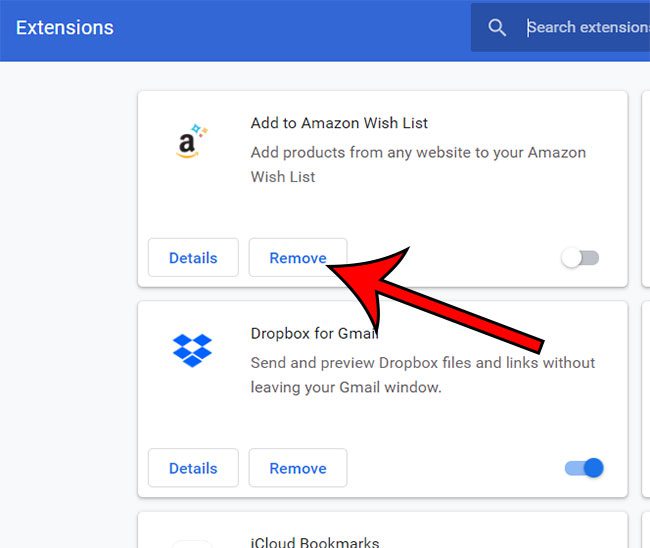
Step 4: Select the “Remove” option under the extension to remove.
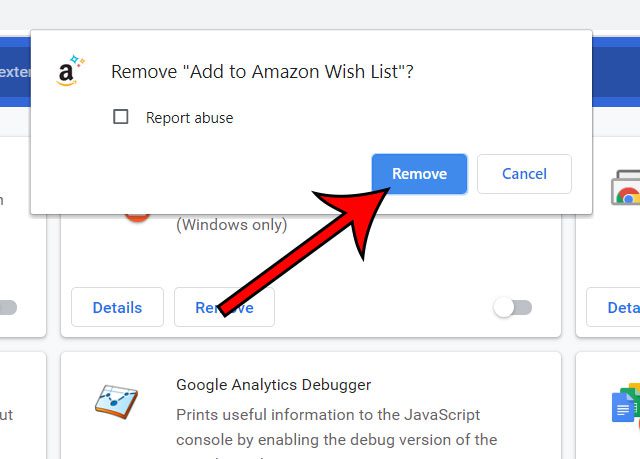
Step 5: Click the “Remove” button to confirm.
The steps in this article were performed in the desktop version of the Google Chrome Web browser, on a laptop running the Windows 10 operating system.
The Google Chrome Web browser is one of the most popular choices for browsing the Internet on computers and mobile devices. It’s fast and easy to use.
While you can do a lot with the basic version of Google Chrome, such as storing and viewing passwords for the sites you visit, you may eventually find that there is specific functionality that you want. Whether it’s adding something to an existing website, or allowing you to perform certain actions on any website, this is something that extensions can help with.
But sometimes you may discover that an extensions isn’t doing what you wanted it to, or that it’s causing issues in other aspects of your Web browsing.
Fortunately, Chrome extensions aren’t permanent fixtures, and you can remove them just as easily as you first added them.
The steps above show you how to get rid of an existing Chrome extension by accessing a menu in the Chrome browser itself.
Additional Information on Deleting Extensions from Chrome
While we have focused on getting rid of unwanted extensions in the Google Chrome Web browser with the guide above, it might not be due to a problematic or dangerous extension.
Sometimes you are just running into a specific issue with a website or service that is being affected by one of the extensions you have installed.
If you delete an extension you can always go back to the Chrome store and download and re-install it in the future.
If you are going through and cleaning up and improving Google Chrome, then you might want to check out our guide that answers the question of where are Chrome bookmarks stored?
Continue Reading
- How to turn off hardware acceleration in Google Chrome
- How to see recent downloads in Google Chrome
- Set Google Chrome as default browser in Windows 7
- How to start Google Chrome automatically
- How to change the startup page in Google Chrome

Matthew Burleigh has been writing tech tutorials since 2008. His writing has appeared on dozens of different websites and been read over 50 million times.
After receiving his Bachelor’s and Master’s degrees in Computer Science he spent several years working in IT management for small businesses. However, he now works full time writing content online and creating websites.
His main writing topics include iPhones, Microsoft Office, Google Apps, Android, and Photoshop, but he has also written about many other tech topics as well.


