Every picture that you create or download from the Internet has its own orientation. Sometimes that orientation is different than your situation requires. Use these steps to flip a picture in Powerpoint 2010.
- Open your Powerpoint presentation.
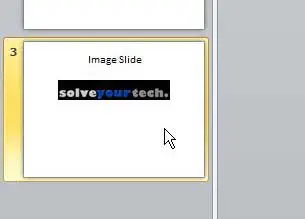
- Choose the slide with the picture to flip.
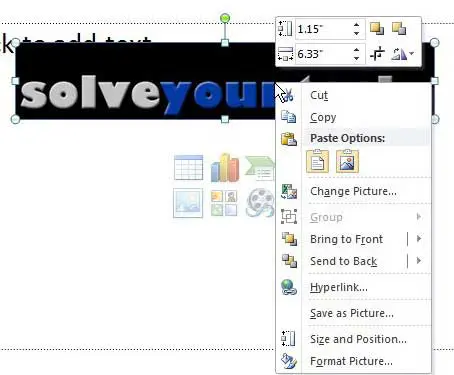
- Right-click on the picture to open the shortcut menu.
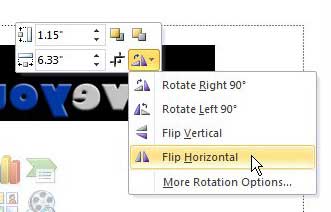
- Click the Rotate button.
- Choose the flipping or rotation option that you need.
Our article continues below with additional information and pictures for these steps.
Good, relevant images make a great addition to any Powerpoint 2010 presentation. They provide a break from the monotony of endless strings of text, and they can stick in an audience’s memory more easily.
But sometimes you receive or acquire an image that is not quite right for your needs, and you need to make some adjustments so that it can help in your presentation. For instance, you might be wondering how to flip a picture in Powerpoint 2010 if the picture you have is not correctly orientated.
While Powerpoint 2010 does not have a full featured image editing application within it, you can make an impressive amount of edits to your images directly from your slideshow. This includes the option for you to flip an image horizontally or vertically.
Flipping Images in Powerpoint 2010
As someone that has been using image editing programs like Photoshop, GIMP and even Microsoft’s own Paint for a while, I am accustomed to fully editing images in those programs before I insert them into a Microsoft Office program like Powerpoint. However, Powerpoint 2010 has a surprising amount of options for adjusting an image after you insert it into a slide, to the point where many of the more common adjustments that you would make in an image editing program can now be performed in Powerpoint.
Step 1: Open the Powerpoint presentation containing the picture that you want to flip in Powerpoint 2010.
Step 2: Navigate to the slide with the image using the slide navigation column at the left side of the window, then click the slide so that it is displayed at the center of the window.
Step 3: Right-click the image to display the shortcut menu.
Step 4: Click the Rotate button in the top segment of the shortcut menu, then click either the Flip Vertically or Flip Horizontally option, depending upon your needs for the slide.
Now that you know how to flip a picture in Powerpoint 2010, you can use this tool to quickly fix an image that is facing the wrong direction in your slideshow.
Note that you can also choose to rotate the image 90 degrees left or right if you do not wish to flip the entire image.
Who Might Need to Rotate an Image in Powerpoint?
If you’re lucky enough, you might not encounter a lot of situations where you need to rotate a picture in your presentation.
Unfortunately, many cameras will have their images in the portrait or landscape orientation, even if you took the picture in the other orientation.
You may also find yourself working with copies of pictures that had been edited previously, and the person that edited them may have needed the images for a different purpose.
Luckily Powerpoint has a number of different image rotation options that should enable you to flip your picture as needed.
What is Image Rotation in Powerpoint?
Image rotation in Powerpoint actually has a number of different options. You can rotate in either direction by 90 degrees, you can flip pictures along the vertical or horizontal axis, and you can even do some custom rotation.
As long as you are able to get the image into one of your slides, there is a high probability that you will be able to flip it to look the way you want.
Where Can I Find the Option to Rotate Images in Powerpoint?
The option to rotate or flip an image in Powerpoint can be found by right-clicking the image, clicking the Image Rotation button, then choosing the desired type of rotation.
When Do I Need to Rotate a Powerpoint Image?
The time when you need to rotate a Powerpoint image is going to be entirely dependent on your own situation. An image that is rotated one way might be fine for some presentations but incorrect for others.
As mentioned earlier, the most common situation I encounter is with pictures created by a digital camera that are portrait or landscape but need to be the other way.
But your school or organization may have image assets that you use that can realistically be displayed in a number of different manners.
Why Would I Need to Rotate a Powerpoint Picture?
Pictures are very helpful visual aids when you are explaining something or informing an audience.
But those pictures need to look good and make sense in the context of the presentation, which is something that flipping or rotating an incorrect image can help to resolve.
Continue Reading
- How to create a check mark in Powerpoint
- How to make curved text in Powerpoint
- How to make a Powerpoint slide vertical
- How to remove an animation from Powerpoint
- How to set a picture as a background in Powerpoint

Matthew Burleigh has been writing tech tutorials since 2008. His writing has appeared on dozens of different websites and been read over 50 million times.
After receiving his Bachelor’s and Master’s degrees in Computer Science he spent several years working in IT management for small businesses. However, he now works full time writing content online and creating websites.
His main writing topics include iPhones, Microsoft Office, Google Apps, Android, and Photoshop, but he has also written about many other tech topics as well.


