By their very nature, Powerpoint 2010 presentations need to be eye-catching.
The purpose of a Powerpoint slideshow is to catch the reader’s attention and keep it so that they can absorb the information that you are presenting.
There are many ways to do this, but one option is to put a picture as a background in Powerpoint 2010.
Using an image, even one that you have taken or created yourself, is a great way to break up the monotony that can occur when watching an endless stream of Powerpoint presentations on plain white backgrounds.
Adding a background image will make your slideshow memorable, and it will give your audience a way to reference the slideshow later in the future if they need to ask questions.
However, the way that you set a Powerpoint background image is a little different from the way that you add other images.
Setting a picture as a background in Powerpoint 2010 will require you to format your slide background rather than formatting the image itself. Our guide below will show you how.
How to Set an Image as a Background in Powerpoint 2010
You can use any image as the background for the Powerpoint 2010 presentation that you want to customize.
Even if you think the image might be too distracting to effectively play its role as a background, you can customize the image to tone it down and make it less of a distraction from the information you are presenting.
Step 1: Begin by opening your presentation in Powerpoint 2010.
Step 2: Browse to the slide to which you want to add a background image.
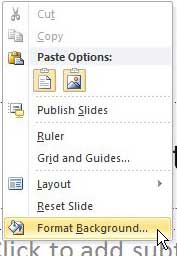
Step 3: Right-click in an open space on the slide, then click the Format Background option at the bottom of the menu.
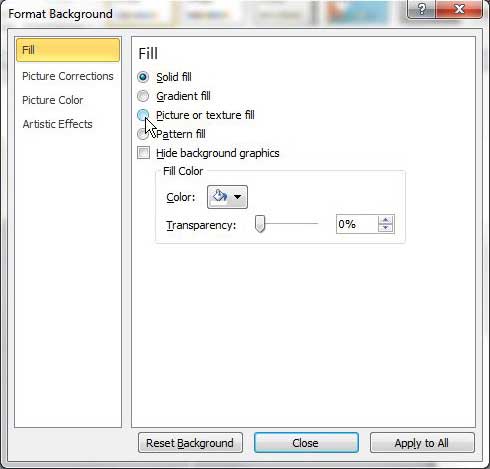
Step 4: Click the Fill option in the column at the left side of the window, then check the button to the left of the Picture or texture fill option.
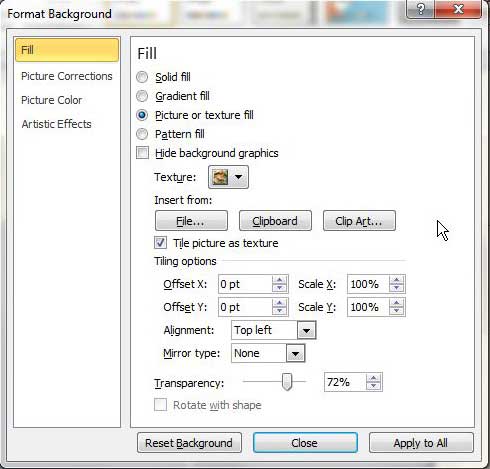
Step 5: Click the File button at the center of the window, under Insert from, then double-click the image file that you want to set as your slide background. The background of the currently selected slide should now change to the image you just selected.
If you want to apply this image as the background to every slide, click the Apply to all button at the bottom of the window.
Now that you know how to set a picture as a background in Powerpoint 2010, you can use this option to better format your presentations if they would benefit from a background image.
If the image is too vivid or distracting, consider increasing the Transparency amount using the slider at the bottom of the window. By making the object more transparent, you will make the text, images and information in the foreground of the slide become more prominent.
There are also Scale and Offset options, under the Tiling options section of the window, that you can use to adjust the position and scaling of the background image. If you wish to repeat the image numerous times, instead of having one large copy, you can also check the box to the left of Tile picture as texture.
Finally, if you find that you do not like the changes that the background has made to the slide, you can click the Reset Background button at the bottom of the window to return to the original slide background.
If you also use Google Slides and are looking for the same tools you have in Powerpoint, then this guide can show you how to add shapes to your slides.
Summary – How to set a picture as a background on Powerpoint
- Open your slideshow, then select the slide where you wish to insert a background picture.
- Right-click on the slide, then click Format Background.
- Click Fill in the left column, then click the circle to the left of Picture or texture fill.
- Click the File button under Insert from.
- Browse to your picture, select it, then click the Insert button.
- Adjust the settings for the picture as needed, then click Close if you are done, or click Apply to All if you want to use this background picture for all of your slides.
Do you need to make a picture in one of your slides transparent? Learn about picture transparency in Powerpoint 2010 to see an interesting method for adding and formatting pictures.

Matthew Burleigh has been writing tech tutorials since 2008. His writing has appeared on dozens of different websites and been read over 50 million times.
After receiving his Bachelor’s and Master’s degrees in Computer Science he spent several years working in IT management for small businesses. However, he now works full time writing content online and creating websites.
His main writing topics include iPhones, Microsoft Office, Google Apps, Android, and Photoshop, but he has also written about many other tech topics as well.


