Reducing the file size in Powerpoint 2010 is important when you need to share your file through email, but it’s too large. Use these steps to compress audio and video in Powerpoint 2010 and reduce file size.
- Open the Powerpoint slideshow.
- Click File.
- Click Info.
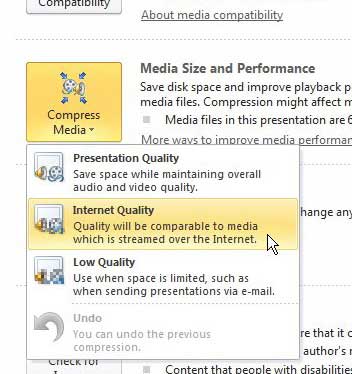
- Select Compress Media.
- Choose the desired compression level.
Our article continues below with additional information and pictures of these steps.
Powerpoint 2010 presentations are often made better when you use audio or video files. However, sometimes these files are embedded in your presentation, which can make the file size very large.
Large Powerpoint slideshows can be difficult to distribute, which can make it complicated to reach your desired audience. Luckily you can learn how to compress audio and video files in Powerpoint 2010, which will reduce the size of the file. You can even achieve improved playback in some cases due to the way that Powerpoint 2010 will compress your files.
Continue reading to see where this utility is located in Powerpoint 2010 and how you can use it.
Compressing Media in Powerpoint 2010 Files
Media files, specifically video, tend to be very large. Unfortunately they can be very useful in Powerpoint 2010, so you do not want to avoid using them because of their file size. But even if you do your best to reduce the size of the video file before it is inserted in the slideshow, the resulting Powerpoint presentation might be too large to be emailed. Continue reading to learn how to compress the media files in your Powerpoint 2010 file.
Step 1: Open the Powerpoint 2010 file that contains the media files you want to compress.
Step 2: Click the orange File tab at the top-left corner of the window, then click Info at the left side of the window.
Step 3: Click the Compress Media drop-down menu at the center of the window, then click the desired level of quality to which you want to compress your media. The options are displayed in terms of the quality and file size that will result from the compression, so Presentation Quality will look the best but have the highest file size, while Low Quality will look the worst but have the smallest file size.
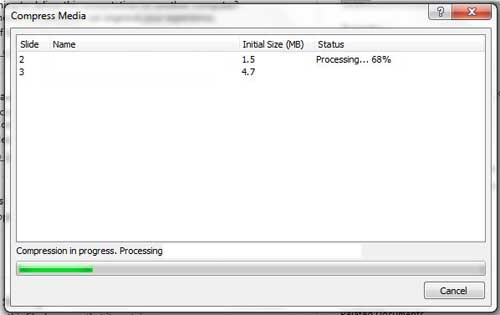
Step 4: Wait until the Compress Media window has closed, which can take a while depending upon the amount of compression that needs to occur.
Once the compression has completed, Powerpoint will tell you which files have been compressed and how much space has been saved. Be sure to save the file after the compression has occurred. I will typically save it with a new file name to keep the original file and quality intact.
Now that you know how to compress audio and video in Powerpoint 2010, you will be able to use this option and make your slideshow presentations a little easier to share.
While compressing video and audio will likely reduce the size of your presentation file, it still may not be small enough to send through email. Other options you might consider include zipping the file, or uploading it to a cloud storage service like Google Drive or Dropbox, then sharing a link to the file there.
See also
- How to create a check mark in Powerpoint
- How to make curved text in Powerpoint
- How to make a Powerpoint slide vertical
- How to remove an animation from Powerpoint
- How to set a picture as a background in Powerpoint

Matthew Burleigh has been writing tech tutorials since 2008. His writing has appeared on dozens of different websites and been read over 50 million times.
After receiving his Bachelor’s and Master’s degrees in Computer Science he spent several years working in IT management for small businesses. However, he now works full time writing content online and creating websites.
His main writing topics include iPhones, Microsoft Office, Google Apps, Android, and Photoshop, but he has also written about many other tech topics as well.


