Presentations often look their best when you use a lot of colors. It helps to capture the reader’s attention and often presents the information in the best-possible light.
But not everyone is going to see the presentation in a format where all of those colors are visible, so you might want to check the slideshow another way.
Our tutorial below will show you how to view your Powerpoint 2010 slideshow in grayscale to see how it will look without all of the colors.
How to Check the Grayscale Version of a Powerpoint Presentation
- Open the slideshow.
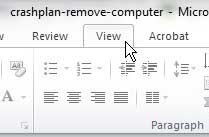
- Choose the View tab.
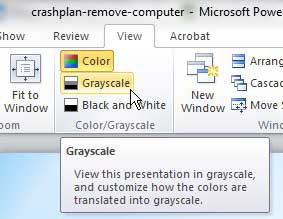
- Click the Grayscale button.
- Check the document for any problems.
Our guide continues below with additional information on how to view your Powerpoint 2010 slideshow in grayscale, including pictures of these steps.
One of the best things about Powerpoint 2010 is how easy it is to insert images and videos into the slides in your presentation.
They give you an additional medium to use to convey your information while also allowing you to improve the appearance of your slides.
However, most image or video files are in color, which can create a problem if you need to view your Powerpoint 2010 slideshow in grayscale.
Some of your audience might be printing your slideshow on a black-and-white printer, or you might be printing your handouts on a black-and-white printer.
If you do not preview what that version of your Powerpoint 2010 presentation will look like, then you might lose some important information when the grayscale conversion occurs.
Fortunately, you can view your Powerpoint 2010 slideshow in grayscale while you are editing it to see how it will appear in those situations.
Related: Check out our guide on how to save a Powerpoint as a PDF with notes if you need it as a presenting aid.
How to Preview Powerpoint 2010 Presentation in Grayscale (Guide with Pictures)
Viewing your Powerpoint 2010 file in grayscale will not actually convert the file to grayscale.
This means that your images, videos, and slide elements will still be in color if you need them – you are simply checking how everything will look when it is printed or viewed in grayscale.
If you detect any problems with the slideshow in this view setting, then you can adjust those problems before they are presented to an audience.
Step 1: Open the Powerpoint 2010 slideshow that you can want to view in grayscale.
Step 2: Click the View tab at the top of the window.
Step 3: Click the Grayscale button in the Color/Grayscale section of the ribbon at the top of the window.
Step 4: Scroll through each of the slides in your presentation to see how they will look when they are printed or viewed in grayscale.
Make any adjustments if a slide element becomes difficult to see or understand.
Now that you know how to view your Powerpoint presentation in grayscale, you will be able to use this as another proofreading tool that can help you understand how people would see the information if they printed it in black and white.
You can exit Powerpoint 2010’s grayscale mode when you are done by clicking the Grayscale button again.
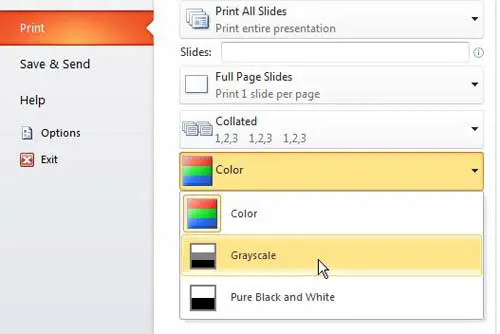
If you want to print in grayscale, you can do so by choosing the Grayscale option on the Color drop-down menu on the Print screen.
You might have noticed that there are also Black and White options in each of the locations referenced above.
This option will convert everything to strictly black and white – there are no shades of gray. If you think that option might be preferable, you can choose it instead to see how your slideshow will look.

Matthew Burleigh has been writing tech tutorials since 2008. His writing has appeared on dozens of different websites and been read over 50 million times.
After receiving his Bachelor’s and Master’s degrees in Computer Science he spent several years working in IT management for small businesses. However, he now works full time writing content online and creating websites.
His main writing topics include iPhones, Microsoft Office, Google Apps, Android, and Photoshop, but he has also written about many other tech topics as well.


