To save a picture as a PDF on an iPhone, open the picture in Photos, tap Share, and choose Print. On the Print Options screen, tap Share at the top, then choose Save to Files and pick a folder. You don’t need a printer, and nothing gets printed.
These steps use apps that come with every iPhone: Photos, Files, Books, and, on iOS 26 and iOS 27, Preview. The Print and Files methods also work on older versions of iOS that are still in use, and the menu names are the same on an iPad. The original photo stays in your library in every method below. The PDF is a separate copy.
Which Method to Use
| Method | Best for | Where the PDF ends up |
|---|---|---|
| Photos > Print | The quickest route for one picture or several | Wherever you save or send it |
| Files > Create PDF | Pictures already saved as files, or making one PDF in a set page order | The same folder as the pictures |
| Preview > Export | Cropping or marking up the picture first (iOS 26 and later) | A folder you choose |
| Photos > Books | Keeping the PDF in your Books library to read later | The Books app |
A PDF (Portable Document Format) file looks the same on any phone or computer, which is why schools, employers, and online forms often ask for one instead of a JPG or HEIC photo. HEIC is the format iPhone cameras use by default, and some websites won’t accept it. Converting to PDF solves that problem for document uploads.
If the form asks for a JPG image rather than a PDF, follow our steps to convert an iPhone photo to JPG instead.
Save a Picture as a PDF From Photos
- Open the Photos app and tap the picture you want to convert. It opens full screen.
- Tap the Share button (the square with an arrow pointing up) in the bottom-left corner. If you don’t see the buttons, tap the picture once to show them. The share sheet slides up from the bottom.
- Scroll down the list of actions and tap Print. The Print Options screen opens with a preview of the page.
- Tap the Share button at the top of the Print Options screen. If you don’t see it, place two fingers on the page preview and spread them apart. This opens a full-size PDF preview with its own Share button.
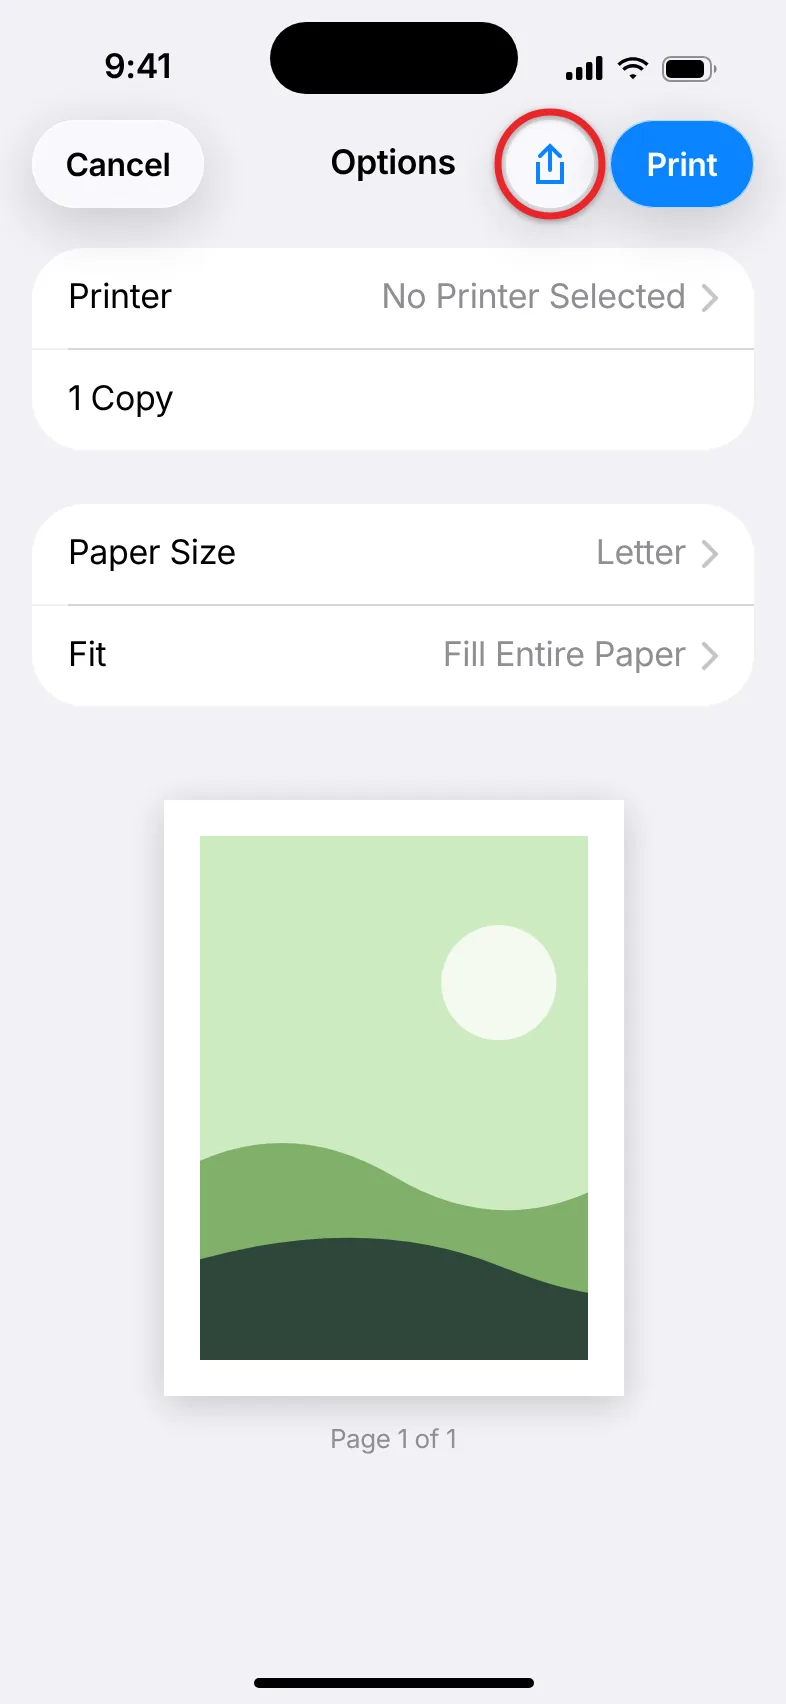
- Tap Save to Files. The Files browser appears.
- Choose a location, such as On My iPhone or iCloud Drive, and tap a folder. Tap the file name at the top if you want to rename it, then tap Save.
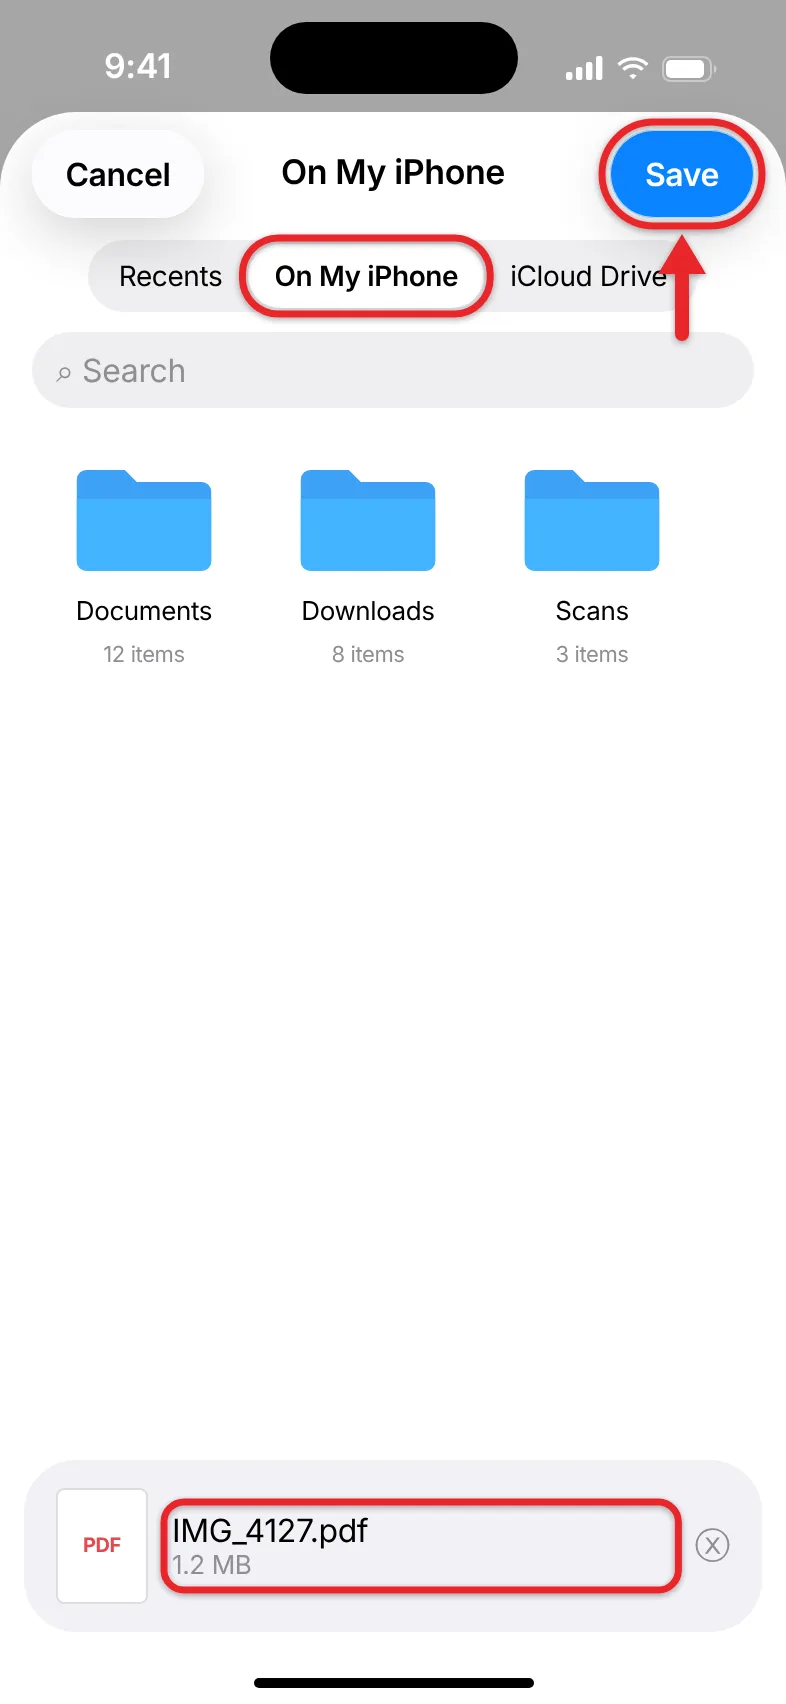
The picture is now saved as a PDF in that folder. To check it, open the Files app, go to the folder, and tap the file. Its name ends in .pdf, and you’ll see the picture on a white page.
You can also send the PDF straight from step 5 instead of saving it. Pick Mail, Messages, or AirDrop in the share sheet, and the picture goes out as a PDF attachment.
Turn Several Pictures Into One PDF
In Photos, tap Select in the top-right corner of your library or an album, tap each picture you want, and then follow steps 2 through 6 above. Each picture becomes its own page in a single PDF.
You can’t rearrange the pages on the Print Options screen. If the page order matters, check the finished PDF, or use the Files method in the next section, where you control the order with file names.
Convert a Picture in the Files App
The Files app has a Create PDF command that converts an image file without opening it. Your pictures need to be in Files first, because Files can’t see the Photos library.
- In Photos, open the picture (or tap Select and choose several), tap Share, and then tap Save to Files.
- Pick a folder you’ll remember, such as On My iPhone, and tap Save. This step saves an image file, not a PDF yet.
- Open the Files app and go to that folder. Apple’s guide to finding files on your iPhone explains the Browse and Recents tabs if you can’t find it.
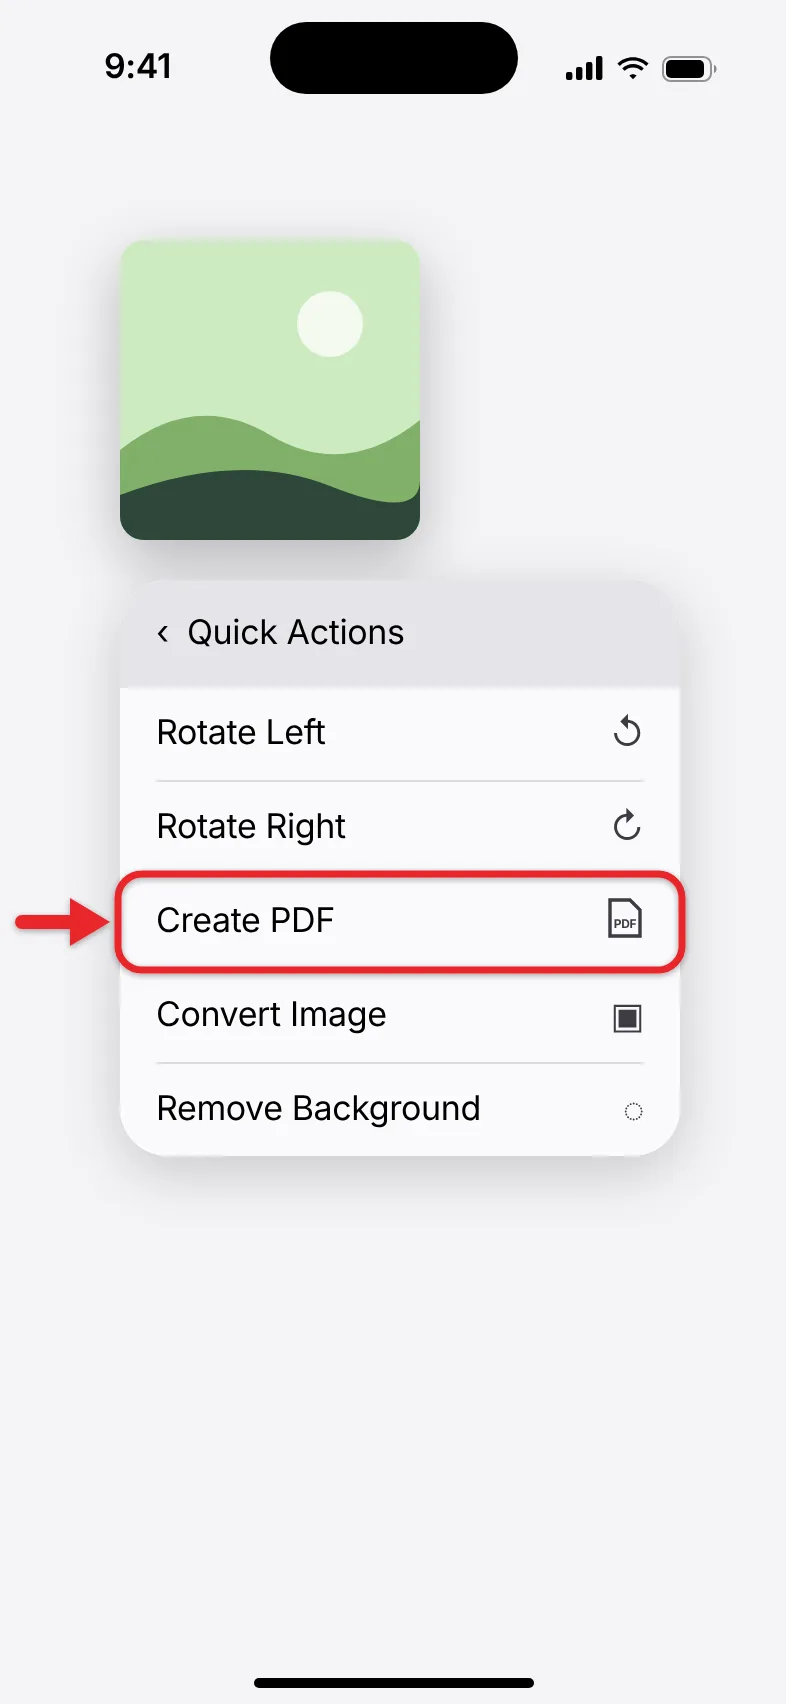
- Touch and hold the picture until a menu appears.
- Tap Quick Actions, then tap Create PDF. A new PDF with the same name appears in the same folder, next to the original picture.
To combine several pictures, open the folder, tap the More button (three dots in a circle) at the top of the screen, and tap Select. Tap each picture, tap the More button at the bottom-right of the screen, and choose Create PDF. Files puts the pages in the order the files are sorted in the folder, so name them in order first (for example, page1, page2, page3) if the order matters.
After the PDF is made, you can delete the image copies from Files. That won’t remove anything from Photos. For more ways to get around the Files app, see our guide on how to find your files on iPhone.
Export a Picture as a PDF in Preview (iOS 26 and Later)
Apple added the Preview app to the iPhone in iOS 26. It’s useful when you want to crop, rotate, or mark up the picture before you turn it into a PDF.
- Save the picture to Files using steps 1 and 2 of the previous section.
- Open Preview. Tap Browse, go to the folder you used, and tap the picture to open it.
- Tap the file name at the top of the screen (the actions menu), and then tap Export.
- Choose PDF as the format. On iOS 27, tap Done to move to the save screen.
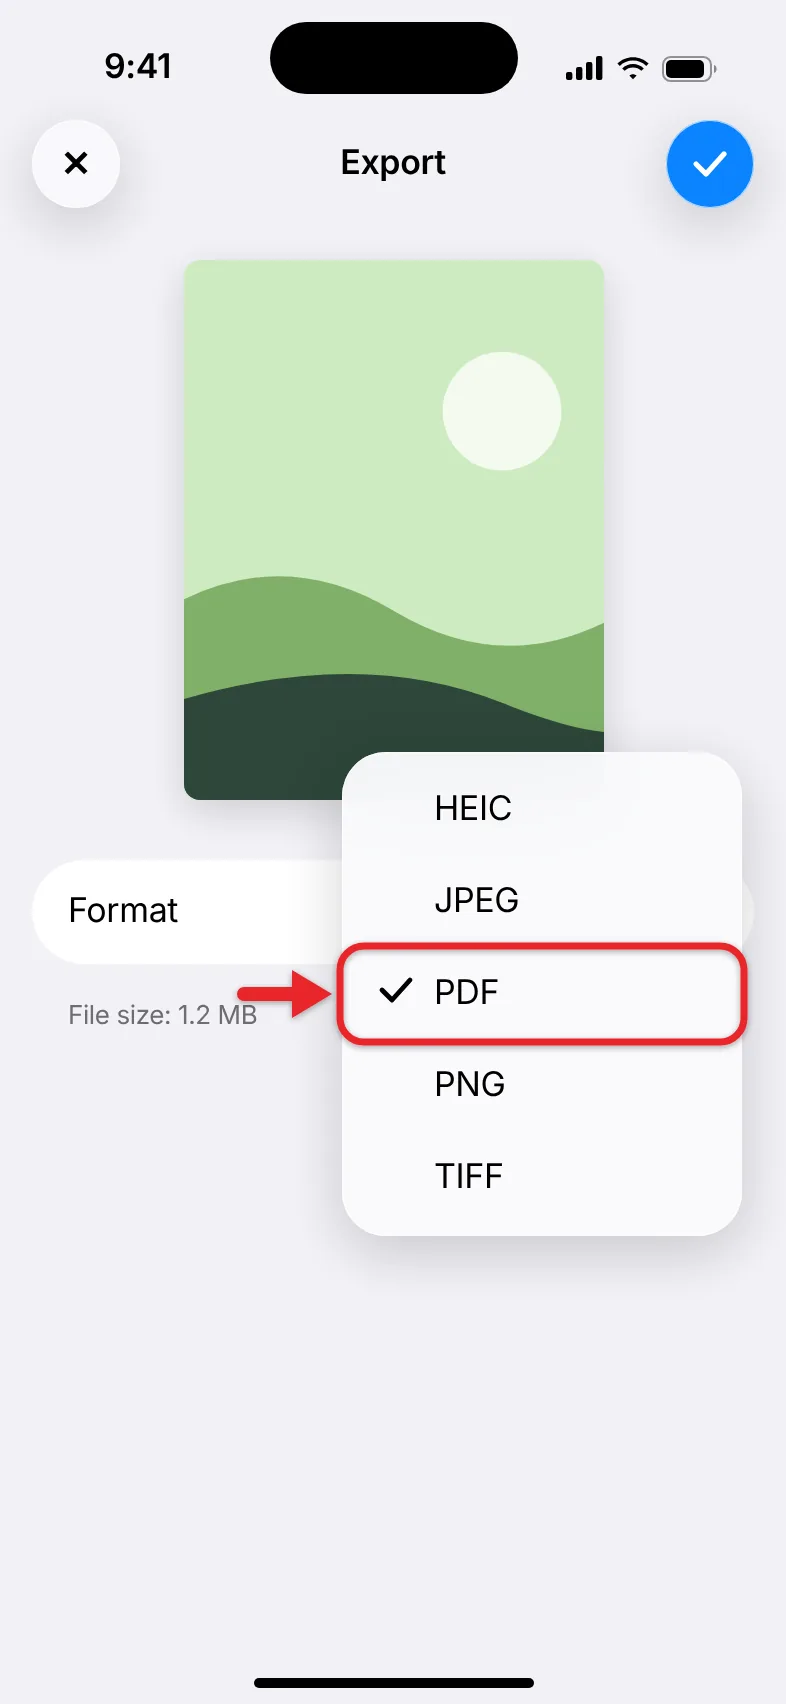
- Choose where to save the file, change the name in Save As if you like, and tap Save.
Apple’s Preview export guide covers the format options. If the format list on your iPhone doesn’t include PDF, use the Files method above instead, which gives the same result.
Preview can also build a multipage PDF. Open the PDF, tap the page-count button to show thumbnails, touch and hold a thumbnail, and choose Insert from File to add another picture. Drag the thumbnails to change their order.
Keep the PDF in Books
You can also send a picture to the Books app. Open it in Photos, tap Share, and tap Books in the row of app icons (tap More at the end of the row if it’s missing). Books saves it as a PDF in the PDFs collection. It’s fine for reading, but Files is easier when you need to attach the PDF to a form or an email.
Troubleshooting
- There’s no Print option in the share sheet. It’s in the list of actions below the row of app icons, so scroll all the way down. You can tap Edit Actions at the bottom of the list to add it to your favorites near the top.
- Save to Files is missing. It’s also in the list of actions below the app icons. Tap Edit Actions to add it to your favorites at the top.
- You can’t find the Share button on the Print Options screen. Spread two fingers apart on the page preview to open the full-size PDF view, which has its own Share button.
- You only got an image file, not a PDF. Saving a photo to Files keeps its original format (HEIC, JPG, or PNG). Use Quick Actions > Create PDF on that file to convert it. Renaming the file to end in .pdf does not convert it.
- The picture is cropped or has wide white margins. The Print method places the picture on a standard paper-size page. For a page that matches the picture’s own shape, use Create PDF in Files instead.
- Create PDF is missing in Files. Make sure you’re touching and holding an image file, not a folder or a file that’s already a PDF. If the file is stored in a third-party cloud app, save a copy to On My iPhone or iCloud Drive and try again.
- The PDF is too large to upload. Big photos make big PDFs. In Preview on iOS 26 or later, export a smaller JPEG copy first with the size slider, then convert that copy to PDF.
If your goal is a PDF of a paper document rather than a photo, the Notes scanner does a better job of straightening and cleaning up the page. See how to scan documents on iPhone. For PDFs of web pages, notes, and other content, our guide on how to make a PDF on iPhone covers those starting points.
Frequently Asked Questions
Do I need an app to save a picture as a PDF on an iPhone?
No. Photos, Files, and Books come with every iPhone, and Preview comes with iOS 26 and later. Third-party scanner and converter apps work too, but some charge a subscription for the same result.
Where does the PDF go after I save it?
With the Print method, it goes to the folder you chose in Save to Files. With Create PDF, it appears in the same folder as the picture. With Books, it stays in the Books library until you share it.
Will converting the picture delete the original photo?
No. Every method makes a new PDF file and leaves the photo in your Photos library unchanged.
Can I combine several pictures into one PDF?
Yes. Select several pictures in Photos and use Print, or select several image files in Files and use Create PDF. Use Files if you need the pages in a specific order, since it follows the folder’s sort order.
Does this work with screenshots?
Yes. Screenshots are saved as PNG images in Photos, so any of the methods above converts them to a PDF the same way.

Matthew Burleigh is the founder, head writer, and editor of Solve Your Tech, which he launched in 2012. He has written technology tutorials since 2008 and worked in IT since 2003, including small-business support, IT management, and consulting. He holds Bachelor’s and Master’s degrees in Computer Science from Arizona State University.
Matthew writes practical guides for Windows, iPhone and iPad, Microsoft Office, Outlook, Google apps, and Android. Solve Your Tech’s guides are checked step by step against the device or app maker’s own documentation and tested on his own devices whenever he has the hardware or software, with clear steps, sources, and update dates.
Read more about Matthew and how Solve Your Tech writes and updates its guides, or report a correction.