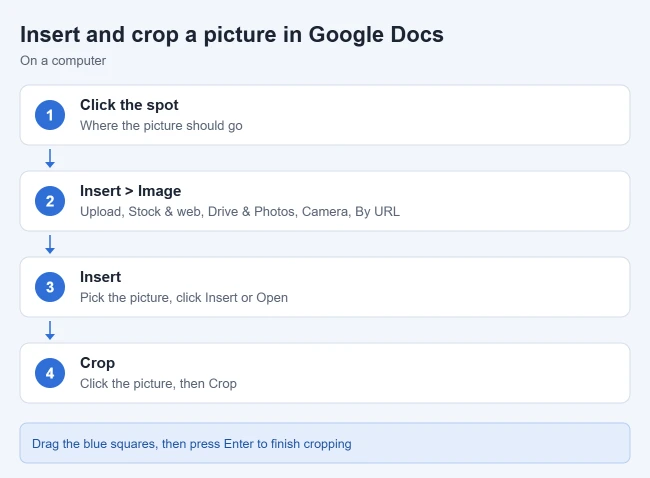
To put a picture in Google Docs, click where you want it, then click Insert > Image and choose Upload from computer, Stock & web, Drive & Photos, Camera, or By URL. To crop it, click the picture, click Crop, drag the blue squares, and press Enter. Everything else, such as size, rotation, text wrapping, color, and borders, is under Image options.
These steps follow Google’s Insert or delete images & videos and Crop & adjust images help pages, checked in October 2026.
What you need before you start
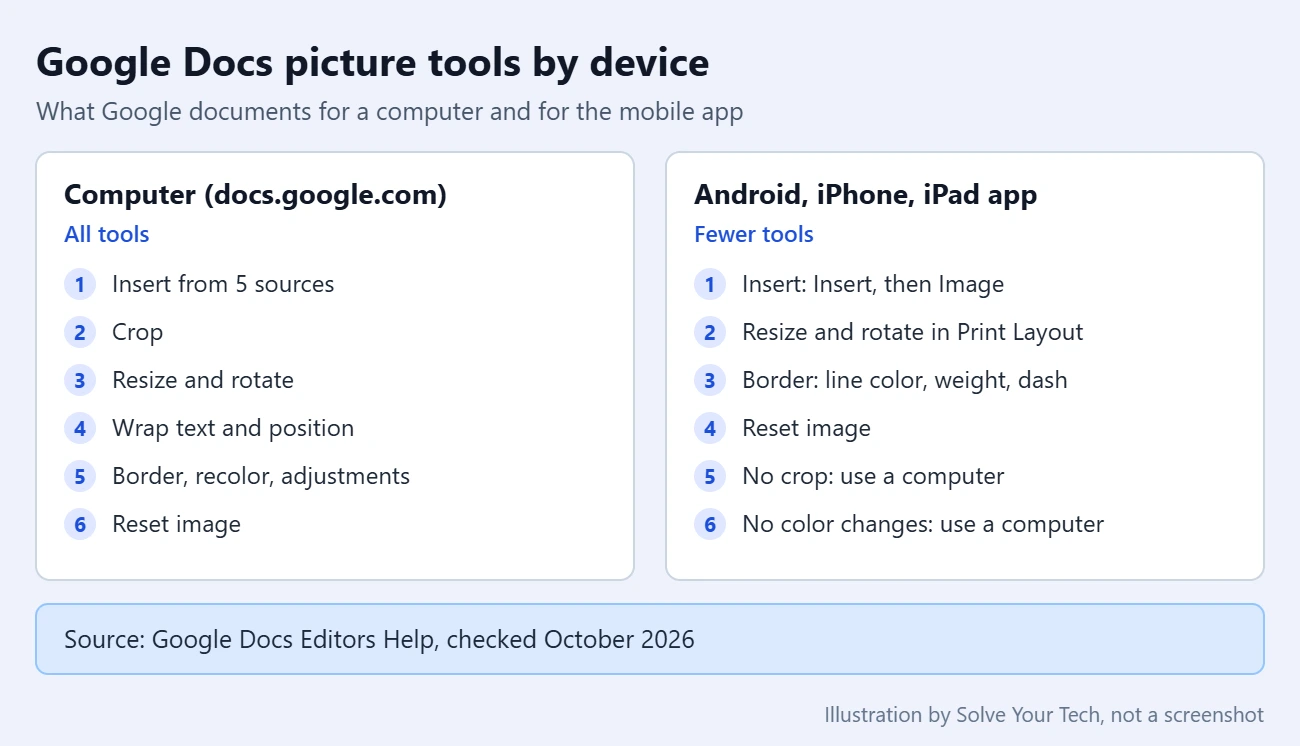
- A computer for the full set of tools. Google Docs in a web browser at docs.google.com can insert, crop, recolor, wrap, and reset pictures. The Android and iPhone apps can insert a picture, resize or rotate it, add a border, and reset it, but Google says cropping and color changes in Docs need a computer.
- Edit access. You need to be able to edit the document. If you can only view or comment, the Insert menu and image tools are not available to you.
- Pages format for layout tools. Text wrapping and position options do not work in a pageless document. Pageless is a Google Docs format that scrolls continuously with no page breaks.
How to insert a picture in Google Docs on a computer
- Open your document and click the spot where the picture should go.
- Click Insert in the menu at the top, then click Image. A list of sources opens.
- Choose where the picture comes from (see the table below).
- Select the picture and click Insert or Open.
Result: the picture appears at your cursor. A new picture sits in line with the text, like a large letter, until you change its layout.
| Source | What it does (per Google) |
|---|---|
| Upload from computer | Inserts an image saved on your device. |
| Stock & web | Inserts stock images, GIF files, stickers, and Google images. |
| Drive & Photos | Uses an image from your Google Drive or Google Photos library. |
| Camera | Uses your device’s camera to add an image. |
| By URL | Inserts an image or a .gif from a web address. |
Pictures you find on the web may be protected by copyright. Check that you are allowed to use an image before you put it in a document you plan to publish or share widely.
Drag or paste a picture instead
Google documents two shortcuts that skip the Insert menu:
- Drag: click an image on your computer or on a website, hold the mouse button, and drag it into the document.
- Copy and paste: right-click an image on your computer or a website, click Copy, go to your document, and click Paste. Google notes it may take a moment for the image to open.
How to crop a picture
Cropping trims the edges of a picture or removes a section you do not want. In Google Docs this is a computer-only tool. For changes Docs cannot make, such as shrinking the file or adding effects, you can edit the image online for free before you insert it.
- Click the picture you want to crop.
- Click Crop in the toolbar.
- Drag the blue squares around the border into the shape you want.
- Press Enter on your keyboard, or click anywhere else in the document.
Result: the edges you dragged in are trimmed off. If you trimmed too much, you can bring the full picture back with Reset image, covered below.
Google Docs does not have the shape-mask tool. Google lists masking (fitting a picture into a circle or other shape) for Google Slides and Google Vids only. If that is what you need, see how to crop a picture in Google Slides.
How to position a picture and wrap text
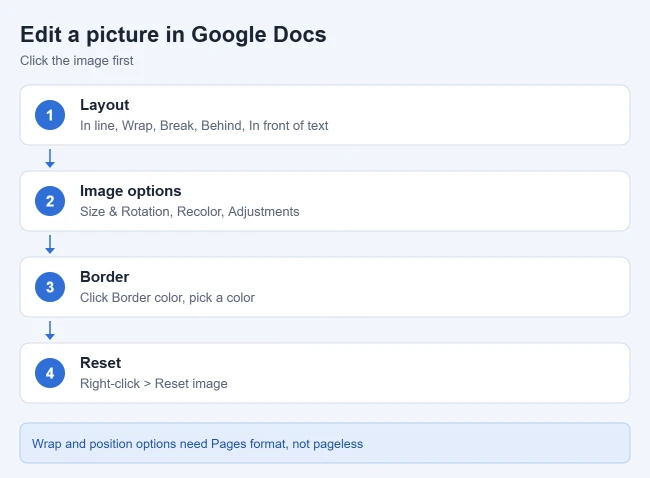
Click the picture. Google says a pop-up opens below it with these layout options:
- In line: the picture sits in the line of text like a character.
- Wrap text: text flows around the sides of the picture.
- Break text: text stops above the picture and continues below it.
- Behind text: the picture sits under the words.
- In front of text: the picture covers the words.
If you choose Wrap text or Break text, you can also pick Move with text or Fix position on page. Move with text keeps the picture next to the same paragraph as you add or delete lines. Fix position on page keeps it in one place on the page.
Important: Google notes these layout options are not available in pageless documents. To switch, click File > Page setup, select Pages, and click OK. You can also click Format and select Switch to Pages format. Google explains both formats on its pages or pageless help page.
How to resize, rotate, and adjust a picture
- Click the picture.
- Click Image options > All image options. You can also click Format > Format options. A sidebar opens on the right.
- Open the section you need and make your change.
| Sidebar section | What you can change |
|---|---|
| Size & Rotation | The size, scale, and rotation of the picture. |
| Text Wrapping | How the picture interacts with the text around it. |
| Position | Where the picture sits in the document. |
| Recolor | The color of the picture. |
| Adjustments | Opacity (transparency), brightness, and contrast. |
Result: Google says you will see your changes as you edit, so there is no Save or Apply button to look for.
You can usually resize a picture faster by clicking it and dragging one of the squares on its border, and rotate it by dragging the round handle attached to it. Google documents those handles for the mobile app and for drawings; its desktop help page for Docs describes the sidebar method above.
Add a border, replace, or reset a picture
- Border: click the picture, click Border color in the toolbar, and choose a color.
- Replace: right-click the picture, click Replace image, choose a source, and choose the new image. The new picture takes the place of the old one.
- Reset: right-click the picture and click Reset image.
Warning: Reset image undoes every change you made to the picture, not just the last one. Google says the edited image returns to the original photo you added to the file, so a crop, recolor, and adjustments can all be removed together. To step back just one change, use Edit > Undo instead.
Pictures in the Google Docs app on Android, iPhone, and iPad
The mobile app has fewer picture tools than the website.
Insert a picture
- Open the document in the Google Docs app.
- Tap Insert (the plus icon).
- Tap Image.
- Choose where to get the image from, then tap a photo.
Resize or rotate a picture
- Open the document, tap More, and turn on Print Layout.
- Tap the picture.
- To resize it, touch and drag the squares along the edges. To rotate it, touch and drag the circle attached to the picture.
Add a border, reset, or delete
- Border: tap the picture, tap Format, and choose a line color, weight, and dash.
- Reset: tap the picture, tap Format, then tap Reset image.
- Delete: tap the picture, then tap Delete.
Google’s mobile pages say that to crop an image in Google Docs, or to adjust image colors, you should go to docs.google.com on a computer.
How to confirm your changes and undo them
- Confirm: click away from the picture. The crop border and handles disappear, and the picture shows the way readers will see it. Google Docs saves changes on its own.
- Undo one step: click Edit > Undo right after the change.
- Undo all picture edits: right-click the picture and click Reset image.
- Remove the picture: in the mobile app, tap the picture and tap Delete. On a computer, clicking the picture and pressing the Delete key normally removes it, although Google’s desktop page does not list that step.
Troubleshooting
The wrap and position options are missing
The document is probably in pageless format. Google says Text Wrapping and Position are not available there. Click File > Page setup, select Pages, click OK, and click the picture again.
There is no Crop button
Check two things. First, click the picture so it is selected; Crop only appears in the toolbar for a selected image. Second, check your device. The Google Docs mobile app does not crop, so open the document at docs.google.com on a computer. If your browser window is narrow, some toolbar buttons may be tucked into a More menu at the end of the toolbar.
The Insert menu is missing or grayed out
You likely have view-only or comment-only access. Ask the owner to share the document with you as an editor, or make your own copy if you are allowed to.
I cannot resize or rotate on my phone
Turn on Print Layout first. Tap More in the Google Docs app, switch on Print Layout, then tap the picture to see the squares and the rotation circle.
A pasted picture does not show up
Wait a few seconds. Google notes a pasted image may take a moment to open. If nothing appears, save the picture to your computer and use Insert > Image > Upload from computer.
Frequently asked questions
Can I crop a picture in the Google Docs app on a phone?
No. Google’s Android and iPhone help pages both say that to crop an image in Google Docs, you need to go to docs.google.com on a computer. The app can resize, rotate, add a border to, and reset a picture.
Can I crop a picture into a circle in Google Docs?
Not with the Crop tool. Google lists shape masking for Google Slides and Google Vids, not for Docs. You can mask the picture in a Google Slides presentation and try copying it into your document, but Google does not document whether the shape carries over.
How do I add alt text to a picture?
Alt text is a short description that screen readers read aloud for people who cannot see the image. Select the picture, click Image options > Alt text, and type a description. Google’s accessibility tips also list a shortcut: Ctrl + Alt + Y, or Command + Option + Y on a Mac.
Can I add a cover image to a Google Doc?
Yes, in pageless documents only. Google says to type @cover image in a new document. A stock image is added, which you can reposition, replace, or delete. Cover images do not show in Pages mode. For a printable first page instead, see how to make a cover page in Google Docs.
How do I save a picture out of a Google Doc?
Google Docs does not have a Save image button. See how to save an image from Google Docs for the options, including downloading the document as a web page.
Does editing a picture in Google Docs change my original file?
Google’s help pages describe the edits as changes to the image inside the document, and Reset image returns it to the original photo you added. Nothing in those pages says the file on your computer or in Google Drive is altered.
Next steps
Once your picture is in place, you can label it with a text box in Google Docs, line it up beside other content using tables in Google Docs, or learn how to put a PDF into Google Docs as a picture of a page. Working in a spreadsheet instead? See how to insert a picture in Google Sheets.

Matthew Burleigh has been writing tech tutorials since 2008. His writing has appeared on dozens of different websites and been read hundreds of millions of times.
After receiving his Bachelor’s and Master’s degrees in Computer Science he spent several years working in IT management for small businesses. However, he now works full time writing content online and creating websites.
His main writing topics include iPhones, Microsoft Office, Google Apps, Android, and Photoshop, but he has also written about many other tech topics as well.