If you are collaborating on a document with other people, then there’s a good chance that edits and comments are being displayed. But you may want to learn how to turn off Track Changes in Word 2010 if you don’t want this to happen.
Working with the change tracking feature in Microsoft Word 2010 is helpful for groups of people that are all contributing to a single document.
It can be difficult to notice when a change has been made to the content in a document, however, with Track Changes turned on, all of the modifications will be displayed in color. Word will even include a user name and/or initials to identify the person that made the change.
But you may find that certain changes do not need to be tracked, or that you want to make an adjustment that you do not want to be highlighted with the change tracking system. Fortunately this setting can be turned on or off within Word 2010 by following our guide below.
How to Turn Off Track Changes in Word 2010
- Open your document.
- Click Review.
- Click Track Changes.
Our article continues below with additional information on turning off Track Changes in Word 2010, including pictures of these steps.
How to Turn Off the Track Changes Feature in Word 2010
The steps in this article will show you how to turn off the “Track Changes” setting. This means that any changes that you make to the document will not be tagged with your name and the color that is associated with your user name.
Step 1: Open the document in Microsoft Word 2010 for which you wish to disable the “Track Changes” setting.
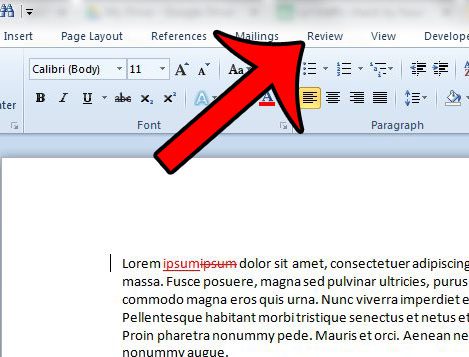
Step 2: Click the Review tab at the top of the window.

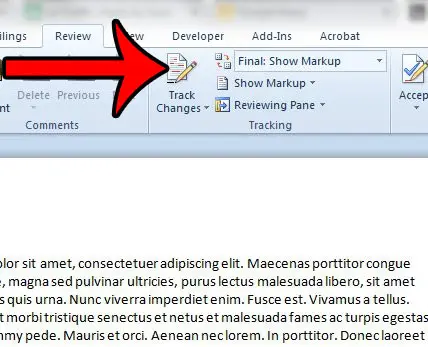
Step 3: Click the Track Changes button in the Tracking section of the Office ribbon.
You will know that the setting is turned off when the shading around the button is blue, and not orange. For example, change tracking is turned off in the image below.

Note that turning this setting off will not remove changes that were made which have not yet been accepted or rejected. If you wish to hide these outstanding changes, then you will need to click the drop-down menu to the right of the Track Changes button, then select either the Final or Original option from the list.

If you wish to turn change tracking back on, simply return to the menu in Step 3 and click the Track Changes button to re-enable it.
Now that you know how to turn off track changes in Word 2010, you can stop the application from making the marks on the screen to indicate that a change has been made.
Do you need to make changes to the metadata included with your Microsoft Word file? Click here to find out how to display the Document Panel in Word 2010 so that you can make these changes more easily.
Continue Reading
- How to insert a check mark in Microsoft Word
- How to do small caps in Microsoft Word
- How to center text in Microsoft Word
- How to merge cells in Microsoft Word tables
- How to insert a square root symbol in Microsoft Word

Matthew Burleigh has been writing tech tutorials since 2008. His writing has appeared on dozens of different websites and been read over 50 million times.
After receiving his Bachelor’s and Master’s degrees in Computer Science he spent several years working in IT management for small businesses. However, he now works full time writing content online and creating websites.
His main writing topics include iPhones, Microsoft Office, Google Apps, Android, and Photoshop, but he has also written about many other tech topics as well.