To remove personal information from a Word document, select File > Info > Check for Issues > Inspect Document, select Inspect, then select Remove All next to Document Properties and Personal Information. Save the file. Word clears the author name, the “last saved by” name, and other hidden details stored with the document.
These steps work in Word for Microsoft 365, Word 2024, 2021, 2019, and 2016 on Windows, and the same File > Info route was introduced in Word 2010, so it works there too. Word for Mac uses a different setting, covered further down. Microsoft explains the tool in Remove hidden data and personal information by inspecting documents.
What Personal Information Is Stored in a Word File?
Every Word document carries information you don’t see on the page. The most common items are:
- Author and Last modified by, taken from the user name in your copy of Office.
- Comments and tracked changes, each labeled with the reviewer’s name.
- Document properties such as company, manager, title, and any custom properties your organization adds.
- Template name, which can include a folder path with your user name in it.
- Hidden text and invisible objects that you or someone else formatted to stay out of view.
Anyone who opens the file can see most of this under File > Info, or by right-clicking the file in File Explorer and choosing Properties > Details. That’s why it’s worth cleaning a document before you send it to a client, submit it for a blind review, or post it online.
How to Remove Personal Information With the Document Inspector
The Document Inspector finds hidden data and removes it in one pass. You may not be able to undo what it removes, so work on a copy.
- Open the document and select File > Save As. Save a copy with a new name, such as “Report – shared copy.” Word now has the copy open.
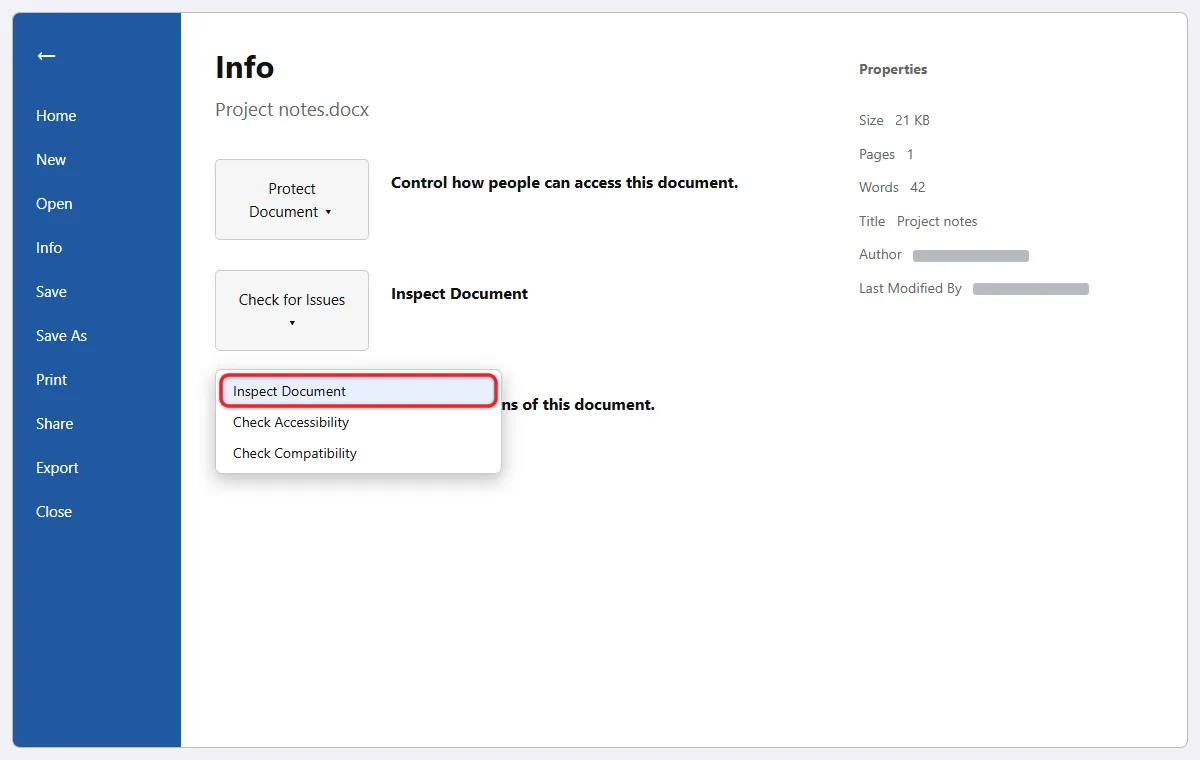
- Select File > Info.
- Select Check for Issues, then Inspect Document. If Word asks you to save changes first, select Yes. The Document Inspector window opens with a list of checkboxes.
- Leave the boxes checked for the types of content you want to look for, then select Inspect. After a few seconds, each category shows either a green check (nothing found) or a red exclamation mark with what was found.
- Select Remove All next to Document Properties and Personal Information. Do the same for any other category you want cleared.
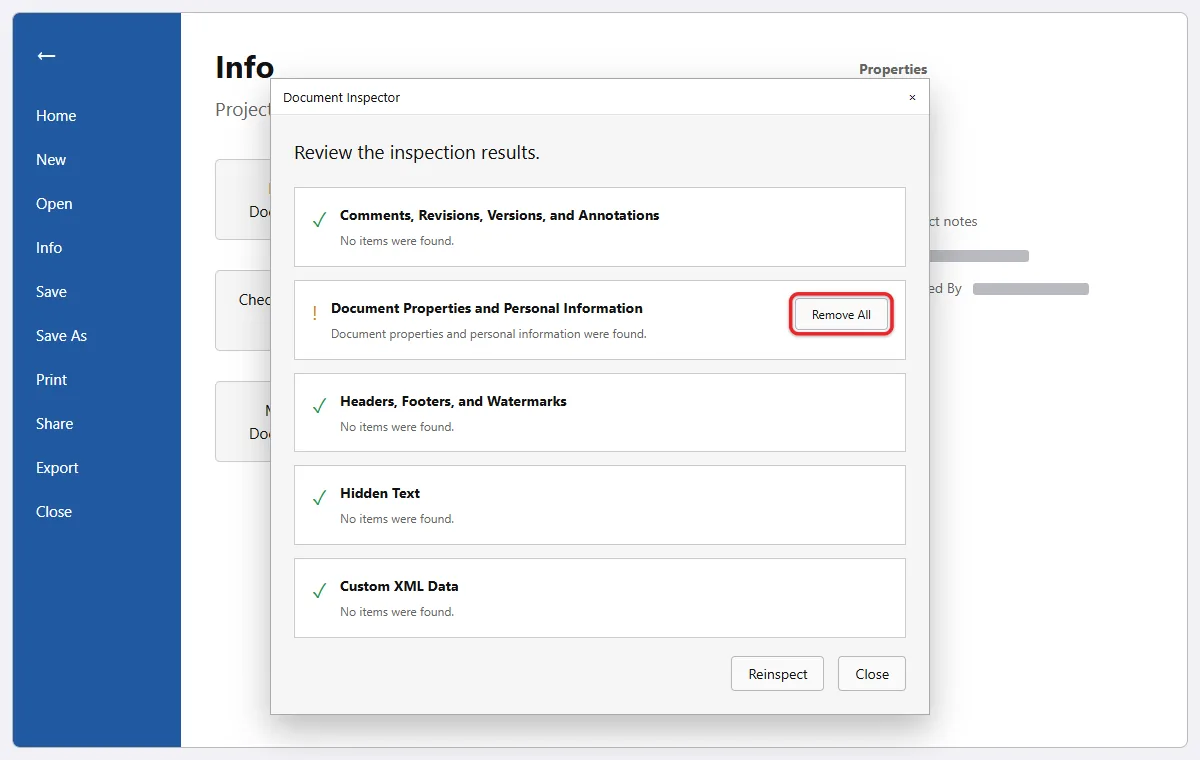
- Select Reinspect to confirm the categories now come back clean, then select Close.
- Save the document.
To check your work, go to File > Info and look at Related People on the right. The author line should be empty.
What Each Document Inspector Category Removes
Read the results before you select Remove All, because some categories take out more than personal details.
- Comments, Revisions, Versions, and Annotations: deletes all comments and tracked-change marks, and clears version information and ink. Any edits still waiting for review end up in the document as if you’d accepted them, so go through them on the Review tab first if some should be rejected. If you only need a clean printout, print without comments in Word instead.
- Document Properties and Personal Information: clears the author, last saved by, company and other properties, plus the template name, email headers, and routing information.
- Headers, Footers, and Watermarks: removes everything in the headers and footers, including page numbers and logos. Skip this one unless your name or contact details are in the header or footer and you’d rather delete them all.
- Hidden Text: deletes text formatted with the Hidden font effect.
- Custom XML Data: removes XML data stored in the file, which usually comes from forms or business systems.
- Invisible Content: deletes objects set to invisible.
To clear only the watermark and keep your page numbers and logos, remove the watermark in Word instead.
Your organization may add its own inspector modules, so a work computer can show extra categories.
What the Document Inspector Can’t Find
The inspector only finds content that Word itself marks as hidden. It misses:
- Text you can’t see because of formatting tricks, such as white text on a white background.
- Objects stacked behind other objects.
- Personal details typed in the body of the document, like a signature block or “Prepared by” line.
Scroll through the document and look for your name, email address, and phone number before you share it. Press Ctrl + F and search for your last name to catch any you’d miss by eye.
Check for signature pictures and signature lines too, especially if you inserted a signature in Word earlier.
If you save in the OpenDocument Text (.odt) format, run the inspector again each time you save, since Word doesn’t keep the cleanup in that format.
How to Change the Author Name Instead of Removing It
Sometimes you only want the right name on the file, not a blank one.
- Select File > Info.
- Under Related People, right-click the author name and choose Edit Property.
- Type the new name in the Edit person box and select OK.
- Save the document.
This changes only that file. To stop your name being added to new documents, select File > Options > General and change User name and Initials under Personalize your copy of Microsoft Office. Check Always use these values regardless of sign-in to Office so Word doesn’t replace them with your Microsoft account name. Microsoft’s author name guide notes that this setting applies to all Office apps.
How to Remove Personal Information in Word for Mac
Word for Mac handles this with a setting that strips your details each time you save.
- Open the document in Word.
- In the menu bar at the top of the screen, select Tools > Protect Document.
- Under Privacy, check Remove personal information from this file on save.
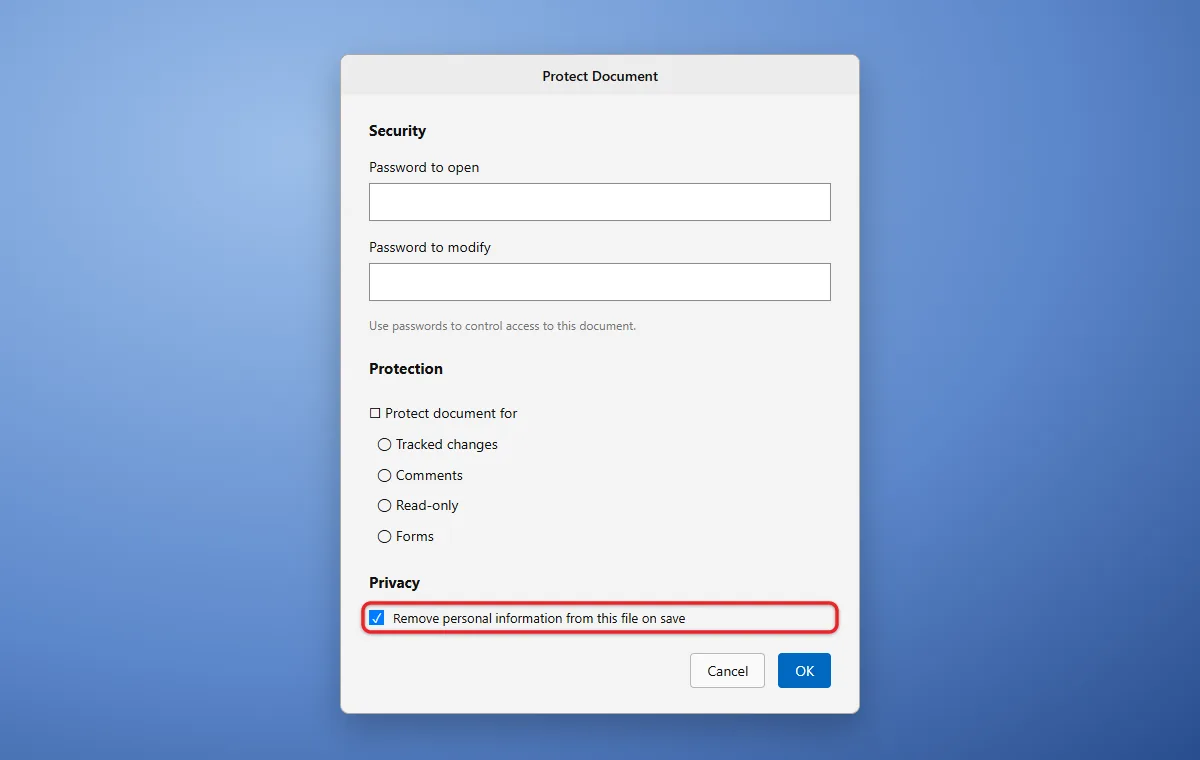
- Select OK, then save the document.
This setting clears the author and other identifying properties, but it doesn’t delete comments or tracked changes. Delete comments with Review > Delete > Delete All Comments in Document, and accept or reject the remaining changes from the Review tab before you save.
If Personal Information Is Still There
- Your name still shows somewhere. The inspector doesn’t touch the file name or the text on the page. Rename the file if needed, and search the body for your name with Ctrl + F.
- Inspect Document is grayed out. The document may be protected or opened in Protected View. Select Enable Editing at the top of the window, or remove the restriction under Review > Restrict Editing.
- Names still show on comments. You removed document properties but not comments. Run the inspector again and remove Comments, Revisions, Versions, and Annotations, or delete the comments from the Review tab.
- You removed something by mistake. Close the copy and go back to the original file you saved in step 1. If you inspected the original, Word may still have an earlier version. Here is how to restore a previous version of a Word file.
Frequently Asked Questions
Does the Document Inspector remove the author name?
Yes. Removing Document Properties and Personal Information clears the author and the name of the person who last saved the file.
Will removing personal information change the text in my document?
No, as long as you only remove Document Properties and Personal Information. The headers, comments, and hidden-text categories do remove content you can see or edit, so check those results before you remove them.
Can I make Word remove personal information automatically every time?
On Windows, there’s no switch for every document. When you remove personal information with the Document Inspector, Word turns on Remove personal information from file properties on save for that file, so later saves stay clean. You can see the checkbox under File > Options > Trust Center > Trust Center Settings > Privacy Options. On a Mac, the Tools > Protect Document setting above does the same for the current file.
Does this work in Excel and PowerPoint?
Yes. The Document Inspector is in the same place, File > Info > Check for Issues > Inspect Document, in Excel and PowerPoint, with categories that fit each app.

Matthew Burleigh is the founder, head writer, and editor of Solve Your Tech, which he launched in 2012. He has written technology tutorials since 2008 and worked in IT since 2003, including small-business support, IT management, and consulting. He holds Bachelor’s and Master’s degrees in Computer Science from Arizona State University.
Matthew writes practical guides for Windows, iPhone and iPad, Microsoft Office, Outlook, Google apps, and Android. Solve Your Tech’s guides are checked step by step against the device or app maker’s own documentation and tested on his own devices whenever he has the hardware or software, with clear steps, sources, and update dates.
Read more about Matthew and how Solve Your Tech writes and updates its guides, or report a correction.