You can set the priority of an Outlook 2013 email by opening Outlook and creating a new email, then clicking the Message tab and choosing one of the priority tags.
Are you sending an email that you really need your recipient to see?
If they are also an Outlook user, then you may be able to make your email stick out by identifying it as being of high importance.
Our guide below will show you how to use the tool in Microsoft Outlook that can add tags to an email so that you can identify the importance level of a message.
How to Mark an Outlook Email with an Exclamation Point
- Launch Outlook.
- Create an email.
- Select Message.
- Click one of the tags.
Our guide continues below with additional information on how to set an email’s priority level in Microsoft Outlook, including pictures of these steps.
If you have been using Microsoft Outlook for at least a short period of time, then you have likely encountered a message with an exclamation point or an arrow next to it. This indicates that the sender felt their message has a level of importance outside that of a normal email.
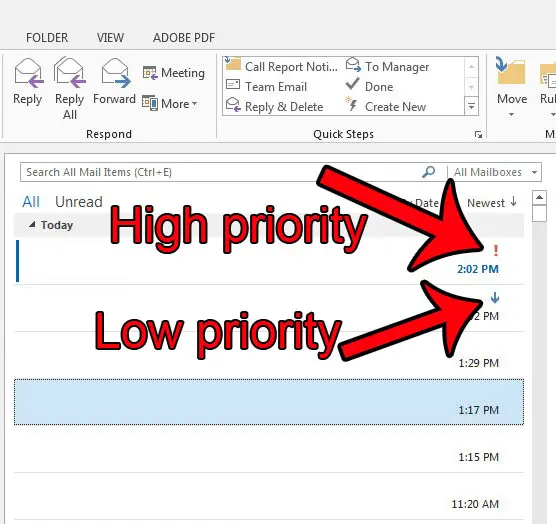
You have the option of selecting between low importance or high importance, and this can be set on a per-message basis. Messages that are sent with high importance will be indicated with a red exclamation point, while messages sent with low importance will have a blue downward-facing arrow. The third level of importance, “normal,” is simply any message that is not sent with a low or high priority.
You can read our red exclamation point Outlook article for additional information on this topic.
Setting the Priority Level for an Email Message in Outlook 2013 (Guide with Pictures)
Note that these priority levels are typically only seen by other people using Microsoft Outlook. Many email providers will not indicate that a message was sent with any kind of priority level or adjusted level of importance.
- Step 1: Open Microsoft Outlook 2013.
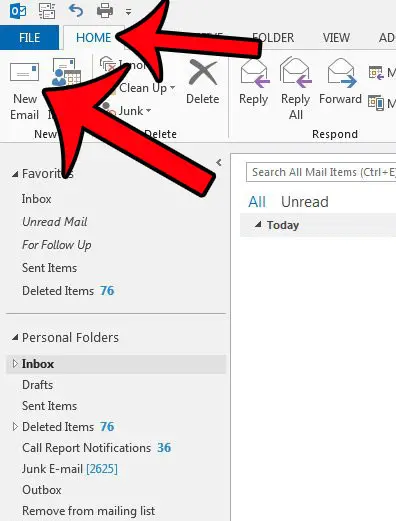
- Step 2: Create a new email message by clicking the Home tab at the top of the window, then the New Email button in the New section of the Office ribbon.

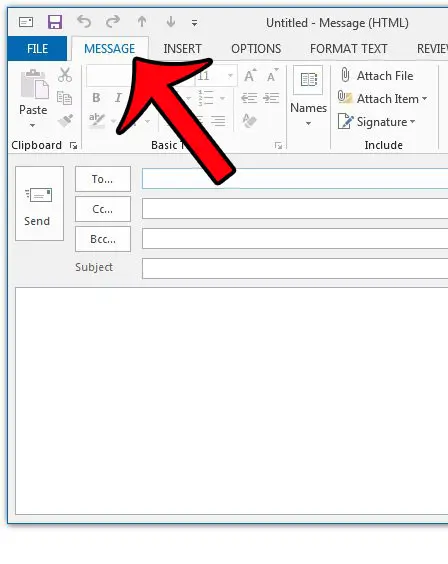
- Step 3: Click the Message tab at the top of the window.

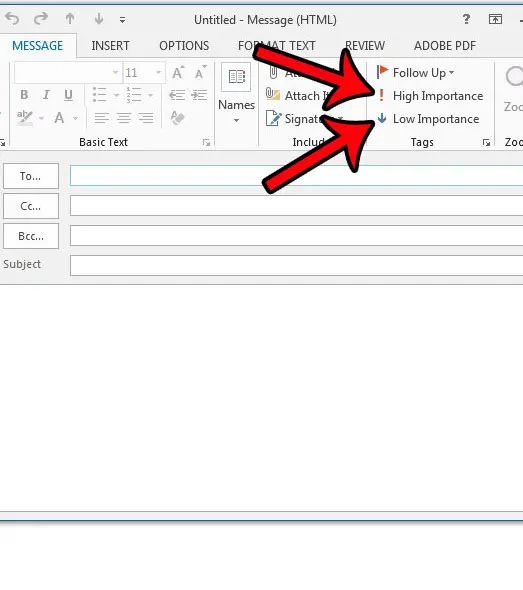
- Step 4: Click the High Importance or Low Importance button in the Tags section of the ribbon.

You can then fill in the rest of the fields to send your email as normal.
Now that you know how to set email priority in Outlook 2013, you will be able to use this option to let your email recipients know about the important level of the message that you have sent to them.
Outlook users who receive your email messages will be able to identify their importance level by the icons identified below. As mentioned previously, the red exclamation point indicates a message that was sent with high priority, while the blue arrow indicates a message sent with low priority.

Is there an email message that you do not want to send until later in the day, or possibly on a different day entirely? This article will show you how you can delay a message’s delivery until a specific date and time.
Additional Sources
- How to disable work offline in Outlook
- How to strikethrough in Outlook
- How to create a Vcard in Outlook
- How to view the blocked sender list in Outlook
- How to set up Gmail in Outlook

Matthew Burleigh has been writing tech tutorials since 2008. His writing has appeared on dozens of different websites and been read over 50 million times.
After receiving his Bachelor’s and Master’s degrees in Computer Science he spent several years working in IT management for small businesses. However, he now works full time writing content online and creating websites.
His main writing topics include iPhones, Microsoft Office, Google Apps, Android, and Photoshop, but he has also written about many other tech topics as well.