You can turn off Wi-Fi and connect to cellular on an iPhone by opening Settings, choosing Wi-Fi, and then tapping the button to the right of Wi-Fi to turn it off. You can then go back to the Settings menu, select Cellular, and then make sure Cellular Data is turned on.
In ideal situations, most iPhone users would prefer to use a Wi-Fi network over a cellular network. Many Wi-Fi networks are faster than cellular networks (and you can even use Wi-Fi instead of cellular to make calls if you’re on Verizon), plus data that is used on Wi-Fi does not count against the monthly data allotment of your cellular plan.
Unfortunately, some Wi-Fi networks can be very slow, almost to the point where you wonder if they even have Internet access. However, the iPhone will not prioritize a faster cellular network over a slower Wi-Fi network, which can leave you waiting for a Web page to load. In these situations, it will typically be more efficient to disconnect from the Wi-Fi network and use your cellular connection instead.
If you aren’t in range of a Wi-Fi network but your iPad or laptop needs to get online, then our iPhone share Internet guide can show you an alternate option.
Turn Off Wi-Fi and Connect to a Cellular Network in iOS 8
The steps in this article were written using an iPhone 6 Plus in iOS 8. These steps will assume that you are currently connected to a Wi-Fi network but that you would like to use your cellular network instead. Note that using data while connected to a cellular network will use the cellular data from your monthly plan.
On newer iPhone models that don’t have a Home button, you can open the Control center by swiping down from the top-right corner of the screen instead.
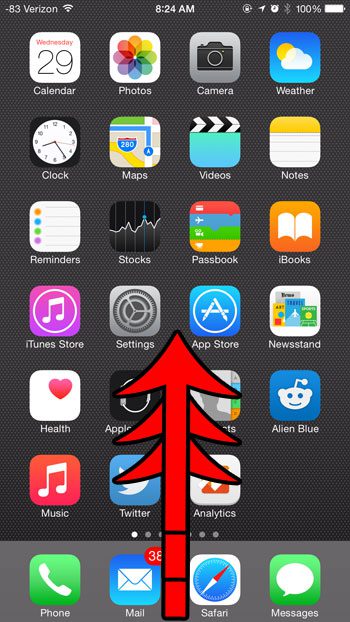
Step 1: Swipe up from the bottom of your screen to bring up the Control Center.
Step 2: Tap the Wi-Fi button to turn it off. Wi-Fi is turned off when the button is gray, as in the image below.
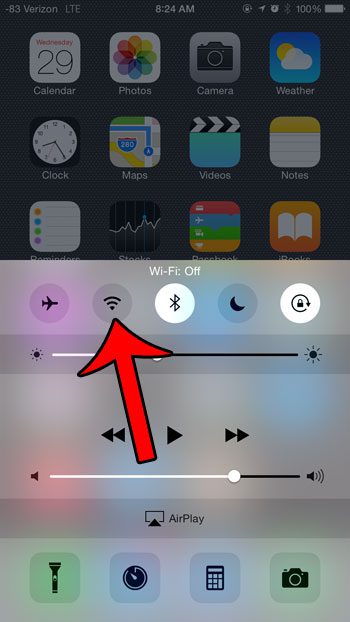
Any data that you use now, such as using Facebook, browsing the Internet, or watching Netflix movies, will be using cellular data. If turning off Wi-Fi is a temporary measure, be sure to remember to turn it back on later. Cellular data usage can add up quickly, especially if you stream a lot of videos.
If you are not able to connect to the Internet while connected to a cellular network, then cellular data might be turned off. You can check this setting by opening the Settings menu –
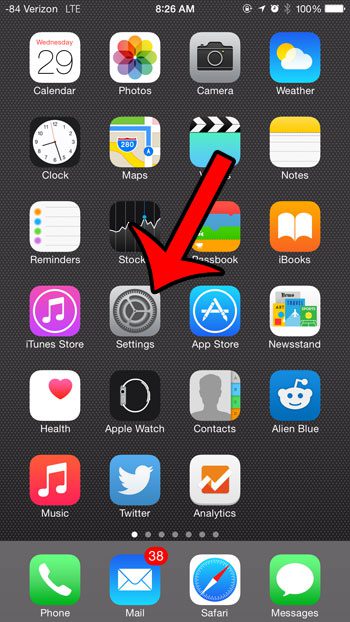
Then selecting the Cellular option at the top of the screen.
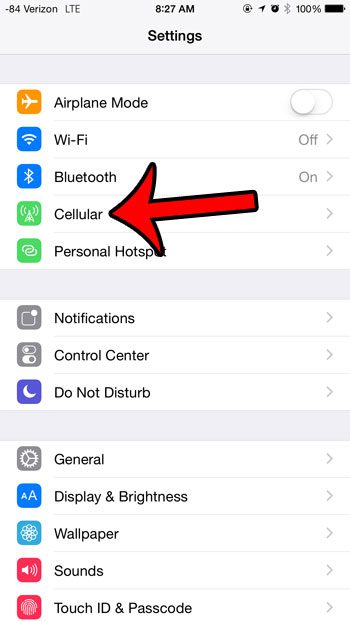
Confirm that the button to the right of Cellular Data is turned on, as in the image below.
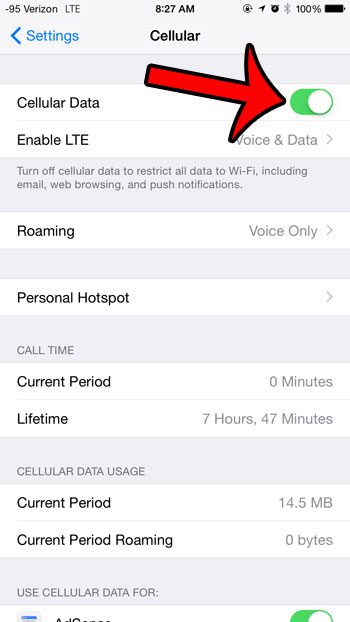
If this button is turned on, then cellular data might be turned off for a specific app. Scroll down to the Use Cellular Data For section, then confirm that cellular data is turned on for the app that you want to use on your cellular network.
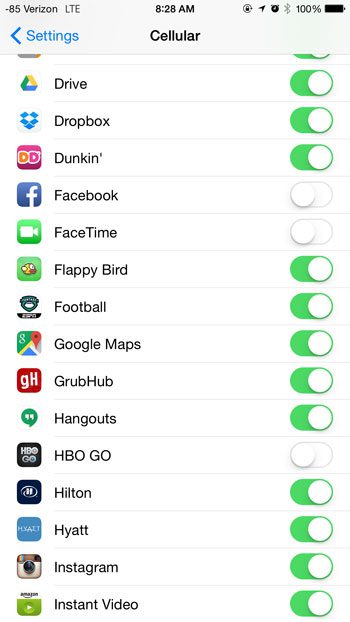
In the image above, cellular data is turned off for Facebook, FaceTime, and HBO Go.
How to Prioritize WiFi on iPhone
It is critical to prioritize Wi-Fi networks on your iPhone to guarantee a steady and efficient internet connection. Here’s how to set your iPhone to prioritize Wi-Fi networks:
Connect to Preferred Networks: The iPhone automatically connects to previously linked Wi-Fi networks. To prioritize a network, make sure you’ve already connected to it.
Forget Unwanted Networks: Go to Settings > Wi-Fi to prevent your iPhone from automatically connecting to unwelcome networks. Tap the (i) icon next to the network you want to forget, then choose “Forget This Network.” This allows your iPhone to concentrate on connecting to your favorite networks.
Reorder Networks: Your iPhone prioritizes Wi-Fi networks based on their order in your list of known networks. You can reshuffle them by heading to Settings > Wi-Fi, tapping “Known Networks,” then rearranging the list with the drag handles on the right.
Personal Hotspots: If you have a personal hotspot enabled on another device, your iPhone may automatically connect to it. To avoid this, go to Settings > Wi-Fi > Auto-Join Hotspot and select “Ask to Join.”
Enable Auto-Join: Make sure “Auto-Join” is enabled for your desired networks. This guarantees that your iPhone automatically connects to these networks when it is in range. Toggle the (i) icon next to the network and select “Auto-Join.”
Use Wi-Fi Assist: To maintain a consistent internet connection in regions with weak Wi-Fi signals, your iPhone can switch to cellular data. To switch on this option, navigate to Settings > Cellular > Wi-Fi Assist.
Reset Network Settings: If you’re having chronic Wi-Fi problems, maybe about resetting your network settings. Reset Network Settings by going to Settings > General > Reset. This will delete all network-related settings, including preferred networks, therefore it should only be used as a last option.
Regularly Update iOS: It is critical to keep your iPhone’s operating system up to date, as Apple frequently makes updates that improve Wi-Fi performance and connectivity.
Prioritizing Wi-Fi networks on your iPhone guarantees that you enjoy the greatest internet experience possible. By following these instructions, you may configure your device to automatically connect to your chosen networks, allowing you to stay online and connected with ease.
Is your iPhone connecting to the wrong Wi-Fi network? This guide will show you how to forget a network to which your iPhone is connecting automatically.

Matthew Burleigh has been writing tech tutorials since 2008. His writing has appeared on dozens of different websites and been read over 50 million times.
After receiving his Bachelor’s and Master’s degrees in Computer Science he spent several years working in IT management for small businesses. However, he now works full time writing content online and creating websites.
His main writing topics include iPhones, Microsoft Office, Google Apps, Android, and Photoshop, but he has also written about many other tech topics as well.